​

Eat Your Beets

  • About
  • Spring Recipes
  • Vegetables
  • Side Dishes
  • Recipe Index
menu icon
go to homepage
  • About
  • Spring Recipes
  • Vegetables
  • Side Dishes
  • Recipe Index
    • Facebook
    • Pinterest
  • subscribe
    search icon
    Homepage link
    • About
    • Spring Recipes
    • Vegetables
    • Side Dishes
    • Recipe Index
    • Facebook
    • Pinterest
  • ×
    Sign Up To Our Newsletter →
    Home » Recipe index

    Pineapple Upside Down Cake

    October 15, 2024 by Angela Milnes

    Pineapple Upside Down Cake.

    This Pineapple Upside Down Cake is a classic dessert with a moist, flavorful cake base topped with caramelized pineapple slices. It’s as beautiful as it is delicious—a real showstopper for any occasion!

    Pineapple upside down cake.
    [feast_advanced_jump_to]

    💖 Why This Recipe Works

    • A Stunning Presentation: The upside-down design with pineapple slices is simple yet impressive.
    • Tropical Flavor: The caramelized pineapple and warm spices make this cake a flavorful treat.
    • Moist and Tender: Yogurt and vegetable oil keep the cake perfectly soft and moist.

    ⭐ Star Ingredients

    Ingredients to make pineapple upside down cake.
    • Brown Sugar: Forms a caramelized topping when baked with butter.
    • Butter: Adds richness and helps caramelize the pineapple slices.
    • Pineapple: Fresh slices provide a juicy, tropical flavor; canned can also be used.
    • Eggs: Bind the cake together and give it structure.
    • Yogurt: Keeps the cake moist and tender while adding a slight tang.
    • Vanilla: Adds a sweet, aromatic hint to the cake.
    • Honey or Maple Syrup: Natural sweeteners that keep the cake flavorful.
    • Flour: The base ingredient for the cake batter.
    • Salt: Balances the sweetness and enhances flavor.
    • Baking Powder and Baking Soda: Help the cake rise and stay fluffy.
    • Vegetable Oil: Keeps the cake moist and soft.
    • Cinnamon and Ground Ginger: Add warmth and depth to the cake's flavor.

    For the complete list of ingredients with measurements and instructions, please see the recipe card at the bottom of the post.

    📖  Substitutions & Variations

    • Add Cherries: Place maraschino cherries in the center of each pineapple slice for a classic touch.
    • Spice It Up: Add nutmeg or cardamom along with the cinnamon and ginger for extra warmth.
    • Coconut Twist: Replace half the yogurt with coconut milk for a tropical spin.
    • Nutty Finish: Sprinkle chopped pecans or walnuts over the brown sugar layer for added texture.

    📖 Optional Toppings for Pineapple Upside Down Cake

    • Nuts: Crushed pecans or walnuts for crunch.
    • Powdered Sugar: A light dusting for a touch of elegance.
    • Cherries: Maraschino cherries for a colorful, traditional look.
    • Coconut Flakes: Sprinkle toasted coconut for a tropical twist.
    • Caramel Drizzle: Add a drizzle of caramel sauce for extra indulgence.

    🔪How To Make Pineapple Upside Down Cake

    Brown sugar and butter mixture in a bowl.

    Step One: Combine brown sugar and butter, then spread the mixture evenly into the bottom of a prepared pie pan.

    Pineapple slices on upside down cake batter.

    Step Two: Arrange pineapple slices on top of the sugar-butter layer in a single row.

    Yogurt, eggs, vanilla, and honey in a bowl.

    Step Three: In a bowl, whisk together yogurt, eggs, vanilla, and honey until smooth.

    Flour, salt, baking powder, baking soda, and cinnamon, mixed with eggs mixture.

    Step Four: Gradually mix in the dry ingredients (flour, salt, baking powder, baking soda, cinnamon, and ginger), then add vegetable oil and stir until combined.

    Pineapple upside down cake batter in a baking dish.

    Step Five: Pour the batter over the pineapple layer, spreading it evenly.

    Pineapple upside down cake in a baking dish.

    Step Six: Bake at 350°F (175°C) for 45-50 minutes. Let cool for 10 minutes, then flip onto a serving plate and enjoy!

    Pineapple upside down cake slice on a plate.

    👩‍🍳 Expert Tips

    • Even Layers: Arrange the pineapple slices evenly for a polished presentation.
    • Choose the Right Pineapple: Fresh pineapple slices work best, but canned slices can be used if fresh isn’t available.
    • Grease the Pan Well: Ensure your pan is well-greased or lined with parchment paper to prevent sticking.
    • Cool Before Flipping: Let the cake cool for at least 10 minutes before flipping to keep the topping intact.

    💭 FAQs

    Can I Use Canned Pineapple Instead Of Fresh Slices?

    Yes, canned pineapple slices work perfectly. Just make sure to drain them well before using.

    Do I have To Flip The Cake Immediately After Baking?

    No, let the cake cool for about 10 minutes before flipping to allow the topping to set slightly and prevent sticking.

    What If I Don’t Have A Pie Pan?

    A round cake pan or square baking dish will work. Just ensure it’s deep enough to hold the batter and topping.

    What If The Batter Is Too Thick?

    Add a tablespoon of milk (dairy or plant-based) at a time until it reaches a smooth, pourable consistency.

    Can I Freeze Pineapple Upside Down Cake?

    Yes! Wrap the cooled cake tightly in plastic wrap, then foil, and freeze for up to 3 months. Thaw at room temperature before serving.

    💖 Serving Suggestions

    Here are some sides to serve with Pineapple Upside Down Cake:

    • Whipped Cream: Add a dollop for a creamy touch.
    • Ice Cream: Pair with vanilla or Coconut Ice Cream for an indulgent dessert.
    • Tropical Drinks: Serve with a Mango Pineapple Smoothie or a glass of iced tea for a refreshing combo.
    Slice of pineapple upside down cake on a plate.

    🍽 More Desserts

    • Papaya Banana Yogurt Ice Cream with Cashews.
      Best Banana Yogurt Ice Cream (With Papaya)
    • Best Pink Oreo Millecrepes.
      Best Pink Oreo Millecrepes
    • Creamy Vanilla Eclair Cake.
      Creamy Vanilla Eclair Cake
    • Traditional Banana Cream Pie.
      Old Fashioned Banana Cream Pie

    Did you make this recipe? Leave a review and a ⭐⭐⭐⭐⭐ rating below, or tag us in our Facebook Group! Alternatively, bookmark it in your browser or save to Pinterest.

    Pineapple Upside Down Cake.

    Pineapple Upside Down Cake

    Angela Milnes
    This Pineapple Upside Down Cake is a nostalgic treat with a caramelized, fruity topping and a soft, fluffy base. It's the perfect balance of sweet and tangy in every bite!
    5 from 2 votes
    Print Recipe Pin Recipe Rate this Recipe
    Prep Time 15 minutes mins
    Cook Time 45 minutes mins
    Cool Time 15 minutes mins
    Total Time 1 hour hr 15 minutes mins
    Course Dessert
    Cuisine American
    Servings 8 servings
    Calories 479 kcal

    Ingredients
      

    • ½ Cup Brown Sugar
    • 3 tablespoon Butter
    • 1 Pineapple
    • 3 Eggs
    • 1 Cup Yogurt
    • ½ teaspoon Vanilla optionally
    • ½ Cup Honey or Maple Syrup
    • 2 Cup Flour
    • ¼ teaspoon Salt
    • 1 teaspoon Baking Powder
    • ½ teaspoon Baking Soda
    • ½ Cup Vegetable Oil
    • 1,½ teaspoon Cinnamon
    • ½ teaspoon Ground Ginger

    Instructions
     

    • In a pie pan, melt the butter and mix it with brown sugar. Spread evenly at the bottom.
    • Arrange pineapple slices on top of the butter-sugar mixture.
    • In a bowl, whisk together yogurt, eggs, vanilla (if using), and honey until smooth.
    • Gradually stir in the dry ingredients (flour, salt, baking powder, baking soda, cinnamon, and ginger), then add the vegetable oil and mix until well combined.
    • Pour the batter over the pineapple slices, spreading it evenly.
    • Bake at 350°F (175°C) for 45-50 minutes. Let cool for 10 minutes, then flip onto a plate and serve!

    Notes

    Even Layers: Arrange the pineapple slices evenly for a polished presentation.
    Choose the Right Pineapple: Fresh pineapple slices work best, but canned slices can be used if fresh isn’t available.
    Grease the Pan Well: Ensure your pan is well-greased or lined with parchment paper to prevent sticking.
    Cool Before Flipping: Let the cake cool for at least 10 minutes before flipping to keep the topping intact.


    Nutrition

    Calories: 479kcalCarbohydrates: 68gProtein: 9gFat: 20gSaturated Fat: 5gPolyunsaturated Fat: 8gMonounsaturated Fat: 5gTrans Fat: 0.3gCholesterol: 74mgSodium: 268mgPotassium: 288mgFiber: 3gSugar: 38gVitamin A: 291IUVitamin C: 54mgCalcium: 134mgIron: 2mg
    Print Recipe Pin Recipe Rate this Recipe
    Tried this recipe?Let us know how it was!

    More Great Dessert Recipes To Try:

    • Pumpkin Crunch Cake
    • The Best No Bake Banana Pudding
    • Lemon Pudding Cake Recipe
    • Mickey Mouse Cake Pops
    • Crispy Peanut Butter Cookies
    • Pumpkin Spice Cinnamon Rolls

    Easy Strawberry Goat Cheese Salad

    October 15, 2024 by Angela Milnes

    Strawberry Goat Cheese Salad.

    Ready for a splash of summer? This Strawberry Goat Cheese Salad is a light, refreshing crowd-pleaser that’s perfect for sunny days—and even better when paired with friends or family!

    Strawberry Goat Cheese Salad.

    This seasonal summer salad is trending thanks to its fresh, vibrant flavors and easy prep. It hits the mark for family dinners, potlucks, or weeknight meals. Plus, it slides beautifully alongside our Stovetop Arugula Frittata and Spinach Egg Muffins With Mozzarella Cheese, giving your table that perfect balanced vibe.

    [feast_advanced_jump_to]

    💖 Why This Recipe Works

    • Incredible flavor balance: sweet strawberries, tangy goat cheese, and nutty crunch
    • Super quick fresh lunch or protein-packed side—ready in under 20 minutes
    • Light yet satisfying, with homemade balsamic vinaigrette that ties it all together

    ⭐ Star Ingredients

    Ingredients to make strawberry goat cheese salad.
    • Strawberries – the seasonal star! Juicy, sweet, and bursting in every bite.
    • Tangy Goat Cheese – creamy contrast that amps up the flavor.
    • Pistachios + Sunflower Seeds – healthy crunch with a boost of antioxidants and fiber.
    • Avocado – creamy richness that brings everything together and keeps you full.

    For the complete list of ingredients with measurements and instructions, please see the recipe card at the bottom of the post.

    📖  Substitutions & Variations

    • Savory protein: Add grilled chicken or shrimp for a heartier dinner.
    • Warm twist: Swap fresh berries for grilled peaches for a caramelized flavor.
    • Dairy-free option: Use feta or plant-based cheese.
    • Nut-free crunch: Try toasted pumpkin seeds or crispy chickpeas.
    • Greens swap: Baby spinach or peppery arugula work beautifully.
    • Dressing switch-up: Go for poppy seed or citrus vinaigrette.

    If you love this refreshing flavor combo, also check out our Mango Arugula Salad and Beet Salad With Feta And Walnuts.

    🔪 How To Make Strawberry Goat Cheese Salad

    Strawberry goat cheese dressing.
    1. Step 1: Blend olive oil, strawberries, balsamic vinegar, and honey until smooth; thin with a splash of water, then strain. Thinly slice strawberries, dice avocado.
    Strawberry goat cheese salad in a bowl.
    1. Step 2: In a big bowl, layer spring mix (or your greens of choice), strawberries, avocado, goat cheese, pistachios, and sunflower seeds. Drizzle the strawberry balsamic dressing over and toss gently. Serve right away!

    💡Hint: chilling your salad bowl before assembly keeps the greens crisp and vibrant.

    Strawberry and cheese salad.

    👩‍🍳 Expert Tips

    • Use ripe, local strawberries—big difference in flavor!
    • Keep the dressing on the side if prepping ahead to prevent soggy greens.
    • Crumble goat cheese after chilling it for easy, pretty chunks.

    💭 FAQs

    Can I use frozen strawberries in this strawberry salad?

    Fresh berries are best for a crisp texture, but if frozen are your only option, thaw thoroughly and drain—though the salad will be softer.

    What greens work best in goat cheese and strawberry salad?

    Baby spinach, arugula, or mixed spring greens are great choices. They provide a fresh and mild base that complements the sweetness of the strawberries and the tangy goat cheese.

    Can I make goat cheese salad in advance?

    Yes, but it's best to store the ingredients separately and assemble just before serving to keep the greens fresh and the goat cheese from getting too soft.

    💖 Serving Suggestions

    • Grilled Chicken: Serve alongside grilled chicken breasts or thighs for a fulfilling and protein-rich meal.
    • Crostini: Serve with crispy crostini topped with a spread of herbed cream cheese for a delightful appetizer or light meal.
    • Carrot Rice: Enhance the meal by serving the salad with fragrant carrot rice, adding a touch of sweetness and vibrant color to the plate.
    • Air Fryer Cod Fillet: Pair with crispy air-fried cod fillets for a light and delicious protein option that complements the fresh flavors of the salad.
    • Jalapeno Cornbread: Complete the meal with a side of warm and spicy Jalapeno Cornbread, adding a comforting and flavorful twist to the dining experience.
    Strawberry Goat Cheese Salad.

    🍽 Try More Goat Cheese Recipes

    • Best Goat Cheese Apple Salad.
      Best Goat Cheese Apple Salad
    • Roasted asparagus with goats cheese.
      Roasted Asparagus With Goat Cheese
    • Beetroot Ravioli With Goat Cheese.
      Beetroot Ravioli With Goat Cheese
    • Berry Salad Recipe With Goat Cheese.
      Fresh Berry Salad Recipe With Goat Cheese (Easy Summer Salad)

    Did you make this recipe? Leave a review and a ⭐⭐⭐⭐⭐ rating below, or tag us in our Facebook Group! Alternatively, bookmark it in your browser or save to Pinterest.

    Strawberry Goat Cheese Salad.

    Strawberry And Goat Cheese Salad

    Angela Milnes
    Indulge in the perfect blend of sweet and savory Strawberry And Goat Cheese Salad! Juicy strawberries, creamy goat cheese, and crunchy nuts are tossed with fresh greens for a delightful, refreshing dish. It’s a simple yet elegant salad that’s perfect for any occasion!
    5 from 4 votes
    Print Recipe Pin Recipe Rate this Recipe
    Prep Time 10 minutes mins
    Cook Time 0 minutes mins
    Additional Time 0 minutes mins
    Total Time 10 minutes mins
    Course Salads
    Cuisine American
    Servings 1 Serving
    Calories 639 kcal

    Ingredients
      

    • 2 cups of Spring Mix
    • ½ cup Strawberries
    • 1 tablespoon Pistachios
    • 1 tablespoon Goat cheese
    • 1 tablespoon Sunflower seeds
    • ½ Avocado
    • 2 tablespoon olive oil
    • ¾ cup Strawberries
    • 1 tablespoon Balsamic vinegar
    • 1 teaspoon honey

    Instructions
     

    • Slice the strawberries and dice the avocado. Ensure the strawberries are thinly sliced to evenly distribute their sweetness throughout the salad.
    • Cut the avocado into small, bite-sized pieces for a creamy contrast to the other ingredients.
    • Combine the olive oil, blended strawberries, balsamic vinegar, and honey in a blender or food processor. Blend on high until the mixture is smooth and well incorporated.
    • Add up to 2 tablespoons of water during blending, if necessary, to achieve the desired dressing consistency.
    • Pour the dressing through a sieve to remove any seeds or lumps, ensuring a silky texture.
    • Place the spring mix, sliced strawberries, diced avocado, pistachios, crumbled goat cheese, and sunflower seeds in a serving dish.
    • Generously drizzle the freshly prepared strawberry balsamic dressing over the salad, coating all the ingredients with its sweet and tangy flavors.
    • Present the Strawberry Goat Cheese Salad immediately after assembling to maintain the freshness and vibrant colors of the ingredients and savor the delightful flavors!

    Notes

    Freshness Matters: Use ripe, juicy strawberries and creamy goat cheese for the best flavor combination in this Strawberry Goat Cheese Salad.
    Make-Ahead Option: Prepare the dressing in advance and store it in the refrigerator. Drizzle over the salad just before serving to keep the ingredients fresh and vibrant.
     

    Nutrition

    Calories: 639kcalCarbohydrates: 35gProtein: 10gFat: 55gSaturated Fat: 9gPolyunsaturated Fat: 8gMonounsaturated Fat: 35gCholesterol: 6mgSodium: 66mgPotassium: 930mgFiber: 12gSugar: 19gVitamin A: 349IUVitamin C: 116mgCalcium: 81mgIron: 3mg
    Print Recipe Pin Recipe Rate this Recipe
    Tried this recipe?Let us know how it was!

    Best Star Anise Substitute Options

    October 15, 2024 by Angela Milnes

    Star anise substitute options.

    Many recipes really enjoy the licorice-anise flavor that star anise brings, but it can be challenging to find in some areas or may not be readily available. Luckily, a few good alternatives bring a similar flavor profile that can easily be found in most grocery stores.

    Today I'll share some useful facts and questions about Star Anise, and the Top Substitutes that can be used in its place: fennel seeds, anise seeds, and licorice root.

    Star anise substitute options.
    [feast_advanced_jump_to]

    What Is Star Anise?

    First, let's clarify that Star Anise is the fruit of a small evergreen tree native to southwest China, while Anise seed comes from the flowering plant in the parsley family.

    Both have a similar licorice flavor, but the star shape and deeper flavor of Star Anise make it a preferred choice in many Asian cuisines.

    Flavor

    Star Anise has a strong licorice flavor, with hints of clove and cinnamon. It's often used in savory dishes but can also add depth to sweet treats like cookies and cakes.

    star anise in a glass bowl.

    Best Substitutes for Star Anise

    So what are the best Star Anise replacements?

    Here is a list of star anise substitutes and information on how to use them as such:

    • Anise Seeds
    • Chinese Five Spice Powder
    • Cloves
    • Caraway Seeds Mixed With Tarragon
    • Allspice
    • Cassia Bark Powder
    • Anise Extract
    • Licorice Root Powder
    • Tarragon
    • Fennel Seeds

    Anise Seeds

    Anise seeds are the closest substitute to Star Anise in terms of flavor, as they come from the same plant family. They can be used interchangeably in recipes, just note that anise seeds are smaller and more potent so you may need to adjust the quantity used.

    Anise Seed Taste

    Ground anise seeds and whole anise seeds have a strong licorice flavor, with a hint of sweetness. You need to store extra anise seeds in a cool and dry place to maintain their taste and aroma.

    Chinese Five Spice Powder

    Chinese Five Spice Powder often contains star anise as one of its main ingredients, along with cinnamon, cloves, fennel seeds, and Szechuan pepper.

    This blend can be used as a substitute for star anise in savory dishes such as marinades or stir-fries. The woody flavor is great for replacing star anise and adding a touch of heat to dishes.

    Different spices.

    Cloves

    Cloves have a similar flavor profile to Star Anise, but they also have a bit of a spicy kick. They should be used sparingly, as their flavor can easily overpower a dish.

    The stronger flavor of ground cloves means you will need to use less in your recipe compared to star anise.

    Spice cloves.

    Caraway Seeds Mixed With Tarragon

    Caraway seeds have a slightly different licorice-anise flavor than Star Anise, but when mixed with tarragon they can provide a similar taste in some dishes. This blend works well in soups, stews, and braised meats.

    Caraway Seeds are a great substitute to use on braised and roasted fish and make a good substitute in many savory foods. The licorice-like flavor really pairs well with pork and cabbage dishes.

    Cumin seeds on a spoon.

    Allspice

    Allspice has a combination of flavors including cloves, nutmeg, and cinnamon with a hint of licorice. It can be used as a substitute in some dishes, just keep in mind that the overall flavor profile will differ.

    Allspice has a sweeter flavor than star anise and works well in marinades, glazes, and baked goods. One savory food option you can use this spice powder in as a substitute for star anise is Jamaican jerk chicken, which often calls for allspice as well as Star Anise.

    Cassia Bark Powder

    Cassia bark (also known as Chinese cinnamon) has a similar flavor profile to Star Anise, with a slightly milder taste. Anise on the other hand has a strong and distinct flavor in comparison.

    Cassia bark can be used in place of star anise just note that the texture may be different as it is ground into a powder.

    Ground cassia bark is a great option when baking and can be added to beverages such as mulled wine, mulled cider or hot toddys.

    Anise Extract

    An extract made from anise seeds or star anise can also be used as a substitute; just keep in mind that it is highly concentrated, so a little goes a long way.

    Whether using anise seed extract or anise seed essential oil to replace star anise, you'll need only a hint of the extract.

    Anise extract is great for flavoring soups, sauces, and baked goods.

    Licorice Root Powder

    Licorice root has a strong licorice flavor and can be used as a substitute for star anise in some dishes, just note that the texture will be different as it is ground into a powder.

    Licorice root powder has a strong flavor and is similar to star anise, so use sparingly and adjust according to taste. It can be used in marinades, glazes, and Chinese cuisine.

    Powder and licorice root on the table.

    Tarragon

    Tarragon has a mild licorice-anise flavor and can be used as a substitute in some dishes, but it may not have the same depth of flavor as star anise.

    Tarragon can be used in meat dishes, rye bread, and as a flavoring in sauces and dressings. It pairs well with chicken, Instant Pot Fish Tacos, and eggs.

    tarragon in a plant pot.

    Fennel Seeds

    Fennel seeds have a similar licorice-anise flavor to star anise, but they also have a slight sweetness. They can be used as a substitute in some dishes, just adjust the quantity as they are slightly milder in flavor.

    fennel seed in a bowl.

    Chinese Cardamom

    Chinese cardamom has a similar licorice-anise flavor with slightly floral notes. It can be used as a substitute for star anise, but use sparingly as it is stronger in flavor.

    Chinese cardamom pairs well with pork and chicken dishes, as well as braised vegetables and stews. It can

    FAQ'S

    How to Store Star Anise Seeds

    Star Anise can be stored in a cool, dry place for up to a year. It is best to keep it whole and grind it as needed for maximum flavor and aroma.

    Can Star Anise Be Used as a Spice and a Medicine?

    Traditionally, Star Anise has been used as both a spice in cooking and as a medicine in traditional Chinese medicine. However, it is always best to consult with a healthcare professional before using any spice or herb for medicinal purposes.

    Can Star Anise Be Used in Sweet Dishes?

    Star Anise can be used in sweet dishes such as desserts and cocktails, but it should be used sparingly as its flavor can easily overpower the dish. It pairs well with chocolate, fruits such as apples and pears, and in spices blends for mulled wine or cider.

    Can Star Anise Be Used in Place of Anise Extract?

    Star Anise can be used in place of anise extract, but remember that it may have a slightly different flavor profile and the extract is more concentrated so a little goes a long way. It is best to adjust the quantity used based on personal preference.

    Do Star Anise and Star Anise Seeds Taste the Same?

    The whole star anise and the seeds within it generally have a similar flavor, with the whole star having a slightly milder taste.

    Some individual stars or seeds may vary in their level of potency. It is best to taste and adjust the quantity used based on personal preference.

    Can I Grind Star Anise?

    Yes, you can grind whole star anise using a spice grinder or mortar and pestle for maximum flavor and aroma. It is best to grind it as needed, as ground star anise will lose its potency over time.

    Ground anise seed can also be used as a substitute for whole star anise, just keep in mind that it may have a slightly different texture and the flavor may not be as potent.

    Can Star Anise Be Used in Place of Fennel?

    Star Anise and fennel both have a licorice-anise flavor, but they can have slightly different taste profiles.

    Fennel also has a slight sweetness to it. They can be used as substitutes for each other in some dishes just adjust the quantity based on personal preference.

    Can Ground Cloves Replace Star Anise?

    While ground cloves have a similar flavor profile to star anise, they will not be a perfect replacement as the flavors are not exactly alike. It may work in some dishes, but it is best to adjust the quantity used based on personal preference and taste.

    Are Star Anise and Chinese Five Spice the Same?

    No, while star anise is a key ingredient in Chinese five-spice blend, it also includes other spices such as cloves, cinnamon, Sichuan pepper, and fennel seed.

    These spices all have a similar flavor profile, but they each bring their own unique flavors to the blend.

    Can Star Anise Be Used in Indian Cooking?

    Yes, star anise is commonly used in Indian cooking and can be found in many traditional spice blends such as garam masala. It pairs well with spicy dishes and rich meats such as lamb or beef. It can also be used in lentil and bean dishes, rice dishes, and curries.

    Wrapping Up

    Star anise adds a unique depth of flavor to both savory and sweet dishes, but if it’s hard to find, there are several great substitutes that can fill its role.

    From anise seeds to fennel and cloves, each alternative offers a slightly different twist on the licorice-anise flavor.

    The key is to experiment and adjust according to your personal taste preferences.

    Whether you're cooking up a hearty stew or spicing up a dessert, these substitutes will ensure that you don’t miss out on the bold flavor that star anise brings.

    More Great Articles:

    • Cream Cheese vs. Cottage Cheese

    Best Substitutes for Shallots: A Detailed Guide

    October 15, 2024 by Angela Milnes

    Substitutes for shallots.

    Looking for a shallot substitute? Then look no further. This detailed guide will share the Best Shallots Substitutes and how to use them.

    Substitutes for Shallots
    [feast_advanced_jump_to]

    What Are Shallots?

    Shallots are a type of onion that has a milder and sweeter taste compared to other onions.

    They also have a hint of garlic flavor and are usually used as a flavoring for dishes like soups, sauces, and salads.

    For every shallot, the recipe calls for, replace it with one white or yellow onion.

    Why do Some prefer Shallots instead of onions? 

    Shallots have a more delicate taste compared to onions, making them great for adding flavor without overpowering the dish.

    They also have a higher ratio of flesh to skin, making them easier to chop and cook with. Sometimes, chefs like to use shallots raw in salads for a more subtle onion flavor. These wholefoods are fantastic in any recipe.

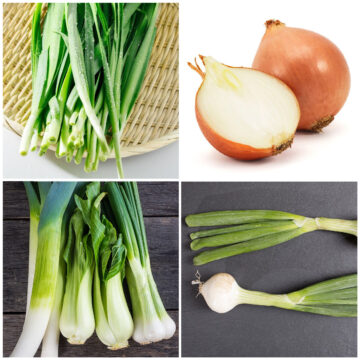
    What are the Substitutes for Shallots?

    Here are my 5 Top Shallot Substitutes:

    • Yellow Onions or White Onions
    • Garlic
    • Chives
    • Leeks
    • Spring Onions

    Onions Substitute for Shallots

    Yellow onions or white onions have a stronger and more pungent flavor than cooked shallots, so use them in smaller quantities.

    Onions As a Shallot Alternative are a fantastic option because they can easily be found in most grocery stores and have a similar texture and shape.

    White Onions.

    Substituting Shallots with Onions in Cooking

    Replace Minced shallot with Diced onion 

    Use a 1:1 ratio and slice or dice the onion as finely as possible to get the closest texture to shallots. If you want a milder taste then do a ratio of 2:1

    1 shallot equals how much onion? 

    There is no set measurement for this as it will depend on the size of the shallot and onion. In general, you can use a smaller amount of a stronger-flavored onion like yellow onion or red onion as a substitute for shallots.

    Can You Substitute Onions for Shallots All Year Round?

    Yes, onions are available year-round while shallots have a more limited season.

    Garlic as a Shallots Substitute

    Garlic has a strong flavor, so it should be used sparingly as a substitute for shallots. It also burns easier, so keep an eye on the cooking time. You can use roasted garlic, minced garlic, or even garlic powder.

    Garlic powder is much more potent than a garlic clove so start with a small amount and adjust to taste. If you love the garlic taste then go for it, but if looking for a mild taste, use garlic powder sparingly as too much garlic powder easily overpowers a dish.

    Garlic is available year-round like onions, making it a convenient substitute for chopped or sliced shallots.

    You can also use garlic scapes as a shallot alternative. Simply chop the garlic scapes finely and use them when a recipe calls for a chopped shallot.

    If you have a garlic plant or grow your own garlic then you could simply cut a few garlic scapes and leave the bulb and scapes to regrow.

    Chives Shallots Substitution

    Chives have a mild onion taste and can be used as a garnish or added towards the end of cooking. Chopped chives are the best shallot substitute for garnishing a dish.

    Chives can also be used as a good shallot substitute. In fact chives make the best shallot substitutes in pasta salads. Just use about twice the amount called for in the recipe.

    Leeks Substitution for Shallots

    Leeks have a milder flavor compared to onions and can be used in the same way as shallots. Though you won't get the exact shallot flavor from a leek you will get a similar texture and taste.

    One thing to keep in mind, is that leeks cook more quickly than other members of the allium family.

    leeks.

    Replacing Shallots With Spring Onions

    Spring onions, also known as scallions or green onions, have a milder flavor compared to regular onions.

    They can be used in soups, salads, and stir-fries as a shallot substitute. The green stalks can be used as a garnish for other dishes.

    You can either save the green stalk of the scallion for a future recipe or dice it up to use in another dish.

    Keep in mind that they will add a slight oniony flavor to the dish. Spring onions are a great substitute or alternative to shallots.

    Best Substitute for Raw Shallots

    When using shallots raw in a dish, like in a salad or as a topping, chives or spring onions make good substitutes. They have a similar texture and mild onion flavor.

    Other Substitutes:

    Garlic Scapes

    Garlic scapes have a mild garlic flavor and can be used as a shallot substitute in dishes like soups, salads, and stir-fries.

    They have a slightly crunchy texture and can be used raw or cooked. The green stalks can also be used as a garnish for other dishes.

    Overall, there are many options for substituting shallots in a dish. Consider the flavor and texture each substitute will add, and experiment with different amounts to find the right balance for your dish.

    Some popular options include yellow or red onions, garlic, chives, leeks, and garlic scapes. Always have fun experimenting in the kitchen!

    Green Onions

    One way to use both shallots and green onions in a dish is to first sauté the diced shallots until they are slightly browned, then add sliced green onion stalks and cook for an additional minute or two. This can be used as a topping for grilled meats or added to salads for extra flavor.

    Substitutes for Shallots In Sauce 

    When substituting for shallots in a sauce, try using garlic or chives for a milder flavor. Leeks or spring onions can also work well as substitutes in sauces.

    If you are looking for a more concentrated flavor then opt for diced yellow or white onion.

    An example of sauces that use shallots would be a béarnaise or a vinaigrette.

    red onions.

    5 Tips for Shallot Replacement

    When finding your shallots substitute, keep these tips in mind:

    1. Shallots have a milder and sweeter flavor, so consider using a smaller amount of a stronger substitute like garlic or red onion.

    2. Chives and spring onions are great for adding flavor towards the end of cooking and they have a similar flavor.

    3. Leeks can be used as a substitute in dishes like soups or sauces. When you substitute leeks be sure to thoroughly clean them as they tend to have trapped dirt in between the layers.

    4. Experiment with different types and amounts of substitutes to find the right balance for your dish.

    5. Keep in mind that the dish may have a slightly different flavor when using a substitute for shallots.

    Shallots vs Green Onion

    Shallots have a milder and sweeter taste, while green onions have a more subtle flavor. Shallots are also usually used for cooking, while green onions can be eaten raw in salads or as a garnish. They have a much more mild flavor than the intense flavor of garlic or yellow onions.

    Shallots vs Red Onion

    Red onions have a sharper and more pungent flavor compared to shallots. When substituting, use less red onion and add towards the end of cooking to preserve its crisp texture. Red onions have a sweet onion profile and a sweet taste. Add half a chopped red onion in place of one shallot.

    French Recipes That Use Shallots

    Some French recipes that use shallots include steak au poivre (pepper steak) and Coq Au Vin (chicken in red wine). Shallots are also used in the classic French sauce, béarnaise.

    Shallot Substitutes in Indian Cuisine

    In Indian cuisine, chopped shallots can be substituted with a small amount of red onion or garlic. Chives can also be used as a milder substitute in dishes like Chutneys and salads.

    Shallot Substitutes in Asian Cuisine

    In Asian cuisine, shallots are often used Tofu Stir Fry and Unstuffed Cabbage Roll Soup. They can be substituted with green onions, leeks, minced or raw garlic.

    Keep in mind that the dish may have a slightly different flavor when using a substitute for shallots.

    Experiment with different amounts and types of substitutes to find the right balance for your dish.

    Shallot Substitutes in Mediterranean Cuisine

    In Mediterranean dishes, shallots can be substituted with garlic or red onion. Chives can also work as a milder substitute in salads or as a garnish.

    Shallot Substitutes in Vegetarian and Vegan Dishes

    In vegetarian and vegan dishes, shallots can be substituted with leeks, spring onions, or garlic. Chives also make a good substitute for raw shallots in salads or as a topping as they have a similar taste.

    Best Way to Store Shallot Substitutes

    Shallots, red onions, leeks, and garlic can all be stored in a cool and dry place for up to one month.

    Chives and spring onions should be stored in the refrigerator, wrapped in a damp paper towel, for up to one week.

    FAQ'S

    Can I Use White Pearl Onions Instead Of Scallions?

    You can use white pearl onions. Pearl onions are sweet onions and have a milder flavor compared to scallions green onions.
    They do have a stronger onion taste and can be used in cooked or raw uncooked dishes like salads, pasta dishes, soups, and stir-fries.

    What About Dried Onions?

    Dried Onions whether they are white onion or yellow onion can be used as a replacement for shallots. However, they do have a stronger flavor and may not be the best option for dishes where a milder onion flavor is desired.

    To use dried onions, soak them in water or broth until they are rehydrated before using in a dish. They can also be used as a topping or garnish on dishes like soups or salads.

    Are Shallots The Same As Green Onions?

    No, Shallots are a type of onion while green onions, also known as scallions or spring onions, are a different variety. Green onions have a milder flavor and can be used as a shallot substitute in certain dishes.

    Green onions have a more distinct flavor than shallots and a sharper taste. The green part of the onion can also be used in cooking or as a garnish.

    Try These Shallot Alternatives

    Finding the perfect shallot substitute can be a fun and flavorful adventure!

    Using onions, garlic, chives, or leeks, you can easily adapt any dish without compromising taste.

    Each substitute brings its unique twist, allowing you to get creative in the kitchen.

    So, the next time you’re in need of shallots, don't stress—grab one of these alternatives and enjoy the delicious results!

    More Useful Articles:

    • 10 Best Substitutes for Bread Crumbs in Meatloaf
    • 19 Best Cottage Cheese Substitute Options
    • Top 9 Gochugaru Substitutes
    • Best Farro Substitutes And Cooking Times
    • French Onion Soup With Cheesy Baguette Slices

    Air Fryer Peaches (Cinnamon Peaches)

    October 14, 2024 by Angela Milnes

    Air Fryer Peaches With Cream.

    These Air Fryer Peaches (aka cinnamon peaches) are tender, caramelized, and ready in under 15 minutes. A cozy, naturally sweet treat you can enjoy year-round—no grill or oven needed!

    Air Fryer Peaches With Cream.
    [feast_advanced_jump_to]

    Whether you're craving something sweet after dinner or want a lighter dessert option, cinnamon peaches in the air fryer are your new best friend. Soft in the center, crisp on top, and ready in minutes—this is what I make when I need dessert fast but still want it to feel a little fancy.

    They also pair perfectly with this Vegan Coconut Chocolate Mousse or a refreshing Mangonada drink.

    💖 Why This Recipe Works

    • Quick & Easy: From prep to plate in under 15 minutes.
    • Naturally Sweet: Uses ripe peaches, cinnamon, and just a touch of sugar.
    • Versatile: Great with ice cream, yogurt, or granola—perfect hot or cold!

    ⭐ Star Ingredients

    Ingredients for Air Fryer Peaches With Cream.
    • Ripe Peaches: I go for freestone peaches—they're easy to halve and hold up beautifully in the air fryer without falling apart.
    • Brown Sugar: Just a sprinkle brings out a rich, toasty flavor as the peaches caramelize.
    • Ground Cinnamon: The warm, sweet spice that makes these cinnamon peaches absolutely sing.

    For the complete list of ingredients with measurements and instructions, please see the recipe card at the bottom of the post.

    📖  Substitutions & Variations

    • No fresh peaches? Canned peaches work too—just rinse and pat dry before air frying.
    • Butter swap: Try coconut oil or dairy-free butter for a vegan version.
    • Add crunch: Top with chopped pecans or granola before serving.
    • Extra spice: Mix in nutmeg or cardamom for a deeper spiced flavor.
    • Sweetener swap: Maple syrup, monk fruit, or coconut sugar all work well.

    🔪 How To Make Air Fryer Peaches With Cinnamon

    Brown sugar, cinnamon, and butter in a bowl.
    1. Step 1: Preheat the air fryer to 350°F.
    Mixing together brown sugar, cinnamon, and butter in a bowl.
    1. Step 2: In a bowl, mix together the brown sugar, cinnamon, and butter until combined.
    Half cut peaches in the air fryer basket.
    1. Step 3: Place the peaches into the air fryer basket with the cut side up. Top each peach with the butter mixture.
    Air fried peaches.
    1. Step 4: Cook the peaches in the air fryer for 7 to 12 minutes until caramelized on top. Serve immediately, topped with vanilla ice cream or whipped cream.

    👩‍🍳 Expert Tip – Frozen Treat Hack:
    Freeze peach halves ahead of time, then air fry straight from frozen. The cold center and warm caramelized edges create an almost peach cobbler meets sorbet vibe—ideal for hot days or last-minute desserts.

    Air fryer peaches are ready to serve topped with cream.

    🍑 Air Fryer Peach Cook Times by Ripeness

    Peach RipenessAir Fryer TempCook Time
    Slightly Underripe350°F10–12 minutes
    Ripe but Firm350°F8–10 minutes
    Very Ripe (soft)340°F6–8 minutes (watch closely!)

    💡Tip: Softer peaches cook fast! Reduce time and check halfway to avoid over-softening.

    👩‍🍳 Expert Tips

    • Choose the right peaches: Freestone varieties are best—they're easy to pit and hold up well.
    • Cold butter or soft? Use softened butter so it melts easily and doesn't slide off during cooking.
    • Want grill marks? Air fry cut-side down for the first 5 minutes, then flip.

    💭 FAQs

    Can I make air fryer grilled peaches with canned fruit?

    Yes! Drain and pat them dry first. They’re a little softer but still delicious.

    Can I serve cinnamon peaches cold?

    Definitely. Air fryer baked peaches taste amazing chilled with Greek yogurt or plant-based cream.

    Do I need to peel the peaches first?

    Nope! The skin softens beautifully in the air fryer, and it helps the peach hold its shape.

    What’s the best way to store leftovers?

    Store in an airtight container in the fridge for 2–3 days. Reheat in the air fryer or enjoy cold!

    What’s the difference between air fried peach and baked peaches?

    The air fryer gives a crispier top and faster cook time, while oven baking takes longer and can make them softer.

    💖 Serving Suggestions

    Serve these air fryer peaches with:

    • Vanilla Ice Cream: Classic combo.
    • Whipped Cream: For a cloud-like finish.
    • Maple Syrup & Walnuts: Drizzle and sprinkle for crunch and sweetness.
    • Granola or Chia Pudding: Make it a breakfast bowl!
    • Greek Yogurt or Coconut Yogurt: For a healthier option with tang.

    💡Leftovers? Chop them up and fold into oatmeal, layer into parfaits, or mash into yogurt for a naturally sweet swirl.

    Air fried peaches with cream.

    🍽 We Love These Desserts Too!

    • Peach Pie Bars.
      Homemade Peach Pie Bars – Sweet, Simple, and So Good!
    • Hazelnut Chocolate Bark.
      Hazelnut Chocolate Bark
    • Creamy Vanilla Eclair Cake.
      Creamy Vanilla Eclair Cake
    • Berry Granola Bites.
      Easy Granola Bites Recipe (With Berries & Yogurt!)

    Did you make this recipe? Leave a review and a ⭐⭐⭐⭐⭐ rating below, or tag us in our Facebook Group! Alternatively, bookmark it in your browser or save to Pinterest.

    Air Fryer Peaches With Cream.

    Air Fryer Peaches (Cinnamon Peaches)

    Angela Milnes
    These Air Fryer Peaches are a quick and delicious treat! Caramelized to perfection with a warm, golden glaze, they make for a sweet and healthy dessert. Serve with ice cream or whipped cream for an irresistible summer treat!
    5 from 2 votes
    Print Recipe Pin Recipe Rate this Recipe
    Prep Time 5 minutes mins
    Cook Time 12 minutes mins
    Total Time 17 minutes mins
    Course Dessert
    Cuisine American
    Servings 12 Servings
    Calories 73 kcal

    Ingredients
      

    • 4 Peaches
    • ¼ Cup Brown Sugar
    • 1 Teaspoon Ground Cinnamon
    • ¼ Cup Butter

    Instructions
     

    • Preheat air fryer to 350°. In a bowl, mix together the brown sugar, cinnamon, and butter until combined.
    • Place the peaches into the air fryer basket with the cut side up. Top each peach with the butter mixture.
    • Cook the peaches in the air fryer for 7 to 12 minutes until caramelized on top.
    • Serve immediately topped with vanilla ice cream or whipped cream.

    Notes

    Canned Peaches: If you don't have access to fresh peaches or it's not stone fruit season, use canned peaches. Wash them and pat dry first and then place in a pan. The peaches will taste almost like a crustless peach pie/peach cobbler.

    Nutrition

    Calories: 73kcalCarbohydrates: 10gProtein: 1gFat: 4gSaturated Fat: 2gPolyunsaturated Fat: 0.2gMonounsaturated Fat: 1gTrans Fat: 0.2gCholesterol: 10mgSodium: 38mgPotassium: 69mgFiber: 1gSugar: 9gVitamin A: 282IUVitamin C: 2mgCalcium: 9mgIron: 0.2mg
    Print Recipe Pin Recipe Rate this Recipe
    Tried this recipe?Let us know how it was!

    Can You Microwave Brie?

    October 14, 2024 by Angela Milnes

    Piece of brie cheese.

    Most of us love a good cheese plate, especially during the holidays. But Can You Microwave Brie to make this tasty cheese warm and gooey?

    Read on as we teach you How To Microwave Brie - it may become one of your new favorite holiday treats!

    Brie cheese.
    [feast_advanced_jump_to]

    Is It Possible to Microwave Brie?

    The short answer is yes! However, there are some important considerations to keep in mind when microwaving brie.

    Microwaving Brie Correctly

    Microwaving brie will change its texture and consistency. The heat from the microwave can cause the cheese to become gooey which is perfect for cheese dip.

    Melted brie can be desirable in some cases, but not everyone wants to melt brie when heating it.

    Does Microwaving Brie Change the Way It Tastes?

    Microwaving may affect the flavor of brie, as the heat can cause the cheese to release more of its oils and flavors.

    Does Microwaving Brie Cheese Make It Expire Earlier?

    In most cases, heating brie in the microwave will not affect its shelf life. You can safely eat it after microwaving as long as you store it properly and follow any instructions on the packaging.

    brie cheese and other cheese on a platter.

    How to Microwave Brie?

    If you want to microwave brie, here is a step-by-step guide:

    1. Start by removing the brie from its packaging and placing it on a microwave-safe plate or dish.
    2. Use a knife to carefully cut off the top rind of the brie, as this can become tough and chewy when microwaved.
    3. Place the brie on a microwave-safe dish and set the power level to 50-60%. This will help to evenly heat the cheese without causing it to burn.
    4. Microwave the brie for 30-45 seconds, or until it is heated through.
    5. Carefully remove the brie from the microwave and let it cool for a few minutes before serving.

    Can You Microwave Baked Brie?

    Another popular type of brie is baked brie, which has been baked in the oven until it is warm and gooey. If you bake brie and it goes cold, warming it in the microwave can be a quick and fast solution.

    Reheat Baked Brie

    To reheat baked brie in the microwave, start by removing it from the oven or baking dish and placing it on a microwave-safe plate.

    Microwave in 10-second increments until the baked brie is warmed. Then leave to sit in the microwave for two minutes. The residual heat will help the brie to continue to warm and soften.

    brie cheese.
    .

    Can You Microwave Frozen Brie?

    Frozen brie can be a great option if you are looking for a cheesy treat but don't have time to defrost frozen brie in the fridge overnight.

    To microwave frozen brie, start by placing it on a microwave-safe plate and setting the power level to 60%.

    Microwave for 2 minutes, then check to see if the brie has completely defrosted. If not, continue microwaving in additional 10-second increments, checking to see if the brie is completely defrosted.

    Be careful not to overheat or burn the frozen brie when microwaving it.

    Some people also like to slice frozen brie into small pieces and microwave it in a baking dish until warmed through. This allows for more even heating of the cheese.

    brie cheese.

    Top Tips to Microwave Brie Cheese

    Here are some dos and don'ts to keep in mind when microwaving brie:

    Use a Low Power Level

    This will help to prevent the cheese from becoming too hot and liquid, and will also help to preserve its flavor. Never use a high heat!

    Stir the Brie

    After microwaving the brie for 30-45 seconds, carefully stir it with a spoon or fork. This will help to distribute the heat evenly and will prevent hot spots from forming.

    Add Toppings to Brie

    Consider topping your microwaved brie with herbs, spices, nuts, or fruit. You could also try adding maple syrup or pomegranate seeds. These toppings can add a delicious and colorful touch to your dish.

    Serve Immediately

    Once the brie is microwaved, it's important to serve it immediately. If it sits for too long, it can become too soft and runny, which can make it difficult to handle and enjoy.

    How Not to Microwave Brie?

    Don't do any of the following when microwaving your brie cheese:

    Overheat the Brie

    Avoid overheating the brie, as this can cause it to become too liquid and messy. It's important to carefully monitor the brie as it microwaves and to stop the microwave when the cheese is heated through and has reached the desired consistency.

    Leave the Rind On

    The top rind of brie can become tough and chewy when microwaved, so it's best to remove it before microwaving the cheese. This will help to ensure that the brie is smooth and creamy when it's heated.

    Leave the Brie in the Microwave for Too Long

    As mentioned above, it's important to serve the brie immediately after microwaving it. Leaving it in the microwave for too long can cause it to become too soft and runny, which can make it difficult to handle and enjoy.

    Use a High Heat

    As mentioned above, it's important to use a low power level when microwaving brie. This will help to prevent the cheese from becoming too hot and liquid, and will also help to preserve its flavor.

    Serving Brie at Parties

    So if you are craving some warm brie, or need a quick appetizer to serve at your next holiday party, try a brie cheese recipe or pair your brie with other cheeses (both hard and soft cheeses) such as camembert, cheddar, blue cheese and goat cheese to create a delicious cheese plate.

    How to Store Brie?

    When you're finished microwaving your brie cheese, it's important to store it properly so that it stays fresh and tasty.

    For best results, you can wrap the brie in plastic wrap or aluminum foil and keep it in the refrigerator for up to 3 days.

    Best Brie Recipes

    Here are some delicious recipes that utilize microwaved brie as a key ingredient:

    Brie and Fig Jam Crostini

    This easy appetizer is made by spreading fig jam on toasted baguette slices and topping them with slices of microwaved brie.

    The result is a sweet and savory treat that is perfect for parties and gatherings.

    Brie and Apple Grilled Cheese

    For a tasty and satisfying lunch, try making a brie and apple grilled cheese sandwich.

    Simply microwave the brie until it's melted, and then sandwich it between slices of bread along with thinly sliced apples and a sprinkle of cinnamon.

    Grill the sandwich in a pan until the bread is crispy and the cheese is gooey.

    Brie and Mushroom Pasta

    This creamy and flavorful pasta dish is made by combining microwaved brie with sautéed mushrooms, garlic, and heavy cream.

    Toss the sauce with cooked pasta and garnish with fresh herbs for a satisfying and delicious meal.

    Brie and Honey Toast

    For a simple and delicious dessert, try topping slices of toasted bread with microwaved brie and a drizzle of honey. The combination of the warm, gooey cheese and the sweet honey is a match made in heaven.

    These are just a few examples of the many ways you can use microwaved brie in your cooking.

    Experiment with different recipes and toppings to find your favorite combinations and enjoy the deliciousness of microwaved brie.

    Wrapping Up

    In conclusion, microwaving Brie cheese can be a quick and easy way to enjoy this beloved treat, whether you're preparing it as an appetizer or adding it to a dish.

    By following simple steps and taking care not to overheat it, you can achieve the perfect gooey texture that pairs wonderfully with toppings like fruits, nuts, and honey.

    Whether you're reheating baked Brie or starting from frozen, the microwave provides a convenient option that doesn't compromise taste.

    Experiment with different recipes, and you might just find that microwaving Brie becomes your go-to method for effortless indulgence!

    More Useful Food Articles:

    • Cream Cheese Vs Cottage Cheese


    10 Best Substitutes for Bread Crumbs in Meatloaf

    October 14, 2024 by Angela Milnes

    Substitutes for bread crumbs in meatloaf.

    Looking for the perfect Substitutes For Breadcrumbs In Meatloaf? Whether you're out of breadcrumbs or looking for a healthier, gluten-free, or low-carb alternative, there are plenty of easy swaps to get that same crunchy texture and binding magic.

    From crushed crackers to almond flour, this list will help you find the best Breadcrumb Alternative for your meatloaf recipe—without missing a beat!

    meatloaf.
    [feast_advanced_jump_to]

    What Are Bread Crumbs Made Of?

    Bread crumbs are made of stale bread that is dried and ground into fine crumbs. These fine crumbs are often used to coat or mix into various dishes, adding texture and flavor.

    Why Do We Need To Substitute Bread Crumbs?

    We substitute breadcrumbs to cater to dietary needs like gluten-free or low-carb diets. Sometimes, breadcrumbs aren't on hand, so alternate options are needed.

    Some people also prefer different textures or flavors in their dishes. Substitutes can offer more suitable options for various recipes.

    Substitutes For Bread Crumbs In Meatloaf

    Do Bread Crumb Substitutes Really Work?

    Yes, breadcrumb substitutes can work well in recipes. They often provide similar texture and binding properties. However, the taste and crunch might vary slightly depending on the substitute used.

    Best Substitutes For Bread Crumbs In Meatloaf

    When preparing meatloaf, these alternatives to breadcrumbs can help maintain texture and flavor:

    1. Add Rolled Oats To Meatloaf

    Rolled oats are a great gluten-free substitute for breadcrumbs in meatloaf. Made from whole oat grains that are steamed and flattened, rolled oats have a mild, slightly nutty flavor. While their taste differs from breadcrumbs, adding herbs or spices can enhance the flavor to match.

    As a substitute, rolled oats help bind the ingredients together, ensuring the meatloaf holds its shape. They provide a hearty, chewy texture, perfect for a robust dish.

    To make rolled oats at home, simply buy whole oat grains and roll them with a rolling pin after steaming to flatten them.

    2. Potato chips

    Crushed potato chips are a fun and tasty alternative to breadcrumbs in meatloaf. Made from thinly sliced potatoes that are fried and salted, potato chips bring a zesty flavor to your dish. Their salty and crispy taste can add a unique twist, different from the usual breadcrumb flavor.

    If you want to match the traditional taste, you can mix them with familiar spices. As a substitute, crushed potato chips help bind the meatloaf ingredients, keeping everything in place. They add a crunchy texture, which can make your meatloaf more exciting.

    Generally, potato chips are gluten-free, but it's always good to check the packaging to be sure. To make crushed potato chips at home, simply place them in a blender or food processor and pulse until they reach a breadcrumb-like consistency.

    Rolled Oats

    3. Add Crushed crackers To Meatloaf

    Crushed crackers are a most popular bread crumb substitute in meatloaf, made from salted crackers. These crackers provide a savory and slightly buttery flavor that can enhance the taste of your dish just as traditional breadcrumbs would.

    Their texture is crumbly yet firm, which helps hold the meatloaf together while adding a pleasant crunch. To make them at home, simply crush salted crackers with a rolling pin or a food processor until they reach the desired consistency.

    Bread Crumbs.

    4. Cornflakes In Meatloaf

    Cornflakes are made from toasted corn and bring a slightly sweet taste and extra flavor to your meatloaf. This adds a new dimension to the dish, and you can even blend cornflakes with spices to match the classic breadcrumb taste.

    As a substitute, cornflakes effectively bind the meat mixture, ensuring the meatloaf holds together well. Their texture, when crushed, is similar to breadcrumbs, adding a satisfying crunch.

    To make crushed cornflakes at home, place them in a plastic bag and crush them with a rolling pin or use a food processor until they reach the desired consistency.

    Cornflakes

    5. Almond flour

    Almond flour, or almond meal, is a fantastic bread crumbs alternative for meatloaf. Made from ground almonds, it has a nutty taste that brings as much flavor to your dish as traditional breadcrumbs.

    This gluten-free alternative effectively binds ingredients, ensuring your meatloaf maintains its shape. Its texture is slightly coarser than regular breadcrumbs, adding a unique twist to the dish.

    To make almond flour at home, simply grind blanched almonds in a food processor until they become fine.

    Almond flour

    6. Add Quinoa flakes To Your Meatloaf

    Quinoa flakes are another substitution for bread crumbs, providing a unique twist to your recipe. Made from quinoa seeds that are rolled into thin, flat flakes, they have a mild, slightly nutty flavor that complements the meat without overpowering it.

    Their texture is soft yet sturdy, offering a pleasant bite. To prepare quinoa flakes for use, measure out the necessary amount and mix them directly into your meatloaf mixture—no crushing needed.

    Quinoa flakes

    7. Cooked rice

    Made simply from boiled rice, long grain white rice add a gentle, neutral taste that won't overpower the flavors in your meatloaf. This substitute helps bind the ingredients together, much like bread crumbs would, ensuring a firm and cohesive loaf.

    The texture of cooked rice is soft yet dense, offering a slightly different but pleasant mouthfeel. To make it at home, just cook your rice as usual, let it cool, and mix it into your meatloaf mixture.

    Cooked rice

    8. Cereal

    Using cereal as a breadcrumb alternative in meatloaf is a creative and tasty option. This substitute is typically made from crushed, unsweetened cereal such as cornflakes or rice cereal.

    The taste is mild, letting the flavors of your meatloaf shine through while adding a subtle crunch. It helps bind the meat mixture together, just like breadcrumbs, ensuring your meatloaf holds its shape.

    The texture is slightly crisp, which can add an interesting contrast to the soft meat. To make this at home, simply place the cereal in a plastic bag and crush it with a rolling pin until it's fine, then mix it into your meatloaf ingredients.

    Cereal

    9. Croutons

    Whether using Jalapeno cornbread croutons or those made from White Bread, this option adds a delightful burst of flavor. Croutons, typically seasoned and toasted, offer a savory, buttery taste that enhances the meatloaf.

    Croutons act as a binding agent, similar to breadcrumbs, holding the meatloaf together while adding texture. The result is a lightly crunchy exterior with a soft interior.

    To prepare croutons for your meatloaf, place them in a zip lock bag and crush them with a rolling pin until they’re in small pieces.

    Croutons

    10. Pretzels

    Pretzel sticks or Pretzel biscuits can be a flavorful and crunchy substitute. Made from wheat flour and seasoned with salt, pretzels bring a savory flavor that complements the rich flavors of meatloaf.

    They act as a binder, much like breadcrumbs, ensuring your meatloaf stays together. The texture they add is crisp and crunchy, providing a delightful contrast to the tender meat.

    To prepare them at home, simply crush the pretzel sticks or biscuits in a food processor or with a rolling pin until they're finely ground, then mix them into ground meat.

    Pretzels

    Enjoy Substituting Bread Crumbs!

    Substituting bread crumbs in meatloaf offers a range of options that cater to various dietary needs while enhancing flavors and textures. From the hearty rolled oats to the nutty almond flour, each alternative brings unique benefits, allowing for creative and personalized cooking.

    Whether adding crunch with potato chips and pretzels or maintaining cohesion with quinoa flakes and cooked rice, these substitutes make your meatloaf exciting and tailored to your taste.

    More Great Substitute Articles:

    • Top 9 Gochugaru Substitutes
    • Best Farro Substitutes And Cooking Times
    • Best Substitute For Capers: 12 Options
    • Fish Stock Substitute: 11 Best Alternatives
    • Best Substitute For Sun Dried Tomatoes
    • The Best Substitute For Arugula

    Sheet Pan Thai Chicken With Lime Wheels

    October 14, 2024 by Angela Milnes

    Sheet Pan Thai Chicken With Lime Wheels.

    Dinner just got a whole lot easier with this Sheet Pan Thai Chicken Recipe! Packed with tender chicken, colorful veggies, and a zesty Thai-inspired sauce, this one-pan meal is full of flavor and a breeze to clean up. Perfect for busy weeknights or whenever you’re craving something bold and delicious!

    Sheet Pan Thai Chicken With Lime Wheels.
    [feast_advanced_jump_to]

    If you're into sheet pan meals, be sure to test out the following sheet pan dinners: Sheet Pan Veggies And Sausage, Sheet Pan Chicken Fajitas, Sheet Pan BBQ Chicken Recipe and Sheet Pan Spanish Roast Potatoes.

    💖 Why This Recipe Works

    • Big, Bold Flavors: The zesty Thai-inspired sauce brings the perfect mix of sweet, savory, and tangy to every bite.
    • One-Pan Wonder: Everything cooks together on one sheet pan, making prep and cleanup super simple.
    • Customizable: Swap in your favorite veggies or adjust the spice level to make it just the way you like it. Perfect for the whole family!

    ⭐ Star Ingredients

    • Boneless Skinless Thin-Sliced Chicken Breasts: The protein foundation of the Sheet Pan Thai Dinner, tender and versatile.
    • Thai Chili Sauce: A sweet and spicy glaze that adds bold flavor to the dish.
    • Soy Sauce: A rich, umami-packed ingredient essential for the perfect marinade.
    • Peanut Butter: Creamy and nutty, it lends depth and texture to the sauce.
    • Lime Wheels: Garnish that adds visual appeal and an extra citrus burst to the Sheet Pan Thai Dinner.
    • Fresh Cilantro: A fragrant, fresh herb that finishes the Sheet Pan Thai Dinner with a burst of flavor.

    For the complete list of ingredients with measurements and instructions, please see the recipe card at the bottom of the post.

    📖  Substitutions & Variations

    • Going meatless? Swap the chicken for tofu or tempeh—soaks up that Thai peanut goodness like a champ and roasts up beautifully!
    • Pineapple lovers, this one’s for you! Toss in fresh or canned chunks for a sweet, tangy kick that plays perfectly with the savory sauce.
    • Craving crunch? Sprinkle on some roasted cashews for that irresistible nutty bite—mix them into the veggies for extra flavor magic!

    🔪How To Make Sheet Pan Thai Chicken

    Sheet Pan Thai Chicken With Lime Wheels.
    1. Step 1: Preheat the oven to 400°F. Place the chicken in a large, sealable plastic bag. In a bowl, add the sweet Thai chili sauce, lime juice, soy sauce, peanut butter, ginger, and garlic. Stir to combine. Pour ¾ of the sauce into the sealable bag with the chicken. Shake the bag and make sure to cover the chicken to marinate for 2 hours.
    Sheet Pan Thai Chicken With Lime Wheels.
    1. Step 2: Remove the chicken from the bag and place the chicken on a parchment-covered sheet pan.  In a large bowl, add the peppers, broccoli, snow peas, carrots, and onion. Drizzle with olive oil and the remaining Thai peanut sauce. Toss to coat. Season with salt and pepper and arrange the veggies around the chicken on the baking sheet. Bake for 25-30 minutes, or until the chicken is cooked through and the veggies are tender. Serve and enjoy!
    Sheet Pan Thai Chicken With Lime Wheels.

    👩‍🍳 Expert Tips

    • Vegetable Preparation: Chop vegetables uniformly to ensure even cooking alongside the chicken.
    • Smooth Peanut Sauce: Warm the peanut butter slightly before mixing to achieve a silky, well-blended sauce for your Sheet Pan Thai Chicken.
    • Proper Pan Spacing: Spread the chicken and vegetables evenly on the pan for the best roasting results without steaming.

    💭 FAQs

    Can I Make This Dish Ahead Of Time?

    Yes, you can marinate the chicken up to 24 hours in advance. Store the marinated chicken in the refrigerator until you’re ready to cook it.

    Can I Use Frozen Vegetables?

    Yes, you can use frozen vegetables, but fresh vegetables will yield a better texture. If using frozen, reduce the cooking time slightly to avoid overcooking.

    Can I Grill The Chicken Instead Of Baking It?

    Yes, you can grill the marinated chicken instead of baking it. Just make sure to grill the chicken over medium heat for about 6-8 minutes per side, depending on the thickness, until it reaches an internal temperature of 165°F.

    How Do I Know When The Vegetables Are Fully Cooked?

    The vegetables should be tender but still slightly crisp. You can check by piercing them with a fork—if it easily goes through, they are done.

    Best Way to Store Sheet Pan Thai Chicken With Lime Wheels

    Refrigerate in an airtight container with sauce for 3-4 days; remove lime wheels to prevent mushiness. Freeze individual portions for longer storage, but vegetable texture may change, reheat gently to avoid dryness.

    💖 Serving Suggestions

    These are my favorite meals to serve with sheet pan Thai chicken.

    • Sweet Corn Fritters: Crispy and slightly sweet fritters offer a delightful texture and balance to the dish.
    • Steamed Jasmine Rice: The delicate aroma of jasmine rice pairs perfectly with the saucy flavors of Sheet Pan Thai Chicken.
    • Thai Coconut Rice: Creamy and slightly sweet coconut rice complements the peanut sauce and lime zest in the dish.
    • Garlic Butter Naan: Warm, fluffy naan bread is great for scooping up every bit of sauce from your meal.
    • Rice Noodles: Toss cooked rice noodles in sesame oil for a light and satisfying side to this dish.
    sheet pan thai chicken on a baking tray.

    🍽 Try These Easy Sheet Pan Recipes

    • Sheet Pan Veggies And Sausage.
      Sheet Pan Veggies And Sausage
    • Sheet Pan Chicken Fajitas.
      Sheet Pan Chicken Fajitas
    • Sheet Pan Nacho Chips.
      Loaded Sheet Pan Nachos (Easy Party Snack Recipe)
    • Best Spanish Roast Potatoes.
      Crispy Spanish Roasted Potatoes With Smoky Spices

    Did you make this recipe? Leave a review and a ⭐⭐⭐⭐⭐ rating below, or tag us in our Facebook Group! Alternatively, bookmark it in your browser or save to Pinterest.

    Sheet Pan Thai Chicken With Lime Wheels.

    Sheet Pan Thai Chicken With Lime Wheels

    Angela Milnes
    This easy one-pan dish features tender chicken seasoned with a flavorful Thai-inspired marinade of lime, garlic, and soy sauce. The chicken is baked alongside vibrant vegetables like bell peppers and onions, with lime wheels adding a zesty kick. It's a quick, healthy, and delicious meal with minimal cleanup.
    5 from 3 votes
    Print Recipe Pin Recipe Rate this Recipe
    Prep Time 15 minutes mins
    Cook Time 25 minutes mins
    Total Time 40 minutes mins
    Course Dinners
    Cuisine Asian
    Servings 4 Servings
    Calories 436 kcal

    Ingredients
      

    • 4-5 Boneless Skinless Thin Sliced Chicken Breasts
    • 0.5 teaspoon Salt
    • 0.5 teaspoon Black Pepper
    • ½ Cup Thai Chili Sauce
    • 2 Fresh Limes Juiced
    • ¼ Cup Soy Sauce
    • 3 tablespoon Peanut Butter
    • 1 tablespoon Grated Ginger
    • 1 tablespoon Minced Garlic
    • 2 Bell Peppers Orange And Red, Stemmed And Chopped
    • 1 Cup Broccoli Separated Into Florets
    • 2 Cups Snow Peas
    • 1 Cup Carrots Sliced Round
    • ½ Onion Diced
    • 2 tablespoon Olive Oil
    • Lime Wheels To Top
    • ¼ Cup Peanuts Chopped
    • Fresh Cilantro

    Instructions
     

    • Preheat the oven to 400°F.
    • Place the chicken in a large, sealable plastic bag.
    • In a bowl, mix together sweet Thai chili sauce, lime juice, soy sauce, peanut butter, ginger, and garlic until well combined.
    • Pour ¾ of the sauce into the bag with the chicken. Seal and shake to coat. Let the chicken marinate for 2 hours.
    • Remove the chicken from the bag and place it on a parchment-lined baking sheet.
    • In a large bowl, combine the peppers, broccoli, snow peas, carrots, and onion.
    • Drizzle with olive oil and the remaining Thai peanut sauce. Toss to coat.
    • Season with salt and pepper and arrange the veggies around the chicken on the baking sheet.
    • Bake for 25-30 minutes, or until the chicken is cooked through and the veggies are tender. Serve and enjoy!

    Notes

    Vegetable Preparation: Chop vegetables uniformly to ensure even cooking alongside the chicken.
    Smooth Peanut Sauce: Warm the peanut butter slightly before mixing to achieve a silky, well-blended sauce for your Sheet Pan Thai Chicken.
    Proper Pan Spacing: Spread the chicken and vegetables evenly on the pan for the best roasting results without steaming.

    Nutrition

    Calories: 436kcalCarbohydrates: 30gProtein: 35gFat: 21gSaturated Fat: 4gPolyunsaturated Fat: 5gMonounsaturated Fat: 11gTrans Fat: 0.01gCholesterol: 72mgSodium: 1780mgPotassium: 1183mgFiber: 8gSugar: 14gVitamin A: 8165IUVitamin C: 146mgCalcium: 101mgIron: 4mg
    Print Recipe Pin Recipe Rate this Recipe
    Tried this recipe?Let us know how it was!

    More Tasty Recipes To Try:

    • Best Thai Peanut Salad Recipe
    • Tofu Stir Fry Noodles With Mushroom
    • Chicken Broccoli Cashew Stir Fry
    • Grandma’s Chicken And Broccoli Bake
    • Best Air Fryer Stuffed Chicken Breast
    • One Pan Chicken And Asparagus
    • Thin Sliced Chicken Breast Recipe: Air Fryer Method

    Roasted Butternut Squash Salad

    October 12, 2024 by Angela Milnes

    Roasted Butternut Squash Salad.

    Get ready to fall in love with my Roasted Butternut Squash Salad. This isn’t your average salad – it’s packed with roasted chickpeas, crisp apple pieces, and crunchy pumpkin seeds. It’s a burst of flavors and textures in every bite! Perfect for a healthy lunch or a vibrant side dish. Trust me, once you try this, you’ll be hooked. Let’s dive in and make this deliciousness together!

    Roasted butternut squash salad with chickpeas and kale.
    [feast_advanced_jump_to]

    💖 Why This Recipe Works

    • Warm & Cozy – The roasted butternut squash and chickpeas, kissed with cinnamon and nutmeg, bring all the cozy vibes.
    • Nutrient-Packed Powerhouse – Kale, quinoa, and apples make this a vitamin-loaded dream bowl.
    • Sweet & Savory Balance – Maple syrup adds a touch of natural sweetness, perfectly countered by the crunchy, savory elements.

    ⭐ Star Ingredients

    Ingredients to make roasted butternut squash salad.
    Ingredients to make salad dressing.
    • Butternut Squash – The real MVP! Roasted to caramelized perfection, it brings natural sweetness and a velvety bite.
    • Kale – Earthy, slightly bitter, and the perfect hearty base to soak up all that dreamy dressing. Massage it for extra tenderness!
    • Chickpeas – Roasted to crispy perfection, they add a protein-packed crunch and soak up the warm spices and maple syrup for a perfect sweet-savory bite.
    • Apples – Crisp, juicy, and just the right amount of tangy sweetness to brighten up every bite.
    • Maple Syrup – A drizzle of this liquid gold ties it all together with rich, warm sweetness.

    For the complete list of ingredients with measurements and instructions, please see the recipe card at the bottom of the post.

    📖  Substitutions & Variations

    • Citrus-Glazed Roasted Butternut Squash Salad: Brighten up your plate with this citrus-infused salad featuring roasted butternut squash, zesty citrus segments, crunchy walnuts, and a citrusy vinaigrette, offering a refreshing and invigorating taste sensation.
    • Goat Cheese Medley with Roasted Sweet Potatoes: Enjoy the harmonious combination of crumbled goat cheese, roasted sweet potatoes, and crunchy candied pecans, all drizzled with a creamy goat cheese dressing for a rich and delicious salad.
    • Mediterranean-Inspired Roasted Butternut Squash Salad: Infused with a Mediterranean flair, this salad pairs roasted butternut squash with tangy feta cheese, briny olives, and a refreshing herb dressing, creating a vibrant and wholesome meal option.

    🔪 How To Make Roasted Butternut Squash Salad

    Soaked cashew nuts in a bowl.
    1. Step 1: Preheat your oven to 400 degrees Fahrenheit. Add cashews to a small bowl and cover with hot water. Set aside to soften. Cook quinoa according to package directions and set aside.
    Chickpeas butternut squash and apple roasted.
    1. Step 2: Drain and rinse chickpeas. Chop apples into bite-sized cubes. Add chickpeas, apples, and butternut squash cubes to a parchment-lined baking sheet. Add cinnamon, nutmeg, maple syrup, and salt to the mixture on the baking sheet and combine well. Bake in the preheated oven for 25 minutes.
    Making a cashew salad dressing.
    1. Step 3: Dice the shallot and drain the cashews. Add all dressing ingredients (cashews, olive oil, apple cider vinegar, Dijon mustard, shallot, salt, and water) to a blender.
    Making a cashew salad dressing in blender.
    1. Step 4: Blend on high for approximately 2 minutes or until a smooth liquid consistency is achieved. If necessary, add additional water to reach the desired consistency.
    Baked kale.
    1. Step 5: Place chopped kale on a second parchment-lined baking sheet. Drizzle with olive oil and combine. Add the kale to the oven for the last 8 minutes of baking time.
    Roasted butternut squash salad with chickpeas and kale in a bowl.
    1. Step 6: Once everything is removed from the oven, combine all salad ingredients in a large salad bowl. Drizzle with the cashew dressing and toss to combine. Garnish with pumpkin seeds for an added crunch. Serve and enjoy your delicious Roasted Butternut Squash Salad!
    Roasted butternut squash salad.

    👩‍🍳 Expert Tips

    • Even Roasting is Key! Chop that butternut squash into equal cubes for uniform caramelization.
    • Don’t Overdress! Let the ingredients shine—add the dressing little by little and toss as you go.
    • Need More Protein? Add grilled tofu or a sprinkle of hemp seeds for a plant-powered boost.

    💭 FAQs

    Can I Use Pre-Cooked Or Frozen Butternut Squash For The Roasted Butternut Squash Salad?

    Yes, you can use pre-cooked or frozen butternut squash for this salad. If using frozen, ensure it is fully thawed and drained before adding to the salad. However, roasting fresh butternut squash brings out a richer, caramelized flavor and a slightly crisp texture that enhances the overall taste of the salad. If using pre-cooked squash, consider lightly reheating it in the oven to mimic the roasted flavor and texture.

    Can I Add Other Ingredients To The Roasted Butternut Squash Salad To Enhance Its Flavor?

    Absolutely! This salad is versatile and can be customized to your taste. Some great additions include roasted chickpeas for crunch, crumbled feta or goat cheese for creaminess, dried cranberries or pomegranate seeds for a burst of sweetness, and toasted nuts like pecans or pumpkin seeds for added texture. You can also experiment with different greens like arugula or kale instead of spinach to create a unique flavor profile.

    Best Way to Butternut Squash Salad

    Keep any leftover Roasted Butternut Squash Salad in a sealed container in the refrigerator for up to 3 days. Store the salad in an airtight container to preserve its freshness and prevent it from absorbing other flavors in the refrigerator.

    💖 Serving Suggestions

    Here are some of the best sides to serve with Roasted Butternut Squash Salad:

    • Quinoa Pilaf: Fluffy, nutty quinoa cooked in veggie broth, tossed with roasted bell peppers and cherry tomatoes—light, hearty, and the perfect sidekick.
    • Sautéed Kale: A quick sizzle in olive oil with garlic and a squeeze of lemon keeps it bright, flavorful, and the ultimate green boost.
    • Wild Rice Salad: Chewy, nutty wild rice mixed with cranberries, pecans, and a citrusy vinaigrette—sweet, tangy, and totally irresistible.
    • Air Fryer Parmesan Asparagus: Charred, smoky, and just the right amount of crisp—this brings a fresh contrast to the caramelized squash.
    • Creamy Parmesan Polenta: Buttery, smooth, and oh-so-comforting, this dreamy polenta adds a rich, savory touch to round out your plate.

    🍽 More Easy Salad Recipes

    • Jalapeno Coleslaw.
      Creamy Jalapeno Coleslaw (With Lime)
    • Italian Octopus Salad With Baby Spinach.
      Italian Octopus Salad With Baby Spinach
    • Watermelon Salad With Feta and Mint.
      Watermelon Feta Mint Salad
    • Beet Sweet Potato Salad.
      Beet And Sweet Potato Salad With Feta

    Did you make this recipe? Leave a review and a ⭐⭐⭐⭐⭐ rating below, or tag us in our Facebook Group! Alternatively, bookmark it in your browser or save to Pinterest.

    Roasted Butternut Squash Salad.

    Roasted Butternut Squash Salad

    Angela Milnes
    Savor the flavors of fall with this Roasted Butternut Squash Salad! Tender, caramelized butternut squash is paired with crisp greens, crunchy nuts, and a tangy dressing for a salad that's both hearty and refreshing.
    5 from 4 votes
    Print Recipe Pin Recipe Rate this Recipe
    Prep Time 10 minutes mins
    Cook Time 25 minutes mins
    Additional Time 0 minutes mins
    Total Time 35 minutes mins
    Course Salads
    Cuisine American
    Servings 4 Servings
    Calories 502 kcal

    Ingredients
      

    • ½ cup Uncooked Quinoa
    • 10 cups Chopped Kale
    • 2 cups Cubed Butternut Squash
    • 2 Apples chopped into bite-sized cubes
    • 1 Can Chickpeas drained and rinsed
    • 1 teaspoon Cinnamon
    • ½ teaspoon Nutmeg
    • 1.5 tablespoons Maple Syrup
    • ½ teaspoon Salt
    • 1 tablespoon Olive Oil
    • ¾ cup Cashews
    • ¼ cup Olive Oil
    • 1 tablespoon Apple Cider Vinegar
    • 1 tablespoon Dijon Mustard
    • ½ Shallot
    • ¼ teaspoon Salt
    • ¾ cup water
    • 1 tablespoon Pumpkin Seeds optional

    Instructions
     

    • Preheat your oven to 400 degrees Fahrenheit.
    • Add cashews to a small bowl and cover with hot water. Set aside to soften.
    • Cook quinoa according to package directions and set aside.
    • Drain and rinse chickpeas. Chop apples into bite-sized cubes. Add chickpeas, apples, and butternut squash cubes to a parchment-lined baking sheet.
    • Add cinnamon, nutmeg, maple syrup, and salt to the mixture on the baking sheet and combine well.
    • Bake in the preheated oven for 25 minutes.
    • Place chopped kale on a second parchment-lined baking sheet. Drizzle with olive oil and combine. Add the kale to the oven for the last 8 minutes of baking time.
    • Dice the shallot and drain the cashews. Add all dressing ingredients (cashews, olive oil, apple cider vinegar, Dijon mustard, shallot, salt, and water) to a blender.
    • Blend on high for approximately 2 minutes or until a smooth liquid consistency is achieved. If necessary, add additional water to reach desired consistency.
    • Once everything is removed from the oven, combine all salad ingredients in a large salad bowl.
    • Drizzle with the cashew dressing and toss to combine.
    • Garnish with pumpkin seeds for an added crunch. Serve and enjoy your delicious Roasted Butternut Squash Salad!

    Notes

    Even Cubes for Even Roasting: Ensure uniformity in cutting the butternut squash into even cubes to promote consistent roasting.
    Don't Overdress: Be mindful not to overdress your salad. This ensures that the flavors of the ingredients shine through without being overshadowed by excess dressing.

    Nutrition

    Serving: 1gCalories: 502kcalCarbohydrates: 51gProtein: 11gFat: 31gSaturated Fat: 5gPolyunsaturated Fat: 5gMonounsaturated Fat: 19gTrans Fat: 0.003gSodium: 518mgPotassium: 865mgFiber: 9gSugar: 18gVitamin A: 12743IUVitamin C: 68mgCalcium: 212mgIron: 5mg
    Print Recipe Pin Recipe Rate this Recipe
    Tried this recipe?Let us know how it was!

    More Vibrant & Nourishing Recipes

    • Grilled Sweet Potatoes
    • Best Sabana De Res Recipe
    • Thin Sliced Chicken Breast Recipe: Air Fryer Method
    • Air Fryer Cod Fillet
    • Citrus And Honey Roasted Beets

    Different Types of Cheese

    October 11, 2024 by Angela Milnes

    Different types of cheese.

    Are you excited to explore the world of cheese?

    We're about to take you on a fun journey through all kinds of cheese, from A to Z, with plenty of delicious stops along the way.

    Grab your favorite crackers or bread and get ready for a tasty adventure!

    From the smooth Asiago to the bold Blue Cheese, there's something here for everyone—so let's dive into this cheesy goodness together!

    Delicious cheese on the table.
    [feast_advanced_jump_to]

    How Many Types of Cheese Are There?

    The exact number of cheese types is unknown, but it's said that there are more than 2,000 varieties across the globe. From soft and creamy Brie to nutty Parmesan, each type has its own unique flavor and texture.

    Whilst your here learn how to make our Instant Pot Cheeseburger Soup! It's delicious!

    Cheese That Starts With A

    Here are some cheeses that start with A. From asiago to asadero, you’ll find something to tantalize your taste buds:

    Appenzeller

    Appenzeller is a Swiss cheese that is semi-hard with an intense flavor full of herbs accompaniments such as wine, fruit, and spices.

    Asadero

    A Mexican cheese that is semi-soft with a mild flavor and creamy texture.

    Asiago Cheese

    Asiago Cheese is a semi-hard cheese is produced in the Northern Italian Alps. This aged cheese has a nutty flavor and can be used in many recipes, like Asiago Creamy Oven Baked Mac and Cheese or Asiago Bread.

    Asiago cheese.

    Asadero

    Asadero cheese is a Mexican cheese with a smooth and creamy texture. It has a mild and slightly tangy flavor, making it perfect for melting. Asadero cheese is commonly used in quesadillas, nachos, and Mexican-inspired dishes.

    Abbaye de Belloc

    Abbaye de Belloc is a semi-hard cheese produced by Benedictine monks in the Pyrenees region of France. It has a nutty and slightly sweet flavor with a smooth and firm texture. This cheese is often enjoyed on cheeseboards or paired with fruits and crusty bread.

    Cheese That Starts With B

    For cheeses that start with B, you'll find a tasty selection! Enjoy:

    Blue Cheese

    A type of cheese with a unique blue-green marbled appearance that comes from the presence of mold. Its flavor is strong yet creamy and slightly salty. Blue cheese pairs perfectly with fruit, nuts and Chicken Caesar Salad.

    blue cheese slice.

    Brie

    Brie cheese, originating from France, is a soft and creamy cheese with a bloomy rind. It has a mild and buttery flavor with earthy undertones. Brie is often enjoyed on its own, spread on crackers, or baked until gooey and served with fruits.

    Brie Cheese Slices

    Brick

    Brick cheese is a semi-soft cheese that originated in the United States. It has a mild and slightly tangy flavor with a creamy texture. Brick cheese is commonly used in sandwiches, grilled cheese, or melted on pizzas.

    Burrata

    Burrata is an Italian cheese made of mozzarella and cream. It has a mild and buttery flavor with a soft and creamy texture. This cheese is often served fresh with a drizzle of olive oil, salt, and pepper.

    Cheese That Starts With C

    Here are 4 cheeses that start with C. Whether it's a creamy camembert or an Italian caciocavallo , your taste buds will be delighted:

    Cheddar

    Cheddar is one of the most popular types of cheese in the world! It’s a hard yellow or white cheese that has a sharp taste. It can be used for anything from nachos to Instant Pot Mac & Cheese. Made from cheese curds , this cheese has a crumbly texture.

    Camembert

    Camembert cheese, also from France, is a soft and creamy cheese with a white, bloomy rind. It has a rich and buttery flavor, similar to Brie but slightly stronger. Camembert is often enjoyed baked, spread on bread, or paired with fruits and nuts.

    Camembert cheese
    Various types of cheese, blue cheese, bree, camambert and wine on a wooden table

    Cottage Cheese

    Cottage cheese is a type of cheese made from cow’s milk. This healthy cheese has a mild, slightly tangy flavor and a soft, crumbly texture. Cottage cheese is often enjoyed on its own or added to salads, pasta dishes, and other recipes.

    cottage cheese in a brown bowl.

    Cacocavallo:

    Caciocavallo is an Italian cheese that is typically made from cow's milk. It has a smooth and elastic texture with a mild and slightly tangy flavor. Caciocavallo is often enjoyed melted on bread or used in pasta dishes.

    Colby:

    Colby cheese is an American-made cheese that has a mild flavor and semi-soft texture. It’s perfect for grating over salads, melting in sandwiches, or adding to pasta dishes.

    Cotija:

    Cotija is a Mexican cheese that has a hard, crumbly texture and salty flavor. This crumbly cheese is often used as an ingredient in tacos or quesadillas, or crumbled over salads and soups. We use cotija in our Best Sabana de Res and Cheesy Mexican Steak And Rice recipes.

    Cheese That Starts With D

    For cheeses that start with D, you can try one of these tantalizing cheese flavors.

    Danish Blue:

    This semi-soft cheese has a mild, slightly sweet flavor and is known for its bright blue veins of mold running through it. Danish Blues are perfect for salads or just eaten on their own as a snack!

    Double Gloucester

    Double Gloucester is an English cheese with a firm and smooth texture. It has a rich and full-bodied flavor, slightly tangy and nutty. Double Gloucester is commonly used in sandwiches, cheese boards, and traditional British dishes.

    Dolcelatte

    Dolcelatte is an Italian blue cheese with a creamy and spreadable texture. It has a milder and sweeter flavor compared to other blue cheeses. Dolcelatte is often crumbled onto salads, used in dressings, or enjoyed with fresh fruits.

    Dunlop Cheese

    Dunlop cheese is a Scottish cheese with a firm and slightly crumbly texture. It has a mild, nutty flavor and is commonly used in casseroles or melted over root vegetables.

    Cheese That Starts With E

    There are plenty of cheeses that start with E from Edamto emmentaler. You'll love these tasty E cheeses:

    Edam

    Edam is a semi-hard cheese that is primarily produced in the Netherlands. It has a slightly nutty flavor and creamy texture, making it great for cheese plates or a grilled cheese sandwich.

    Emmental

    Emmental cheese, also known as Swiss cheese, is a medium-hard cheese with characteristic large holes. It has a mild and nutty flavor, making it popular for sandwiches, fondues, and gratins. Emmental pairs well with cured meats.

    13 Best Substitutes for Emmental Cheese

    Edelpilz

    Edelpilz cheese is a German blue cheese with a creamy and spreadable texture. It has an earthy, nutty flavor and pairs well with fruits, nuts, and wine. Edelpilz is perfect for adding to salads, spreading on crackers, or melting over vegetables.

    Edelpilz cheese

    Cheese That Starts With F

    Now we can look at cheeses that start with F:

    Feta

    Feta cheese originates from Greece and is made from sheep's or goat's milk. It has a tangy and salty taste, with a crumbly texture. Feta is commonly used in Greek salads, pastries, and as a topping for various dishes. Try our Greek Feta Pasta Salad recipe here!

    Feta Cheese

    Fontina

    Fontina cheese, hailing from Italy, is a semi-soft cheese with a pale yellow color. It has a mild and nutty flavor with a creamy and smooth texture. Fontina is often used in melting dishes, such as fondues, pasta, grilled cheese sandwiches and french onion soup.

    Fromage Blanc

    Fromage Blanc is a fresh and creamy cheese that originated in France. It has a slightly tangy flavor and a smooth, spreadable texture. Fresh cheeses from Fromage Blanc is versatile and can be used in both sweet and savory recipes, such as cheesecakes, dips, and desserts.

    Fourme D'Ambert

    Fourme d'Ambert is a French blue cheese made from cow's milk. It has a creamy and tangy flavor with a slightly sweet undertone. This cheese is often crumbled onto salads, used in dressings, or enjoyed with crusty bread and fruits.

    Cheese That Starts With G

    Here are 5 cheeses that start with G:

    Gouda

    Gouda cheese, hailing from the Netherlands, is a semi-hard cheese known for its mild and slightly sweet flavor. It has a smooth and creamy texture and is often enjoyed on cheese boards or melted in sandwiches and casseroles. Check out this Gouda Mac and Cheese Recipe.

    Gorgonzola

    Gorgonzola cheese is an Italian blue cheese with a crumbly and creamy texture. It has a sharp and tangy flavor, characteristic of blue cheeses. Gorgonzola is often crumbled onto salads, used in dressings, or enjoyed with crusty bread and honey.

    Gruyère

    Gruyère cheese is a Swiss cheese that is known for its nutty and slightly sweet flavor. It has a firm and creamy texture. Gruyère is often used in fondue, quiches, and gratins.

    Gruyere Cheese.

    Goat Cheese

    Goat cheese, also known as chèvre, is a versatile cheese made from goat's milk. It has a creamy texture and can vary in flavor from mild and tangy to strong and pungent. Goat cheese is used in various culinary applications, including salads, pastas, and desserts.

    Goat Cheese.

    Grana Padano

    Grana Padano is an Italian hard cheese similar to Parmesan. It has a granular texture and a rich, nutty flavor. Grana Padano is often grated over pasta dishes, risottos, and salads.

    Garrotxa

    Garrotxa is a Spanish goat cheese from the Catalonia region. It has a semi-soft texture and a distinctive flavor that is earthy, slightly nutty, and mildly acidic. Garrotxa is often enjoyed on its own, with fruits, or used in salads and sandwiches.

    Cheese That Starts With H

    These cheeses that start with H are sure to please your palate:

    Halloumi

    This unique cheese originates from Cyprus and is made from a mixture of goat's and sheep's milk. Halloumi has a high melting point, allowing it to be grilled or fried without losing its shape. It has a salty and tangy taste and is often served as a grilled cheese or added to salads.

    Havarti

    Havarti cheese, originating from Denmark, is a semi-soft cheese with small irregular holes. It has a buttery and slightly tangy flavor, with a creamy and smooth texture. Havarti is a firm cheese often enjoyed on sandwiches, cheese boards, or melted in recipes.

    Havilah

    Havilah cheese is an artisanal cheese produced in the United States. It has a firm and dense texture with a rich and nutty flavor. Havilah is often aged for a long period, which intensifies its taste. This cheese pairs well with fruits, nuts, and crusty bread.

    Herve

    Herve is a Belgian cheese made from cow's milk. It has a strong aroma and a pungent flavor. Herve cheese is often enjoyed on its own or used as a flavoring ingredient in various dishes.

    Huntsman

    Huntsman cheese is an English cheese that combines layers of Double Gloucester and Stilton. It has a unique appearance with a combination of orange and blue veins running through it. Huntsman cheese has a mellow and creamy flavor.

    Harzer

    Harzer cheese is a German sour milk cheese with a strong and tangy flavor. It has a distinctive odor and a crumbly texture. Harzer cheese is often enjoyed as a traditional snack or used in various German recipes.

    Humboldt Fog

    Humboldt Fog is an American artisanal goat cheese with a distinctive appearance. It has a creamy and crumbly texture, with a tangy and complex flavor. Humboldt Fog is often enjoyed on its own or paired with fruits and honey.

    Cheese That Starts With I

    These cheeses that start with I are all from Spain and couldn't be tastier.

    Iberico

    Iberico cheese comes from Spain and is made from a blend of cow's, sheep's, and goat's milk. It has a rich and buttery flavor with nutty undertones. This cheese is often enjoyed on its own or paired with cured meats and olives.

    Ibore

    Ibores cheese is a Spanish cheese made from goat's milk. It has a semi-hard texture with a slightly crumbly consistency. Ibores cheese has a tangy and slightly spicy flavor, owing to the paprika rubbed on its rind. It is often enjoyed on cheese boards or paired with cured meats.

    Istara

    Istara cheese is a Basque cheese made from sheep's milk. It has a semi-hard texture and a slightly sweet and nutty flavor. Istara is often enjoyed on its own, with fruits, or paired with cured meats.

    Cheese That Starts With J

    Try some cheeses that start with J for something different.

    Jarlsberg

    Jarlsberg cheese, originating from Norway, is a mild and nutty Swiss-style cheese. It has large holes and a smooth, creamy texture. Jarlsberg is commonly used in sandwiches, fondue, and as a topping for burgers.

    Jack

    Jack cheese, also known as Monterey Jack, is a mild and creamy American cheese. It has a pale yellow color and a smooth texture. Jack cheese is versatile and can be used in sandwiches, quesadillas, or melted on burgers and tacos.

    monterey jack cheese.

    Juustoleipä

    Juustoleipä, also known as "squeaky cheese" or Finnish bread cheese, is a mild and chewy cheese made from cow's milk. It has a slightly salty flavor and a unique texture that squeaks when you bite into it. Juustoleipä is often pan-fried and served warm.

    Jindi Brie

    Jindi Brie is an Australian brie cheese with a rich and creamy texture. It has a delicate and buttery flavor with a soft, edible rind. Jindi Brie is often enjoyed on cheese boards, spread on crackers, or paired with fruits.

    Cheese That Starts With K

    More cheeses that start with K.I think these will hit the spot:

    Kasseri

    Kasseri is a Greek cheese made from sheep's milk, although some varieties may include goat's or cow's milk. It has a slightly tangy and salty taste with a firm and slightly crumbly texture. Kasseri is often enjoyed grilled or used in Greek dishes such as saganaki.

    Kefalotyri

    Kefalotyri is a hard Greek cheese made from sheep's or goat's milk. It has a salty and sharp flavor, similar to Parmesan. Kefalotyri is often grated over dishes, used in Greek cuisine, or enjoyed as a table cheese.

    Kunik

    Kunik is a luxurious triple-cream cheese made in the United States. It's a blend of goat's milk and cow's cream, resulting in a creamy and decadent texture. Kunik has a rich and buttery flavor with a slight tanginess.

    Kashkaval

    Kashkaval is a semi-hard cheese commonly found in the Balkans and Eastern Europe. It has a smooth and elastic texture with a slightly nutty flavor. Kashkaval is often used in grilled sandwiches, pizzas, or melted in dishes.

    Cheese That Starts With L

    Try these cheeses that start with L for something different:

    Limburger

    Limburger cheese, originating from Belgium, is known for its pungent aroma and strong flavor. It has a soft and creamy texture with a reddish-orange rind. Limburger is often spread on crackers or bread and pairs well with onions and rye bread.

    Leicester

    Leicester cheese, also known as Red Leicester, is an English cheese with a firm and crumbly texture. It has a mellow and nutty flavor, slightly sweet and tangy. Leicester cheese is commonly used in sandwiches, cheeseboards, and traditional British recipes.

    L'Etivaz

    L'Etivaz is a Swiss alpine cheese made from raw cow's milk. It has a hard and crumbly texture with a nutty and slightly fruity flavor. L'Etivaz is often used in fondue and grated over dishes.

    Leerdammer

    Leerdammer cheese, originating from the Netherlands, is a semi-hard cheese with a mild and buttery flavour. It has a smooth and creamy texture. Leerdammer is often used in sandwiches, salads, or enjoyed on its own.

    Cheese That Starts With M

    Now for a taste of cheeses that start with M.

    Mozzarella

    Mozzarella cheese, originally from Italy, is a soft and mild cheese with a stringy texture. This string cheese is traditionally made from buffalo's milk but can also be produced using cow's milk. Fresh mozzarella is a staple in pizza, caprese salad, and various Italian dishes.

    Monterey Jack

    Monterey Jack cheese is an American semi-hard cheese with a mild and creamy flavor. This cow's milk cheese has a pale yellow color and a smooth texture. Monterey Jack is often used in melting dishes, such as quesadillas, macaroni and cheese recipe, or enjoyed on its own.

    Manchego

    Manchego is a Spanish cheese made from sheep's milk. It has a firm and compact texture with a buttery and slightly tangy flavor. Manchego is often enjoyed on cheeseboards, paired with quince paste, or used in traditional Spanish dishes.

    Manchego

    Maroilles

    Maroilles is a French cheese with a distinctive square shape and a strong aroma. It has a soft and creamy texture with a pungent and tangy flavor. Maroilles is often enjoyed on crusty bread or paired with fruits and nuts.

    Munster

    Munster is a French cheese with a washed rind and a distinct aroma. It has a creamy and smooth texture with a nutty and tangy flavor. Munster is often enjoyed on its own or used in cooking and sauces.

    Marscapone

    Marscapone is an Italian cheese made from cream and tartaric acid. It has a soft and creamy texture with a sweet, slightly acidic flavor. Marscapone is often used in desserts such as tiramisu or cannoli, as well as savory dishes like lasagna. Perfect for both sweet and savory dishes.

    Cheese That Starts With N

    Here are a list of cheeses that start with N

    Neufchâtel

    Neufchâtel cheese is a soft, creamy cheese that originated in France. It has a mild and slightly tangy flavor, similar to cream cheese. Neufchâtel is often spread on bagels, used in cheesecakes, or enjoyed with fruits and crackers.

    Nacho Cheese

    Nacho cheese is a processed cheese sauce often used as a topping for nachos. It has a smooth and creamy texture with a mild and tangy flavor. Nacho cheese is a popular choice for snacking or as a condiment for Tex-Mex dishes.

    Nisa

    Nisa cheese is a Portuguese cheese made from sheep's milk. It has a semi-soft texture with a buttery and slightly tangy flavor. Nisa is often enjoyed on its own, with fruits, or used in salads and sandwiches.

    Nokkelost

    Nokkelost is a Norwegian cheese that's flavored with cumin, caraway seeds, and cloves. It has a semi-hard texture and a spicy, aromatic taste. Nokkelost is often enjoyed on bread or paired with fruits and nuts.

    Normandy Camembert

    Normandy Camembert is a soft and creamy French cheese with a bloomy rind. It has a rich and buttery flavor with earthy undertones. Normandy Camembert is often enjoyed baked, spread on bread, or paired with fruits and nuts.

    Nduja

    Nduja is an Italian spreadable salami that's often considered a cheese because of its creamy texture. It's made with pork, Calabrian chili peppers, and spices, giving it a spicy and intense flavor. Nduja is commonly used as a condiment for Homemade Mini Pizzas, pasta, and sandwiches.

    Nantais

    Nantais is a French cheese with a semi-hard texture and a slightly tangy taste. It's often compared to Gouda, but it has a milder flavor. Nantais is great for snacking, cheese platters, or used in cooking and recipes.

    Cheese That Starts With O

    A list of cheeses that start with O. Which will you try?

    Oaxaca

    Oaxaca cheese, also known as quesillo, is a Mexican cheese with a mild and buttery taste. It has a stringy and elastic texture, making it ideal for melting. Oaxaca cheese is commonly used in quesadillas, enchiladas, and other Mexican dishes.

    Oka

    Oka cheese, hailing from Canada, is a semi-soft cheese with a smooth and creamy texture. It has a buttery and nutty flavor, with a mild aroma. Oka cheese is often used in sandwiches, cheeseboards, or melted in recipes.

    Olivet Cendré

    Olivet Cendré is a French goat's milk cheese with a soft and creamy texture. It has a delicate and slightly tangy flavor with a natural ash-covered rind. Olivet Cendré is often enjoyed spread on bread or crackers.

    Ossau-Iraty

    Ossau-Iraty is a traditional French cheese made from sheep's milk in the Pyrenees region. It has a firm and smooth texture with a nutty and slightly sweet flavor. Ossau-Iraty is often enjoyed on its own or paired with fruits and nuts.

    Ossolano

    Ossolano is an Italian cheese made from a blend of cow's and goat's milk. It has a semi-soft texture with a rich and buttery flavor. Ossolano is often used in cooking, melted over pasta dishes, or enjoyed on cheese platters.

    Orkney Cheddar

    Orkney Cheddar is a Scottish cheese with a crumbly texture and a sharp and tangy flavor. It's aged for at least nine months to develop its robust taste. Orkney Cheddar is commonly used in sandwiches, burgers, and cheese boards.

    Oschtjepka

    Oschtjepka is a Croatian cheese made from sheep's milk. It has a hard texture and a slightly salty taste. Oschtjepka is often enjoyed as a snack or grated over various dishes.

    Cheese That Starts With P

    Here are some cheeses that start with P.

    Parmesan

    Parmesan cheese, or Parmigiano-Reggiano, is a hard and granular cheese originating from Italy. It has a sharp and nutty flavor, which intensifies with age. Parmesan is often grated over pasta dishes, salads, and soups.

    Some of our favortie recipes with parmesan are Creamy Cajun Pasta Sauce with Parmesan and Air Fryer Asparagus with Parmesan.

    Pecorino

    Pecorino is an Italian cheese made from sheep's milk. It comes in various varieties, including Pecorino Romano and Pecorino Toscano, each with its distinct flavor profile. Pecorino has a salty and tangy taste, and it is commonly grated over pasta, salads, and soups.

    Provolone

    Provolone is an Italian cheese with a semi-hard texture. It comes in two varieties: Dolce (mild and buttery) and Piccante (sharp and piquant). Provolone is often used in sandwiches, pizzas, and as a table cheese.

    PROVOLONE CHEESE.

    Port-Salut:

    Port-Salut is a semi-soft French cheese with a smooth texture and a mild, nutty flavor. It's often enjoyed on cheese platters, sandwiches, or melted in recipes. Grab your cheese board and add some port-salut to it today.

    Paneer:

    Paneer is a fresh cheese commonly used in Indian cuisine. It has a soft and crumbly texture and a mild, milky flavor. Paneer is often used in curries, gravies, and vegetarian dishes.

    Paneer Cheese.

    Pouligny-Saint-Pierre:

    Pouligny-Saint-Pierre is a French goat cheese with a pyramid shape. It has a dense and creamy texture with a delicate flavor. Pouligny-Saint-Pierre is often enjoyed on its own or paired with fruits and honey.

    Cheese That Starts With Q

    Here are a list of cheeses that start with Q, from quark to Queso blanco, for you to try:

    Queso Fresco:

    Queso fresco is a mild Mexican cheese with a crumbly texture. It has a milky and slightly salty flavor, making it great for snacking or melting. Queso fresco is often used in fish tacos, burritos, and other traditional dishes.

    Queso Fresco

    Quark:

    Quark is a fresh and creamy cheese that originated in Germany. It has a mild and tangy flavor, similar to yogurt or sour cream. Quark is versatile and can be used in both sweet and savory recipes, such as cheesecakes, dips, and spreads.

    Queso Blanco:

    Queso Blanco is a Mexican cheese with a mild and fresh flavor. It has a crumbly texture and a slightly tangy taste. Queso Blanco is often used in Mexican cuisine, such as in tacos, Air Fryer Enchiladas, or crumbled-over salads.

    Queso de Bola:

    Queso de Bola, also known as Edam cheese, is a Dutch cheese with a semi-hard texture. It has a mild and slightly sweet flavor. Queso de Bola is often enjoyed on its own, with fruits, or used in sandwiches.

    Queso Oaxaca:

    Queso Oaxaca, also known as quesillo, is a Mexican cheese with a mild and buttery taste. It has a stringy and elastic texture, making it ideal for melting. Queso Oaxaca is commonly used in quesadillas, enchiladas, and other Mexican dishes.

    Cheese That Starts With R

    Cheeses that start with R include ricotta, roquerfort and raclette.

    Ricotta:

    Ricotta cheese is an Italian whey cheese with a mild and slightly sweet flavor. It has a creamy and grainy texture. Ricotta is often used in Italian desserts like cannoli or as a filling for pasta dishes such as lasagna.

    Roquefort:

    Roquefort cheese, from France, is a famous blue cheese made from sheep's milk. It has a rich, tangy, and slightly salty taste. Roquefort is often crumbled into salads, used in dressings, or enjoyed with crusty bread and fruit.

    Raclette:

    Raclette is a Swiss and French cheese that is known for its excellent melting properties. It has a semi-firm texture with a creamy and nutty flavor. Raclette is traditionally melted and scraped onto potatoes, vegetables, or bread.

    Red Leicester:

    Red Leicester is an English cheese with a smooth, firm texture and a mellow, slightly nutty flavor. It has a reddish-orange color, achieved by adding annatto during the cheesemaking process. Red Leicester is often used in sandwiches, toasties, or cheese platters.

    Romano:

    Romano cheese, also known as Pecorino Romano, is an Italian hard cheese made from sheep's milk. It has a sharp and salty flavor, making it perfect for grating over pasta dishes, soups, and salads.

    Pecorino Romano.

    Cheese That Starts With S

    For cheeses that start with S, you'll have oo many to choose from.

    Swiss:

    Swiss cheese, also known as Emmental or Gruyère, is a medium-hard cheese with large holes. It has a mild and nutty flavor, making it popular for sandwiches, fondues, and gratins. Swiss cheese pairs well with cured meats and pickles.

    Stilton:

    Stilton cheese is an English blue cheese with a crumbly and creamy texture. It has a strong and tangy flavor, characterized by blue cheeses. Stilton is often crumbled onto salads, used in dressings, or enjoyed with crackers and grapes.

    Stinking Bishop:

    Stinking Bishop is an English cheese with a washed rind and a pungent aroma. It has a creamy and smooth texture with a rich and savory flavor. Stinking Bishop is often enjoyed on cheeseboards or used in cooking and sauces.

    Saint André:

    Saint André is a triple-cream French cheese with a rich and buttery flavor. It has a soft and creamy texture that melts in your mouth. Soft cheeses such as Saint André is often enjoyed spread on bread or crackers.

    Smoked Gouda:

    Smoked Gouda is a variation of Gouda cheese that is infused with a smoky flavor. It has the same mild and slightly sweet taste as regular Gouda but with a delightful smokiness. Smoked Gouda is often used in sandwiches, cheese platters, or enjoyed on its own

    Gouda Cheese.

    Sbrinz:

    Sbrinz is a hard Swiss cheese with a dense and granular texture. It has a nutty and savory flavor, similar to Parmesan. Sbrinz is often grated over pasta dishes, risottos, and salads

    Shropshire Blue:

    Shropshire Blue is an English blue cheese with a creamy texture and a milder flavor compared to other blue cheeses. It has a slightly sweet and nutty taste. Shropshire Blue is often crumbled onto salads or enjoyed with fruits and honey.

    San Simon:

    San Simon is a Spanish smoked cheese made from cow's milk. It has a semi-firm texture with a distinct smoky aroma and a slightly nutty flavor. San Simon is often enjoyed on cheeseboards, melted in sandwiches, or used in cooking.

    St. George:

    St. George is an American cheese inspired by British cheddar. It has a smooth and firm texture with a slightly tangy and savory flavor. St. George is often used in sandwiches, grilled cheese, or as a table cheese.

    Cheese That Starts With T

    Here are some cheeses that start with T.

    Taleggio:

    Taleggio cheese, hailing from Italy, is a semi-soft cheese with a fruity and tangy taste. It has a creamy and buttery texture with a pinkish rind. Taleggio is often used in pasta dishes, risottos, and served alongside fresh fruits.

    Tillamook:

    Tillamook cheese is an American cheddar cheese produced in Oregon. It has a creamy texture with a rich and slightly tangy flavor. Tillamook cheese is commonly used in sandwiches, burgers, or enjoyed on its own.

    Tête de Moine:

    Tête de Moine is a Swiss cheese with a firm and dense texture. It has a nutty and slightly spicy flavor. Tête de Moine is often served in thin shavings created using a special tool called a "girolle."

    Tomme:

    Tomme is a general term for various types of cheese in the French and Swiss Alps. It comes in different varieties, such as Tomme de Savoie and Tomme de Chevre. Tomme cheeses generally have a semi-soft to semi-hard texture with a mild and earthy flavor.

    Truffle Cheese:

    Truffle cheese is a type of cheese infused with real truffles or truffle flavor. It can be made with various cheese bases, such as cheddar or brie, and has a luxurious and distinctive truffle aroma and taste.

    Telemes:

    Telemes is a Greek cheese made from sheep's milk or a blend of sheep's and goat's milk. It has a soft and creamy texture with a tangy and slightly salty flavor. Telemes is often enjoyed on its own, in salads, or grilled.

    Tybo:

    Tybo is a Danish cheese with a semi-firm texture and a mild, nutty flavor. It is often compared to Dutch Edam cheese. Tybo is commonly used in sandwiches, grated over dishes, or as a table cheese.

    Cheese That Starts With U

    For cheeses that start with U, try one of these:

    Urgelia:

    Urgelia is a semi-soft cheese produced in Spain, specifically in Catalonia. It has a buttery and slightly tangy flavor with a creamy texture. Urgelia is often enjoyed on cheese boards, melted in sandwiches, or incorporated into sauces and dips.

    Ubriaco:

    Ubriaco cheese, hailing from Italy, is a semi-hard cheese that is soaked or washed in wine during the aging process. It has a complex flavor with hints of fruitiness from the wine. Ubriaco cheese is often enjoyed on cheese boards or paired with cured meats.

    Usigliano:

    Usigliano is an Italian cheese made from cow's milk. It has a semi-soft texture with a creamy and buttery flavor. Usigliano is often enjoyed on its own, with fruits, or used in pasta dishes and gratins.

    Usban:

    Usban is a traditional cheese from Yemen made from cow's milk. It has a firm texture and a tangy, slightly sour flavor. Usban is often enjoyed with bread, fruit, or in traditional Yemeni dishes.

    Cheese That Starts With V

    Here are some cheeses that start with the letter V:

    Valdeón

    Valdeón cheese is a Spanish blue cheese made from cow's and goat's milk. It has a strong and tangy flavor, similar to Roquefort. Valdeón is often crumbled onto salads, used in sauces, or enjoyed with crackers and honey.

    Vacherin

    Vacherin cheese is a Swiss cheese with a soft and creamy texture. It has a mild and slightly nutty flavor, similar to Brie. Vacherin is often enjoyed melted as a fondue or baked until gooey and served with crusty bread.

    Vermont Cheddar

    Vermont Cheddar is an American cheese made in Vermont. It has a firm and crumbly texture with a sharp and tangy flavor. Vermont Cheddar is commonly used in sandwiches, burgers, or enjoyed on its own.

    Vernotte

    Vernotte is a French cheese made from cow's milk. It has a firm texture and a sweet, nutty flavor with hints of fruit. Vernotte is often enjoyed on cheeseboards or paired with crusty bread and fruits.

    Vinho Verde:

    Vinho Verde is a Portuguese cheese made from cow's, sheep's, or goat's milk. It has a semi-hard texture with a slightly tangy and earthy flavor. Vinho Verde is often enjoyed with wine or served in traditional Portuguese dishes.

    Vlaskaas

    Vlaskaas is a Dutch cheese with a semi-hard texture and a sweet, nutty flavor. It is made from cow's milk and is often enjoyed on bread, in salads, or on cheese platters.

    Cheese That Starts With W

    Here are some cheeses that start with W.These are super tasty and are sure to impress:

    Wensleydale

    Wensleydale cheese, originating from England, is a crumbly and slightly sweet cheese. It has a creamy and moist texture, with a mild and fruity taste. Wensleydale is often enjoyed on its own or paired with fruits, such as cranberries or apricots.

    White Cheddar

    White cheddar is a variety of cheddar cheese that does not contain annatto, a natural food coloring that gives regular cheddar its orange color. It has a sharp and tangy flavor with a crumbly texture. White cheddar is commonly used in cheese boards, sandwiches, and macaroni and cheese.

    Washed Rind

    Washed rind cheeses are a diverse group of cheeses that undergo a specific washing process during aging. The washing involves the application of liquids such as beer, wine, or brine, which contributes to their distinct flavors and aromas. Examples include Munster, Limburger, and Taleggio.

    Winnimere

    Winnimere is an American cheese made by Jasper Hill Farm in Vermont. It is a soft, washed-rind cheese with a rich and buttery flavor. Winnimere is wrapped in spruce bark, which imparts unique flavors and aromas. It is often served with crusty bread or paired with charcuterie.

    Weinkase

    Weinkase, also known as "wine cheese," is a German cheese that is washed or soaked in wine during the aging process. It has a semi-firm texture and a fruity, tangy flavor. Weinkase pairs well with German wines and is often enjoyed on cheese platters.

    Cheese That Starts With X

    Here is one cheese that start with the letter X

    Xynotyro

    Xynotyro is a traditional Greek cheese made from sheep's or goat's milk. It has a rich and tangy flavor, similar to a cross between feta and ricotta. Xynotyro is commonly used in Greek salads, pastries, and spreads.

    Cheese That Starts With Y

    Here are some cheeses that start with Y.

    Yarg

    Yarg cheese is a Cornish cheese from England that is wrapped in nettle leaves, giving it a unique appearance. It has a creamy and slightly crumbly texture with a mild and buttery flavor. Yarg is often enjoyed on cheese boards or in sandwiches.

    Yorkshire Blue

    Yorkshire Blue cheese, originating from England, is a mild and creamy blue cheese. It has a buttery flavor with gentle blue veins running through it. Yorkshire Blue is often crumbled onto salads, used in dressings, or enjoyed with crackers and honey.

    Yellow Buck

    Yellow Buck is a type of artisanal cheese produced in the United Kingdom. It is a semi-hard cheese made from cow's milk and has a smooth and creamy texture. The cheese has a slightly sweet and nutty flavor profile, making it a versatile choice for various dishes.

    Yarra Valley Persian Fetta

    Yarra Valley Persian Fetta is an Australian cheese made from cow's milk. It has a creamy and soft texture with a tangy and salty flavor. Yarra Valley Persian Fetta is often marinated in oil and herbs, making it perfect for salads and antipasto platters.

    Cheese That Starts With Z

    And finally, here are some cheeses that start with Z:

    Zamorano

    Zamorano cheese, originating from Spain, is a hard cheese made from sheep's milk. It has a rich and nutty flavor with a firm and crumbly texture. Zamorano is often grated over dishes or enjoyed alongside cured meats and olives.

    Ziegenkäse

    Ziegenkäse, which translates to "goat cheese" in German, refers to a variety of goat cheeses produced in Germany. These cheeses can have different textures and flavors, ranging from creamy and mild to firm and tangy. Ziegenkäse is often enjoyed on its own, in salads, or used in various German dishes.

    Enjoy the Different Cheeses From Around the World

    Now that you’ve embarked on this exciting journey through the world of cheese, you’re ready to unlock a whole new level of cheesy bliss!

    From creamy, rich flavors to bold, tangy bites, there’s a world of variety just waiting to be explored.

    Whether you’re a seasoned cheese enthusiast or a curious foodie eager to try something new, these cheeses promise to add a burst of joy to your next meal.

    So don’t wait—dive into the delicious possibilities and sprinkle some cheesy magic on your next culinary adventure! You deserve it!

    Best Soup Recipes Ever:

    • Instant Pot Chinese Dumpling Soup
    • Instant Pot Chicken Pot Pie Soup
    • Instant Pot Enchilada Soup
    • Recipe For Zuppa Toscana Soup
    • Instant Pot Split Pea Soup

    Cream Cheese Vs Cottage Cheese

    October 10, 2024 by Angela Milnes

    A bowl of cottage cheese and a bowl of cream cheese.

    Cream cheese and cottage cheese are two types of soft cheese that are commonly used in the kitchen. Although both cheeses are delicious and versatile, they have different flavors and uses.

    In this article, we will discuss the difference between cream cheese and cottage cheese and give you helpful ideas for using them in your cooking. Let's get started!

    A bowl of cottage cheese and a bowl of cream cheese.
    [feast_advanced_jump_to]

    Cream Cheese In Comparison With Cottage Cheese

    Cream cheese is a smooth, creamy cheese made from a combination of sweet milk and cream.

    It has a subtly sweet, milky taste, mildly tangy flavor, and spreadable texture that is perfect for spreading on bagels, toast, or crackers. Cream cheeses are also commonly used in bagels, salads, within a cake batter, and as a topping.

    Cottage cheese, on the other hand, has a slightly salty and sour flavor and a lumpy, creamy wetness. While cream cheese retains most water, cottage cheese is drained after processing, leaving solid pieces in curdles.

    Cottage cheeses are often used in dips, pancakes, casseroles, and desserts and can be a substitute for ricotta cheese.

    Cream Cheese and Cottage Cheese.

    Nutritional Content

    Cream and cottage cheese have different nutritional profiles, and their nutritional content can vary depending on the brand. Here's a comparison of the basic nutritional content of 29 grams of regular cream cheese versus regular cottage cheese:

    Cream Cheese: 29 Grams Serving

    According to Nutritionix:

    • Calories: 102
    • Total Fat: 10 grams
    • Saturated fat: 5 grams
    • Cholesterol: 29 milligrams
    • Carbohydrates: 1.6 gram
    • Protein: 1.8 grams
    • Sodium: 91 milligrams

    Cottage Cheese (Non-Fat): 29 Grams Serving

    According to Fatsecret:

    • Calories: 25
    • Fat: 0.12 gram
    • Saturated fat: 0.079 gram
    • Cholesterol: 2 milligrams
    • Carbohydrates: 0.54 gram
    • Protein: 5.01 grams
    • Sodium: 4 milligrams

    Make sure to check the nutrition label to ensure the cheese you're buying fits your dietary needs and goals!

    How to Prepare These Soft Cheeses?

    You can make homemade cream cheese and cottage cheese, but the process can be a bit different for each.

    Cream Cheese:

    First, here is how to make cream cheese from scratch:

    Ingredients

    • 4 cups full-fat whole cow's milk
    • ¼ teaspoon of salt
    • 2-3 tablespoons of freshly squeezed lemon juice

    Instructions

    1. The first step is curdling milk. Heat the whole milk in a heavy-bottomed saucepan over medium-high heat to a rolling simmer. Reduce the heat to medium and add lemon juice one tablespoon at a time, in 1-minute intervals, while stirring constantly.
    2. Keep cooking until the mixture curdles, which should take just a few minutes. Stir constantly until the mixture separates, with thick curdles on top and a green liquid on the bottom. Remove from heat.
    3. Place a cheesecloth-lined sieve over a bowl and strain the curd mixture through it. Allow it to strain and cool for 15 minutes
    4. Once cooled, transfer the curds to a food processor and process until they come together and are smooth and creamy, which should take around 3-4 minutes. Keep going if the cream cheese is still grainy.
    5. Add salt to taste and any herbs, garlic, or other flavors you like.
    6. Store the cream cheese in the fridge and use it for 7 days to 2 weeks.
    cheese in a fridge.

    Cottage cheese:

    Meanwhile, here are the steps in making cottage cheese:

    Ingredients

    • 1 gallon of whole milk
    • ¾ cup of white vinegar
    • 1 teaspoon of salt

    Instructions

    1. Heat the milk in a large pot over medium heat until it reaches 190°F.
    2. Remove your pot from the heat and stir in the vinegar (milk curdling process). Cover and let the mixture sit for 30 minutes.
    3. Place a colander lined with cheesecloth over a bowl. Pour the mixture into the colander and let it drain for 30 minutes.
    4. Gather the corners of the cheesecloth and rinse the curd under cold water for 3 to 5 minutes. Continue squeezing and moving the mixture until it has cooled completely.
    5. Pour the cheese from the cloth into a bowl and use a spoon to crumble it into small curds.
    6. Flavor cottage cheese by mixing in salt to your liking.

    Uses of Fresh Cheese

    Cream cheese and cottage cheese are two types of cheese that have different textures and flavors, and as such, they are used in different ways in recipes. Here are some common uses of cream cheese and cottage cheese:

    Cream Cheese Uses

    • As a spread: Cream cheese is often used as a spread on bagels, toast, crackers, and sandwiches.
    • In baking: Cream cheese is a common ingredient in desserts such as cheesecakes, frosting, and cream fillings for pastries.
    • In dips: Cream cheese is a popular ingredient in savory dips, such as buffalo chicken dip and spinach and artichoke dip.
    • In pasta dishes: Cream cheese can be used as a sauce base for pasta dishes, such as Shrimp Fettuccine Alfredo.
    fettucine, shrimp and chicken alfredo on a plate.

    Cottage Cheese Uses

    • In salads: Cottage cheese can be added to salads for a boost creaminess.
    • In baked goods: Cottage cheese can be used in baked goods such as muffins, pancakes, and quick breads to add moisture.
    • In casseroles: Cottage cheese is a common ingredient in casseroles, such as lasagna and baked ziti, to add creaminess.

    Cream and cottage cheese can also be used in various other ways, such as in smoothies, omelets, and topping for baked potatoes. The choice between cream cheese or cottage cheese often comes down to the specific recipe and desired texture and flavor.

    Shelf Life

    Cream cheese and cottage cheese can have different shelf lives depending on the brand and how you store them.

    If you've got unopened cream cheese, it can last up to two weeks past the sell-by date as long as it's stored at or below 40°F (4°C). Once you open it, make sure to eat it within 7-10 days.

    Meanwhile, cottage cheese has a shorter shelf life than cream cheese. If it's unopened, it can last up to one week past the sell-by date in the fridge. But once you open it up, it's best to eat it within 5-7 days.

    kitchen fridge.

    Can I Use Cottage Instead of Cream Cheese and Vice Versa?

    Typically, avoid swapping cottage cheese for cream cheese or vice versa due to differing textures, consistencies, and flavors impacting your recipe. However, some situations may allow for making these substitutions.

    If you are using cream cheese as a spread on a bagel or as a dip, you may be able to substitute cottage cheese that has been blended until smooth or mixed with other ingredients like yogurt or sour cream to achieve a creamier texture.

    However, keep in mind that the flavor will not be exactly the same as cream cheese.

    Enjoy Cottage Cheese and Cream Cheese

    In conclusion, both cream cheese and cottage cheese offer unique flavors, textures, and uses in the kitchen.

    Cream cheese, with its creamy smoothness, is perfect for spreads, desserts, and sauces, while cottage cheese brings a lumpy, tangy touch to salads, casseroles, and baked goods.

    Understanding their differences can help you make the best choice for your recipes, enhancing your meals whether you crave the richness of cream cheese or the lightness of cottage cheese.

    So, the next time you're whipping up a dish, try incorporating these versatile cheeses into your cooking and explore new ways to enjoy them!

    You may also enjoy the following

    • Ricotta Cheese vs Cottage Cheese
    • Is Cottage Cheese A Slider Food

    19 Best Cottage Cheese Substitute Options

    October 10, 2024 by Angela Milnes

    Cottage cheese substitute options.

    Do you ever find yourself in a pickle when your recipe calls for cottage cheese, but you're all out?

    Don't worry—you're not alone!

    Luckily, there are plenty of alternatives to using cottage cheese in your recipes that will add the same creamy texture and richness without making an inconvenient trip to the store.

    In this article, we will uncover all the best cottage cheese substitute alternatives, so you can keep your recipes delicious and nutrient-packed!

    Cottage cheese in a brown bowl. Learn about cottage cheese substitute.
    [feast_advanced_jump_to]

    What Is Cottage Cheese?

    Made from pasteurized cow's milk curds, cottage cheese is a type of fresh cheese. The production process involves adding an acidic substance, typically vinegar or lemon juice, to warm milk to cause it to curdle.

    Excess moisture is removed by rinsing or pressing the curds after being separated from the whey.

    19 Cottage Cheese Substitutes

    Are you tired of using cottage cheese in your recipes or simply looking for cottage cheese substitute options? Here are the 19 best alternatives to try out:

    1. Ricotta Cheese

    If you're looking for a healthy and flavorful substitute for cottage cheese, ricotta cheese is your answer!

    Hailing from Italy, ricotta is a creamy cheese perfect for any dish that calls for cottage cheese.

    It is a great substitute and has a unique flavor profile that will take your Italian recipes to the next level.

    Ricotta cheese in containers.

    Whether you want to make lasagna, stuffed shells, or simply top a salad, ricotta cheese satisfies your craving for rich and creamy cheese!

    2. Fromage Blanc

    Have you ever heard of Fromage Blanc?

    With its creamy, soft texture and sweet flavor, this white cheese is the perfect substitute for cottage cheese! Fromage Blanc originates from Northern France and is often used in French cuisine as a tastier alternative to other creamy cheeses.

    Fromage Blanc cheese in a bowl.

    Fromage Blanc is made from whole or skim milk and has a mild taste, with a hint of sweetness, somewhat like a buttery Greek yogurt. The cheese's smooth texture makes it a versatile option for any dish that calls for cottage cheese.

    3. Egg Whites

    If you're looking for a healthy and tasty alternative to cottage cheese, egg whites might be a perfect choice! They are an excellent source of protein and low in calories and fat, making them an ideal ingredient for those watching their waistline.

    One way to enjoy egg whites is by making an egg white omelet, which you can customize with your favorite veggies and seasonings.

    But you can also use them as whipped egg whites by blending them, as a cottage cheese substitute in recipes like salads, dips, and smoothies!

    4. Greek Yogurt

    Greek yogurt is an excellent alternative to cottage cheese because it has a similar creamy texture and tangy flavor but with fewer calories and fat. It's also high in protein, calcium, and probiotics, making it a healthy option for your diet.

    Greek yogurt in a bowl.

    Greek yogurt can be used in the same ways as cottage cheese, such as a topping for sweet or savory dishes or as a base for dips and spreads.

    5. Parmesan Cheese

    Parmesan cheese is a delicious substitute for cottage cheese in various savory recipes. This Italian cheese adds a rich and nutty flavor to many dishes, making it an excellent choice for those who prefer a more intense taste.

    Parmesan cheese is also low in lactose, making it a good option for lactose-intolerant people. You can use a substitute for cottage cheese in many dishes, such as lasagna, pasta bakes, and casseroles.

    Parmesan cheese on a chopping board.

    However, it is important to note that Parmesan cheese has a different texture than cottage cheese, so it may be necessary to adjust the recipe or use it in combination with another ingredient to achieve the desired consistency.

    6. Kefir Cheese

    This tangy treat is one of the best cottage cheese alternatives for those who typically use cottage cheese in their meals or snacks.

    Kefir cheese is made from kefir milk, a fermented dairy product rich in probiotics. This means that it not only tastes great, but it can also help promote good gut health.

    Kefir cheese on wooden spoon.

    7. Feta Cheese

    Feta cheese is a tangy and salty cheese that can give your recipes a unique twist.

    To achieve a cottage cheese texture, simply blend the feta cheese with some heavy cream in a food processor. This will result in a creamy and savory cheese mixture that could work well in various dessert recipes.

    8. Cream Cheese

    This versatile ingredient has a soft texture and a rich, indulgent taste that can add a touch of luxury to any recipe.

    Not only is cream cheese a delicious base for sweet recipes like cheesecake, frosting, and fruit dips but it can also be used in savory dishes like stuffed vegetables or dips.

    9. Whipped Heavy Cream

    For those trying to cut back on dairy or simply looking for a healthier alternative, using whipped heavy cream as a substitute for cottage cheese could offer a delicious solution.

    While you may have previously relied on pureed or blenderized cottage cheese for your favorite dishes, whipping heavy cream can provide a light and airy consistency that mimics the texture of cottage cheese.

    Whipped heavy cream in a bowl.

    You'll enjoy all the benefits of cottage cheese without the added dairy by simply replacing pureed cottage cheese with whipped heavy cream in your next recipe.

    10. Faisselle Cheese

    This French-style cheese is made from freshly curdled milk gently poured into molds and allowed to drain, resulting in a tangy and velvety texture perfect for snacking or cooking.

    11. Mascarpone Cheese

    This Italian cheese is known for its rich and creamy texture, and it is perfect to replace cottage cheese in your favorite recipes.

    Mascarpone cheese in a bowl.

    Whether making a savory lasagna or a sweet fruit salad, mascarpone cheese will add a layer of decadence to impress your taste buds.

    12. Mozzarella Cheese

    Mozzarella cheese serves as a fantastic cottage cheese substitute. This versatile cheese has a similar texture to cottage cheese and works perfectly in recipes like lasagne, quiches, and casseroles.

    Grated mozzarella cheese.

    Mozzarella boasts a mild, slightly sweet flavor that can complement many dishes. Additionally, this cheese is high in protein and low in carbohydrates, making it a great choice for those watching their carb intake.

    13. Goat's Cheese

    Selecting a delicious cheese can be challenging for those watching their fat intake. Luckily, goat's cheese is a good substitute for high-fat varieties such as cottage cheese.

    Goat cheese slices.

    With its unique tangy flavor and creamy texture, goat's cheese pairs perfectly with various dishes. Plus, it's an excellent option for those seeking a reduced-fat cheese alternative.

    14. Sour Cream 

    Sour cream is trendy in many savory recipes, and you can use it as a substitute for cottage cheese.

    Some recipes call for cottage cheese, but sour cream can be a great alternative if you don't have any on hand. This is because cottage cheese and sour cream have a tangy flavor and creamy texture that works well in many dishes.

    Sour cream in a bowl.

    15. Tofu

    Tofu is one of the most popular substitutes for cottage cheese. It has a similar texture to cottage cheese and can be used in various dishes.

    Tofu is made from soybeans and is a rich protein source, making it a healthy alternative to cottage cheese.

    Tofu squares in a bowl.

    Additionally, tofu is naturally low in fat and calories, making it an excellent option for those watching their weight.

    16. Hummus

    If you're a fan of baking recipes that call for cottage cheese, but can't seem to find it in your pantry, don't panic! A delicious alternative will give you the same creamy, tangy taste - chickpea puree, aka hummus.

    Yes, that's right! Hummus can be used as a substitute to replace pureed cottage cheese.

    Hummus on a plate garnished with oil and basil.

    It's creamy, has a similar consistency to cottage cheese, and is flavorful. Hummus is made from tahini, fresh lemon juice, olive oil, and chickpeas. It is perfect for substituting in your baking recipes and a tasty and healthy dip for veggies and crackers.

    17. Almond Milk 

    For those people who are either intolerant to lactose or follow a vegan diet, almond milk is a great cottage cheese substitute. This dairy-free cottage cheese alternative has a nutty flavor that is both versatile and delicious.

    Almond milk can be used in various dishes, such as pasta dishes or pasta sauces, where cottage cheese is typically used.

    Almond milk in a glass.

    It can be whipped to create a texture similar to cottage cheese or blended to create a creamier consistency. Additionally, almond milk contains fewer calories and less fat than cottage cheese, making it a healthier option for those watching their caloric intake.

    18. Red or White Bean Puree 

    Red or white bean puree can be a delicious and healthy substitute for cottage cheese in many recipes, particularly in pasta fillings. Beans are high in protein, fiber, and other essential nutrients, making them an excellent alternative to cheese.

    Besides, they provide a creamy texture similar to cottage cheese, making them an ideal ingredient for recipes that call for cheese.

    19. Lean Meats

    Lean meats can be a great option to substitute cottage cheese when you need a high-protein snack. While cottage cheese is a popular go-to for protein, some people may not enjoy the taste or texture.

    FAQs

    What Does Cottage Cheese Taste Like?

    Cottage cheese has a mild, slightly tangy flavor. Some people describe it as slightly salty or sour. Its texture is creamy and curdy, which can vary depending on the brand and the level of processing.

    Some cottage cheeses are smooth and creamy, while others are lumpy and grainy. The taste and texture of cottage cheese also depend on the fat content, with full-fat varieties being richer and creamier than lower-fat versions.

    Is Cottage Cheese Healthy?

    Cottage cheese can be a healthy addition to your diet, as it contains high protein, calcium, and vitamin B. It is a low-calorie food that can help with weight loss and management.

    However, choosing a low-sodium variety of cottage cheese is essential as being aware of portion sizes, as some varieties can contain added sugars or other additives.

    Choose the Best Cottage Cheese Substitute For Your Needs!

    There are plenty of delicious and nutritious alternatives to cottage cheese that can fit seamlessly into your recipes.

    From dairy-based substitutes like ricotta and Greek yogurt to vegan options like tofu and almond milk, each alternative offers unique flavors and textures.

    These substitutes not only replace cottage cheese but can also add a new twist to your meals.

    Whether you're looking for a high-protein option, a creamy texture, or a lactose-free alternative, there's a cottage cheese substitute for every dish.

    So, next time you're out of cottage cheese, don't worry—try one of these substitutes and keep your recipes flavorful and satisfying!

    More Great Articles To Read

    • Top 9 Gochugaru Substitutes
    • Best Farro Substitutes And Cooking Times
    • Best Substitute For Capers: 12 Options
    • Top 12 Paprika Substitutes
    • Fish Stock Substitute

    Do You Wash Onions?

    October 10, 2024 by Angela Milnes

    washing onion.

    Do You Wash Onions? It's an interesting question that most cooks and chefs will likely have a strong opinion about. While it may seem silly to debate, washing or not washing onions can significantly affect the flavor of your finished dishes - so finding out which method works best for you is essential!

    Tune into today's post as we delve into the debate around washing onions — and find some practical solutions you can use immediately!

    washing an onion under the tap.
    [feast_advanced_jump_to]

    Why Do You Need to Wash Onions?

    Well, the answer is simple. Like every other vegetable, onions are grown in soil and carry a lot of dirt, grime, and bacteria on their outer peeling.

    You must rinse fruits and vegetables before consuming them raw, even if you are going to peel them!

    Washing onions thoroughly helps eliminate all the unwanted chemicals, dust, and grime accumulated on the surface.

    As onions are mostly eaten raw or in salads, washing onions helps remove any pesticides that might have been used during the growing process and prevent them from making you sick.

    How To Wash Onions?

    Washing onions correctly is something that many people are unsure about. While onions may seem easy to wash, they can harbor dirt and bacteria that can be harmful if not removed before consumption. To use onions in your recipes safely and effectively, here are some techniques for washing them:

    How Do You Wash Onions Before Peeling Them?

    Washing onions before peeling them is essential to get rid of any dirt or pesticides on the outer layer of the onion. Here are the steps to wash onions properly:

    1. First, quick rinse the onions under running water to remove loose dirt or soil from the outer skin.
    2. Fill the bowl with cold water and place the onions in it.
    3. Gently rub the onions with your fingers to remove any remaining dirt or debris on the outer skin.
    4. Let the onions soak in the water for a few minutes to loosen any visible dirt or residues that may be stuck to the skin.
    5. After soaking, remove the onions from the water and rinse them thoroughly under running water.
    6. Pat the onions dry with a clean towel and then peel them.

    How Do You Wash Onions Before Cutting?

    Washing onions is important before chopping them to ensure their freshness, flavor, and cleanliness. Here's a simple step-by-step guide on washing raw onions after peeling or chopping.

    1. Start by removing the skin or peel of the onion.
    2. Rinse the peeled onion under cool water to remove any debris or dirt.
    3. Pat the onion dry with a paper towel to remove any excess moisture.
    4. Fill a clean bowl with enough cool water to submerge the onion.
    5. Place the peeled onion in the bowl of water, and using your hands, gently rub the onion to remove any remaining dirt or debris.
    6. Remove the onion from the water and pat dry with a paper towel.
    7. Place the onion on a clean cutting board, and using a sharp knife, chop or slice as required.

    How Do You Wash Onions After Cutting?

    Properly washing onions after chopping is crucial to remove any impurities and ensure they are clean for consumption. Here are the steps to wash onions after chopping:

    1. Place the chopped onions in a strainer.
    2. Quickly rinse the onions under cold running water to remove dirt or debris.
    3. Fill a bowl with vinegar and cold water (ratio of one part vinegar to three parts water).
    4. Soak the onions in the water and vinegar solution for at least five minutes. You can also use the vinegar mixture in a spray bottle and spray on the onion to kill bacteria and clean any dirt.
    5. After soaking, rinse the onions under cold running water to remove any remaining vinegar.
    6. Drain the excess water and pat the onions dry with a clean paper towel.

    Washing onions this way not only removes impurities but also reduces the pungent and raw aroma, making them perfect for salad and other raw dishes. If you love onions then check out this recipe for Turkish Sumac Onion Salad. You can also learn How To Caramalize Onions to make this tasty Caramalized Onion Dip With Chives.

    How to Wash Green Onions?

    Washing veggies, such as green onions (also called scallions), is essential to removing dirt and unwanted debris. Here are the steps to properly wash green onions:

    1. Remove the roots from the green onions by cutting them off.
    2. Separate the individual stems.
    3. Rinse the stems under cold running water.
    4. Make sure to turn onions to make sure all sides are thoroughly rinsed. And gently rub each stem with your fingers while rinsing.
    5. Soak the green onions in a bowl of cold water for a few minutes, then rinse again.
    6. After cleaning the green onions, pat them dry with a towel or allow them to air dry.
    washing spring onion.

    Is Washing Onions With Salt Good?

    If you're wondering whether washing onions with salt is a good idea, the answer is yes!

    Cleaning your onions before chopping them is always a good practice, especially if you plan to eat them raw.

    Salt is a great natural disinfectant that can help remove dirt or bacteria on the onion's surface. In addition to salt, you can also use vinegar to effectively clean your red onions.

    Once your onions are washed and ready to be chopped, you can confidently add them to your favorite salad or dish, knowing they are clean and safe to eat.

    So, the next time you're prepping onions, soak them with salt water or vinegar to ensure that your food is delicious and healthy!

    Do You Wash Onions Before Cooking?

    Yes, it is recommended to wash onions before cooking, as they are a food item often grown with pesticides.

    Additionally, washing the onions' outer peels can help eliminate any dirt that might have gathered during transportation and storage.

    It is important to note that cooking onions at high heat will also help to eliminate any potential contaminants that may be present. 

    Is It Good to Saok Onions in Water?

    Soaking peeled onions in cool water before eating them is unnecessary, but it can be beneficial. Soaking onions in water helps to reduce their pungency, which can make them easier to eat raw.

    However, soaking them too long can also cause them to lose some flavor and nutrients. So, if you're looking to incorporate raw onions into your diet, soaking them for a few minutes in cool water can be helpful, but do not soak them for too long.

    chopped onion red onion.

    Can You Clean Onions With Baking Soda?

    Yes, you can clean onions with baking soda. If you notice any clear signs of dirt or debris on the onion's surface, it is a good idea to clean it thoroughly before peeling.

    Here's a step-by-step guide on how to clean onions with baking soda:

    1. In a bowl, combine two cups of water with one teaspoon of baking soda.
    2. Soak your onions in the mixture for at least two minutes. You can do this by placing the onions in the bowl or pouring the mixture over them.
    3. Gently rub the onions with your hands to remove any dirt or debris.
    4. Once you have thoroughly cleaned the onions, rinse them with clean water.
    5. Pat the onions dry with a clean towel or paper towel.
    6. Now you're ready to peel and prepare your cleaned onions for your recipe!

    Remember, while baking soda can help remove dirt and debris from your onions, it's still important to handle them carefully to avoid bruising or damaging the vegetable.

    baking soda in a jar.

    Can You Wash Onions With Soap?

    It is generally not recommended to wash onions with soap. Onions have a natural protective layer that helps to prevent contamination, and washing them with soap can remove this layer and potentially introduce harmful chemicals.

    Instead, it is recommended to rinse onions under running water, scrubbing gently with a brush, if necessary, to remove any dirt or debris.

    Do You Wash Onions Before Storing Them?

    Yes, it's a good idea to wash veggies and fruits, including onions, before storing them. This helps remove dirt on the onion's surface, making cooking with them easier.

    Additionally, cleaning onions can help prolong their shelf life and prevent bacteria or mold from growing.

    Is There a Way to Cut Onions Without Crying?

    Possibly! When you cut a raw onion, an enzyme is released, creating a gas that can irritate your eyes and cause tears to happen.

    Here are some tips to reduce the amount of gas released and hopefully prevent tears from flowing:

    • Before chopping onions, chill them with water- this will slow down the release of the enzyme.
    • Cut the onion under running water - the water will wash away the gas before it reaches your eyes.
    • Use a sharp knife to minimize damage to the onion cells and reduce the gas released.

    Give one or all of the above methods a try to see if it helps you cut onions without crying!

    washing an onion under the tap.

    Is There Any Method to Remove the Smell of Onions From Your Hands?

    One effective method to remove the smell of onions from your hands is to rub them with a stainless steel object under running water. This can be a steel spoon, knife, or stainless steel utensil.

    Another option is to mix lemon juice or white vinegar with water and wash your hands with the solution. You can also try using a mixture of baking soda and water, or rubbing your hands with salt and then washing them.

    Finally, washing your hands with soap and warm water for at least 20 seconds is always a good choice.

    Wrapping Up

    The debate over washing onions may seem trivial, but it plays a crucial role in ensuring the safety and flavor of your dishes.

    By following the right techniques for washing and preparing onions, you can eliminate harmful bacteria and pesticides while enhancing their taste.

    Whether you're using them raw in salads or cooking them in your favorite recipes, clean onions can make a significant difference.

    So, the next time you’re in the kitchen, remember to take a few moments to wash your onions properly.

    Your taste buds—and your health—will thank you!

    Don’t forget to share your favorite onion recipes in the comments and inspire others to elevate their culinary creations!

    You may enjoy this article: Does Beef Jerky Go Bad?

    Pollo En Chile Rojo

    October 10, 2024 by Angela Milnes

    Pollo En Chile Rojo.

    Today, I’m excited to share my mouthwatering Pollo en Chile Rojo recipe. Also known as Pollo Colorardo, this dish features tender chicken simmered in a rich, flavorful red chile sauce that’s packed with traditional spices. It’s a fiesta of flavors that will transport your taste buds straight to Mexico. Perfect for a family dinner or a special occasion. Ready to spice up your mealtime? Let’s get cooking!

    instant pot chicken colorado
    [feast_advanced_jump_to]

    Why This Recipe Works

    • Bold and Spicy: The chili powder and ground cumin give this dish a bold, spicy flavor that's sure to satisfy.
    • Simple and Delicious: With just a few ingredients, this Pollo En Chile Rojo recipe is easy to prepare yet delivers a delicious and authentic taste.
    • Hearty and Satisfying: The combination of tender chicken breasts and vibrant bell peppers makes for a hearty and satisfying meal.

    🥘 Ingredients

    Pollo En Chile Rojo Ingredients.
    • Yellow Onions, halved and sliced: These add a sweet and savory flavor, providing a robust aromatic base for the dish.
    • Red Bell Peppers, seeded and sliced: Contribute a sweet, slightly fruity flavor and a vibrant color, adding both taste and visual appeal to the dish.
    • Boneless, Skinless Chicken Breast: Provide lean, tender protein that absorbs the flavors of the spices and sauce, making the dish hearty and satisfying.
    • Chili Powder: Adds a warm, smoky heat and a rich red color, infusing the dish with classic Southwestern flavors.
    • Ground Cumin: Offers a warm, earthy flavor and a hint of citrus, enhancing the depth and complexity of the dish's seasoning.
    • Red Enchilada Sauce: Provides a rich, tangy, and mildly spicy base, tying all the ingredients together with its robust and savory flavor.

    For the complete list of ingredients with measurements and instructions, please see the recipe card at the bottom of the post.

    📖  Substitutions & Variations

    • Seafood Infusion: Experiment with seafood by using shrimp or fish fillets instead of chicken. The seafood will absorb the spicy red chile sauce beautifully, creating a unique and flavorful dish.
    • Vegetarian Twist: Substitute the chicken with diced tofu or tempeh for a vegetarian version of Pollo en Chile Rojo. Marinate the tofu or tempeh in the red chile sauce before cooking to infuse it with flavor.

    🔪 How To Make Pollo en chile rojo

    onion and peppers in instant pot

    Step One: Place the onions and peppers into the electric pressure cooker.

    chicken breasts in Instant Pot

    Step Two: Layer the chicken breasts over the vegetables in the pressure cooker.

    Pollo en chile rojo ingredients

    Step Three: Sprinkle salt, black pepper, garlic powder, and cumin over the chicken.

    Pollo en chile rojo ingredients

    Step Four: Pour the enchilada sauce over the seasoned chicken. Cover the electric pressure cooker and cook on manual or pressure cook setting for 12 minutes.

    Pollo en chile rojo ingredients

    Step Five: After the cooking cycle is complete, perform a quick release of the pressure.

    instant pot chicken collorado

    Step Six: Using two forks, shred the cooked chicken and mix it in with the sauce. Serve the flavorful chicken mixture on warm flour tortillas or tortilla cones for a delicious meal.

    instant pot colorado chicken.

    👩‍🍳 Expert Tips

    • Thickening the Sauce: If the sauce is too thin after cooking, you can simmer it uncovered for a few extra minutes to reduce and thicken it to your desired consistency.
    • Garnish Creatively: Sprinkle fresh cilantro, crumbled queso fresco, a squeeze of lime juice, and a sprinkle of seeds like sesame or pumpkin seeds over the finished dish to enhance the flavors and add texture.

    💭 FAQs

    What is Pollo en Chile Rojo?

    Pollo en Chile Rojo, or Chicken in Red Chile Sauce, is a traditional Mexican dish featuring chicken cooked in a rich, spicy sauce made from dried red chiles, tomatoes, and aromatic spices. This flavorful dish showcases the depth and complexity of Mexican cuisine.

    Which types of chiles are typically used in the sauce?

    Commonly, dried guajillo and árbol chiles are used to create the red sauce. Guajillo chiles impart a mild heat with a slightly sweet, tangy flavor, while árbol chiles add a sharper, spicier kick.

    How do I prepare the chile sauce?

    First, toast the dried chiles briefly to enhance their flavor, then soak them in hot water until softened. Blend the softened chiles with roasted tomatoes, garlic, onions, and spices like cumin and cloves to form a smooth sauce. This mixture is then cooked to deepen the flavors before combining with the chicken.

    Can I make a vegetarian version of this dish?

    Yes, you can substitute the chicken with hearty vegetables such as mushrooms, zucchini, or tofu to create a vegetarian version of Chile Rojo. The robust red chile sauce pairs well with various ingredients, allowing for versatile adaptations.

    Best Way to Store Pollo en chile rojo

    Store any leftover Pollo en Chile Rojo in an airtight container in the refrigerator for up to 3-4 days. Transfer the Pollo en Chile Rojo to a freezer-safe container or bag and freeze for up to 2-3 months. Defrost the Pollo en Chile Rojo in the refrigerator overnight.

    🧂Serving Suggestions

    Pair Pollo en Chile Rojo With These:

    • Mexican Rice: Serve fluffy Mexican rice cooked with tomatoes, onion, and spices. The savory flavors of the rice complement the rich and spicy sauce of the chicken.
    • Plantain Tortillas: Warm and soft tortillas make the perfect vessel for scooping up the tender chicken and flavorful sauce. You can also use them to make tacos or tostadas for a fun and interactive meal.
    • Cilantro Lime Slaw: Toss shredded cabbage with fresh cilantro, lime juice, and a touch of honey for a refreshing and crunchy side dish. The acidity of the lime and the freshness of the cilantro help cut through the richness of the Mexican chicken.
    • Avocado Salad: Make a simple avocado salad with diced avocado, tomatoes, red onions, and cilantro, dressed with lime juice and olive oil. The creamy avocado adds a cooling contrast to pollo con chile rojo.
    • Mango Salsa: Add a refreshing twist to your Pollo en Chile Rojo by serving it with a side of vibrant mango salsa. The sweet and tangy flavors of the salsa complement the spicy chicken dish beautifully.
    Pollo en chile rojo

    🍽 Related Recipes

    • einkorn angel hair and cherry tomato pasta in a white bowl.
      One-Pan Einkorn Angel Hair Pasta with Cherry Tomatoes
    • Salmon Dill Puree.
      Lemon Dill Salmon Mousse (Bariatric Friendly)
    • close-up-watermelon-slices-with-blackberry-plastic-disposable-cup-perfect for a summer party.
      How To Host An Awesome Summer Party
    • Oven baked lobster tail with garlic butter and lemon.
      How To Cook Lobster Tail At Home

    Did you make this recipe? Leave a review and a ⭐⭐⭐⭐⭐ rating below, or tag us in our Facebook Group! Alternatively, bookmark it in your browser or save to Pinterest.

    Pollo En Chile Rojo.

    Pollo en chile rojo

    Angela Milnes
    Indulge in the rich, bold flavors of Pollo en Chile Rojo! Tender chicken is simmered in a vibrant red chile sauce, creating a dish that's full of warmth and spice. Perfect for serving with rice or tortillas, it’s a traditional Mexican favorite that’s sure to impress!
    5 from 4 votes
    Print Recipe Pin Recipe Rate this Recipe
    Prep Time 10 minutes mins
    Cook Time 12 minutes mins
    Additional Time 0 minutes mins
    Total Time 22 minutes mins
    Course Dinners
    Cuisine Spanish
    Servings 6 Servings
    Calories 394 kcal

    Ingredients
      

    • 2 Yellow Onions halved and sliced
    • 2 Red Bell Peppers seeded and sliced
    • 4 Boneless skinless chicken breasts
    • 1 tablespoon Chili Powder
    • 1 teaspoon Ground Cumin
    • 28 Ounce Can Red Enchilada Sauce

    Instructions
     

    • Place the onions and peppers into the electric pressure cooker.
    • Layer the chicken breasts over the vegetables in the pressure cooker.
    • Sprinkle salt, black pepper, garlic powder, and cumin over the chicken. Pour the enchilada sauce over the seasoned chicken.
    • Cover the electric pressure cooker and cook on manual or pressure cook setting for 12 minutes.
    • After the cooking cycle is complete, perform a quick release of the pressure.
    • Using two forks, shred the cooked chicken and mix it in with the sauce.
    • Serve the flavorful chicken mixture on warm flour tortillas or tortilla cones for a delicious meal.

    Notes

    Thickening the Sauce: If the sauce is too thin after cooking, you can simmer it uncovered for a few extra minutes to reduce and thicken it to your desired consistency.
    Garnish Creatively: Sprinkle fresh cilantro, crumbled queso fresco, a squeeze of lime juice, and a sprinkle of seeds like sesame or pumpkin seeds over the finished dish to enhance the flavors and add texture.

    Nutrition

    Serving: 1gCalories: 394kcalCarbohydrates: 7gProtein: 66gFat: 10gSaturated Fat: 3gPolyunsaturated Fat: 2gMonounsaturated Fat: 4gTrans Fat: 0.04gCholesterol: 172mgSodium: 180mgPotassium: 1253mgFiber: 2gSugar: 3gVitamin A: 1642IUVitamin C: 54mgCalcium: 39mgIron: 3mg
    Print Recipe Pin Recipe Rate this Recipe
    Tried this recipe?Let us know how it was!

    More Easy Dinner Recipes

    • Instant Pot Cajun Rice And Beans Recipe
    • Instant Pot Wild Rice Blend
    • Crock Pot Chili Mac And Cheese
    • Creamy Oven Baked Mac and Cheese
    • Mango Arugula Salad
    • Unstuffed Cabbage Roll Soup
    • Goat Cheese Apple Salad
    • Kale Butternut Squash Salad With Blueberries

    Grandma's Chicken And Broccoli Bake

    October 9, 2024 by Angela Milnes

    Here's a timeless and comforting recipe that brings the wholesome goodness of grandma's kitchen right into your home. My Grandma's Chicken And Broccoli Bake recipe combines tender chicken, nutritious broccoli, and carrots in a creamy, cheesy sauce, topped with crispy breadcrumbs. Baked Chicken And Broccoli is a hearty dish that's perfect for family dinners or potluck gatherings.

    Grandma's Chicken And Broccoli Bake
    [feast_advanced_jump_to]

    💖 Why This Recipe Works

    • Comforting Flavor: Grandma's Chicken and Broccoli Bake offers a comforting blend of cheesy goodness, tender chicken, and nutritious broccoli that tantalizes your taste buds with every bite.
    • Family Recipe Heritage: This Grandma's Broccoli Cheese Chicken Bake carries the legacy of a cherished family recipe passed down through generations, adding a touch of nostalgia and love to your dining experience.
    • Easy Preparation: With simple ingredients and straightforward instructions, Grandma's Broccoli Chicken Bake makes cooking a breeze, perfect for busy weeknights or cozy family gatherings.

    ⭐ Star Ingredients

    ingredients for chicken broccoli bake.
    • Whole Chicken: Provides rich, tender protein that absorbs flavors well.
    • Fresh Broccoli: Adds crunch and vitamins, offering a fresh contrast.
    • Carrots: Sweeten and add color, softening nicely when cooked.
    • Sour Cream: Creates a creamy, tangy sauce base.
    • Lemon Juice: Brightens the dish with a touch of acidity.
    • Chicken Soup: Enhances chicken flavor and helps bind the sauce.
    • Breadcrumbs: Offer a crispy topping for texture contrast.
    • Cheddar Cheese: Gives a gooey, flavorful finish and golden color.

    For the complete list of ingredients with measurements and instructions, please see the recipe card at the bottom of the post.

    📖  Substitutions & Variations

    • Creamy Pesto Chicken Casserole: Creamy chicken, broccoli, and a pesto-laced combination of melted butter, pine nuts, and basil for a vibrant twist.
    • Chicken Broccoli Rice Casserole: Combine shredded rotisserie chicken with cooked rice, broccoli florets, and a creamy mushroom soup mixture seasoned with onion powder and garlic powder for a comforting twist on the classic bake.
    • Buttery Chicken and Broccoli Casserole: Combine tender chicken breasts and broccoli all drenched in a luscious sauce crafted from rich melted butter, complemented by flavorful chicken broth and a touch of thyme for a truly indulgent experience.

    🔪 How To Make Grandma's Chicken And Broccoli Bake

    Grandma's Chicken And Broccoli Bake
    1. Step 1: Start by boiling the whole chicken for about 35 minutes until fully cooked. Once done, remove it from the pot, discard the bones, and shred the meat. Place the shredded chicken in your casserole dish. Chop the broccoli and carrots, and optionally add mushrooms. Mix these with the chicken. In a separate bowl, combine the chicken soup, sour cream, and lemon juice until well mixed.
    Grandma's Chicken And Broccoli Bake
    1. Step 2: Grate a slice of bread for fresh breadcrumbs and grate the cheese. Pour the soup mix over the chicken and vegetables in the casserole dish, ensuring even coverage. Sprinkle breadcrumbs over the sauce and top with grated cheese. Bake in a preheated oven for 25 minutes, until the cheese is bubbly and golden brown, creating a crispy topping for your chicken casserole.
    Grandma's Chicken And Broccoli Bake
    1. Step 3: Once the chicken broccoli casserole is baked to perfection, remove it from the oven. Allow it to cool slightly before serving.
    Grandma's Chicken and Broccoli Bake
    1. Step 4: Scoop generous portions onto plates and enjoy this savory, cheesy Grandma's Chicken and Broccoli Bake with your favorite sides for a complete meal experience.

    👩‍🍳 Expert Tips

    • Season at Every Stage: Seasoning throughout the cooking process layers flavors. Add salt and other seasonings incrementally as you cook to develop a well-balanced dish.
    • Taste as You Go: Regularly taste your dishes while cooking. Adjust seasoning and flavors as needed to achieve the perfect taste profile.

    💭 FAQs

    Can I use frozen broccoli instead of fresh?

    Yes, frozen broccoli can be used in place of fresh broccoli. Ensure you thaw and drain it thoroughly before adding it to the casserole to prevent excess moisture

    How can I make this dish ahead of time?

    You can assemble the casserole, cover it tightly, and refrigerate it for up to 24 hours before baking. When ready to cook, bake it at the recommended temperature, adding an extra 10-15 minutes to the baking time to ensure it's heated through.

    What are some suitable side dishes to serve with Chicken and Broccoli Bake?

    This hearty casserole pairs well with crusty bread, a fresh green salad, steamed vegetables like carrots or green beans, or roasted potatoes. These sides complement the creamy and savory flavors of the bake.

    Can I make a vegetarian version of this bake?

    Yes, you can substitute the chicken with firm tofu or additional vegetables such as mushrooms or bell peppers to create a vegetarian-friendly casserole.

    Best Way to Store Grandma's Chicken And Broccoli Bake

    Place Grandma's Chicken and Broccoli bake in an airtight container or wrap them tightly with plastic wrap. Store in the refrigerator for up to 3-4 days. If you want to store them for a longer period, freezing is ideal. Wrap the baked chicken and broccoli individually or together in foil or freezer-safe bags. Make sure to remove excess air to prevent freezer burn. They can be frozen for up to 2-3 months. When ready to consume, thaw frozen broccoli and chicken bake overnight in the refrigerator.

    🧂Serving Suggestions

    Pair Grandma's Chicken and Broccoli Bake With These:

    • Fresh Garden Salad: A crisp and refreshing salad with a tangy vinaigrette dressing provides a light contrast to the richness of the cheesy chicken broccoli.
    • Russian Tarragon Soda (Yoda Soda): Quench your thirst with the unique and refreshing flavors of Russian Tarragon Soda, also known as Yoda Soda, adding a touch of novelty to grandma's chicken and broccoli bake.
    • Guacamole: Serve up some creamy and zesty guacamole alongside grandma's chicken and broccoli bake for a burst of fresh avocado goodness, balanced with tangy lime and flavorful spices.
    • Quinoa Salad: A refreshing quinoa salad with diced cucumbers, cherry tomatoes, and a lemon vinaigrette adds a light and nutritious element to grandma's chicken and broccoli bake.
    • Warm Dinner Rolls with Herb Butter: Soft, warm dinner rolls slathered with herb-infused butter provide a comforting and indulgent addition to your dinner spread.

    💖 Serving Suggestions

    Pair Grandma's Chicken and Broccoli Bake With These:

    • Fresh Garden Salad: A crisp and refreshing salad with a tangy vinaigrette dressing provides a light contrast to the richness of the cheesy chicken broccoli.
    • Russian Tarragon Soda (Yoda Soda): Quench your thirst with the unique and refreshing flavors of Russian Tarragon Soda, also known as Yoda Soda, adding a touch of novelty to grandma's chicken and broccoli bake.
    • Guacamole: Serve up some creamy and zesty guacamole alongside grandma's chicken and broccoli bake for a burst of fresh avocado goodness, balanced with tangy lime and flavorful spices.
    • Quinoa Salad: A refreshing quinoa salad with diced cucumbers, cherry tomatoes, and a lemon vinaigrette adds a light and nutritious element to grandma's chicken and broccoli bake.
    • Warm Dinner Rolls with Herb Butter: Soft, warm dinner rolls slathered with herb-infused butter provide a comforting and indulgent addition to your dinner spread.
    Grandma's Chicken and Broccoli Bake

    🍽 More Hearty Recipes

    • Mushroom Risotto in a bowl.
      Creamy Spinach Mushroom Risotto (Easy & Ready in 30 Minutes!)
    • Almond Milk Mashed Potatoes.
      Best Almond Milk Mashed Potatoes (Dairy Free)
    • Easy Vegan White Bean Stew.
      Easy Vegan White Bean Stew
    • Cheesy Sausage Lasagna With Zucchini.
      Cheesy Sausage Lasagna Recipe (With Zucchini)

    Did you make this recipe? Leave a review and a ⭐⭐⭐⭐⭐ rating below, or tag us in our Facebook Group! Alternatively, bookmark it in your browser or save to Pinterest.

    Grandma's Chicken And Broccoli Bake.

    Grandma's Chicken And Broccoli Bake

    Angela Milnes
    Bring a touch of nostalgia to your table with Grandma's Chicken and Broccoli Bake! This comforting casserole features tender chicken, fresh broccoli, and a creamy, cheesy sauce baked to golden perfection. It's a family favorite that’s sure to warm your heart and satisfy your appetite!
    5 from 4 votes
    Print Recipe Pin Recipe Rate this Recipe
    Prep Time 5 minutes mins
    Cook Time 30 minutes mins
    Additional Time 25 minutes mins
    Total Time 1 hour hr
    Course Dinners
    Cuisine American
    Servings 6 Servings
    Calories 430 kcal

    Ingredients
      

    • 1 Whole Chicken
    • 1 Broccoli
    • 3 medium Carrots
    • 5 Tablespoons Sour Cream
    • 2 Tablespoons Lemon juice
    • 1 can Chicken Soup
    • 1 slice of bread made into Breadcrumbs
    • 150 g grated Chedder Cheese

    Instructions
     

    • Begin by cooking the whole chicken in a pot of boiling water for about 35 minutes until fully cooked.
    • After the chicken is cooked, carefully remove it from the pot, discard the bones, and shred the meat. Place the shredded chicken into your casserole dish.
    • Chop the broccoli and carrots, and optionally add mushrooms for extra flavor and nutrients. Combine these vegetables with the shredded chicken in the casserole dish.
    • In a separate bowl, mix the can of chicken soup with sour cream and lemon juice until well combined.
    • Grate a slice of bread to make fresh breadcrumbs and grate the cheese.
    • Pour the prepared soup mixture over the chicken and vegetables in the casserole dish, ensuring even distribution. Sprinkle the breadcrumbs evenly over the sauce, then top with the grated cheese.
    • Bake the prepared baking dish in a preheated oven for 25 minutes or until the cheese on top is bubbly and golden brown, creating a deliciously crispy topping for your wholesome chicken casserole.
    • Once the chicken broccoli casserole is baked to perfection, remove it from the oven. Allow it to cool slightly before serving.
    • Scoop generous portions onto plates and enjoy this savory, cheesy Grandma's Chicken and Broccoli Bake with your favorite sides or a fresh salad for a complete meal experience.

    Notes

    Season at Every Stage: Seasoning throughout the cooking process layers flavors. Add salt and other seasonings incrementally as you cook to develop a well-balanced dish.
    Taste as You Go: Regularly taste your dishes while cooking. Adjust seasoning and flavors as needed to achieve the perfect taste profile.

    Nutrition

    Serving: 1gCalories: 430kcalCarbohydrates: 13gProtein: 36gFat: 25gSaturated Fat: 10gPolyunsaturated Fat: 12gCholesterol: 121mgSodium: 517mgFiber: 2gSugar: 3g
    Print Recipe Pin Recipe Rate this Recipe
    Tried this recipe?Let us know how it was!

    More Recipes to Try

    • Easy Air Fryer Broccolini
    • Grilled Eggplant With Lemon Dip
    • Mini Cheese Stuffed Peppers
    • Roasted Brussels Sprouts With Maple Syrup
    • Best Cheesy Mashed Cauliflower Recipe
    • Butterfly Pea Tea Lemonade Recipe

    Top 9 Gochugaru Substitutes

    October 9, 2024 by Angela Milnes

    Gochugaru Substitutes.

    Cooking with gochugaru, the spicy Korean red pepper powder can add an amazing kick to your dishes. But what are the best Gochugaru Substitutes to use when this spicy flavoring is not available?

    Today I'm sharing some Top Gochugaru Alternatives to help achieve similar flavors and bring the spice to your meals!

    Whether you're out of gochugaru or just want to try something different, these substitutes will keep your recipes tasting delicious. From common pantry staples like crushed red pepper flakes to unique options like Aleppo pepper, I'll guide you through the best choices to match that distinctive heat and flavor. So, let's dive in and find the perfect substitute for your next spicy dish!

    Gochugaru Substitutes
    [feast_advanced_jump_to]

    What is Gochugaru Made Of?

    Gochugaru is a Korean word that means "chili powder." It is made from Korean chili peppers that are dried and ground into a fine, bright red powder known as Korean chili pepper powder.

    This powder has a spicy and slightly sweet flavor, often with a hint of smokiness from being sun-dried. Before grinding, the seeds and stems are usually removed to create a smooth texture. Gochugaru is a key ingredient in many Korean dishes, adding both heat and flavor.

    Top Gochugaru Substitutes

    Finding the perfect Gochugaru substitute can be a culinary adventure, with a variety of chili powders and flakes offering unique flavors and heat levels. Here are some alternatives to explore:

    1. Aleppo Pepper Flakes

    Aleppo Pepper Flakes, a substitute for gochugaru, is made from dried red chili peppers grown near the Syrian town of Aleppo. These peppers are crushed into coarse flakes, creating a vibrant red seasoning.

    Aleppo peppers have a moderate spice level, similar to Gochugaru, with a mild heat that ranges around 10,000 Scoville Heat Units. They have a fruity, tangy flavor with a hint of cumin-like earthiness, making them a suitable substitute for Gochugaru. However, Aleppo pepper flakes can be a bit sweeter and less smoky.

    They work well in dishes like stews, colorful salads, and marinades. When using them as a substitute, you can use a 1:1 ratio with Gochugaru, but taste as you go to adjust for sweetness.

    Aleppo Pepper Flakes

    2. Cayenne Pepper

    Cayenne pepper is made from dried and ground chili peppers and is known for its fiery heat, ranging between 30,000 to 50,000 Scoville Heat Units (SHU). It has a slightly smoky taste and is much spicier than gochugaru, which is a Korean chili powder that has a milder flavor.

    This makes cayenne pepper a suitable substitute if you like your dishes extra spicy. However, because of its higher heat level, you might want to use less when replacing gochugaru. A good rule is to use about half the amount of cayenne pepper compared to gochugaru.

    It works well in dishes like kimchi, spicy soups, and marinades where you want to add some serious kick. Just be careful not to overpower the dish, as Cayenne's intense heat can sometimes overshadow other flavors.

    Cayenne Peppers With Cayenne Pepper Powder.

    3. Chipotle Powder

    Chipotle powder is made from dried and smoked chipotle peppers, which are essentially jalapeño peppers that have been smoked until they turn rich and flavorful.

    It has a medium heat level, usually around 3,000 to 10,000 Scoville Heat Units (SHU), which is similar to gochugaru. This makes chipotle powder a suitable choice if you want to add smokiness along with some heat to your dishes.

    It's perfect for recipes like BBQ sauces, chili, and stews where a smoky taste is welcome. However, because of its distinct smoky flavor, it might change the flavor profile of traditional Korean dishes.

    When using chipotle powder as a gochugaru replacement, start with an equal amount and adjust to taste, keeping in mind the smokiness.

    Chipotle Powder

    4. Paprika (Sweet or Hot)

    Paprika is made from ground sweet and hot chili peppers and comes in various flavors, including sweet paprika and hot paprika. It is known for its sweet and smoky flavor, which makes it a good gochugaru alternative, especially if you prefer a milder heat.

    Sweet paprika has little to no heat, while hot paprika can add a bit more spice, ranging from 100 to 500 Scoville Heat Units (SHU). This makes paprika suitable for dishes like goulash, stews, and Air Fryer Roasted Vegetables, where you want a hint of smokiness without overwhelming spiciness.

    However, because paprika is usually milder than gochugaru, you might need to use a bit more to achieve a similar flavor. Start with an equal amount and adjust according to taste, keeping in mind the desired level of heat and smokiness.

    Paprika Powder In A Spoon.

    5. Chili De Arbol Powder

    Chili De Arbol powder is made from dried and ground Chili De Arbol peppers, which are known for their bright red color and intense heat. This powder has a sharp, earthy flavor with a spice level ranging from 15,000 to 30,000 Scoville Heat Units (SHU), making it much hotter than gochugaru.

    It's a suitable substitute if you want to add a fiery kick to your dishes, but you should be cautious as it can easily overpower other flavors. Chili De Arbol powder works well in dishes like Fish tacos, Canned Black Bean And Corn Salsa or spicy Tofu Stir Fry.

    When using it as an alternative for gochugaru, start by using about half the amount and adjust to taste, keeping in mind its intense heat.

    Dried Red Organic Chile de Arbol Peppers.

    6. Fish Pepper

    Fish Pepper is a unique type of chili pepper known for its colorful striped skin and medium heat level, which ranges between 5,000 to 30,000 Scoville Heat Units (SHU).

    Unlike regular chili powder, fish pepper adds a vibrant, slightly sweet, and complex flavor to dishes, making it an interesting option to replace gochugaru.

    It can provide a lively kick to seafood dishes, soups, and stews. However, because of its distinct flavor, it might change the taste of traditional Korean recipes.

    When substituting fish pepper for gochugaru, start by using a smaller amount and adjust according to your taste preference, as its heat can vary.

    7. Guajillo Powder

    Guajillo powder is made from dried and ground Guajillo peppers, which are a popular chili in Mexican cooking. This powder offers a moderate heat level, ranging from 2,500 to 5,000 Scoville Heat Units (SHU), making it milder than gochugaru but still flavorful.

    It has a fruity and tangy taste with hints of berry and tea, making it a good choice in gochugaru substitutes list. If you want to add some depth without too much spiciness. Guajillo powder works well in soups, sauces, and marinades.

    When replacing it for gochugaru, you can start with an equal amount and adjust according to your taste preference. However, keep in mind that its unique flavor might alter the traditional taste of delicious Korean food.

    Ground guajillo chili

    8. Crushed Red Pepper Flakes

    Crushed Red Pepper Flakes are made from a mix of dried and crushed hot chili peppers, often including cayenne. These flakes are known for their spicy kick, commonly ranging from 30,000 to 50,000 Scoville Heat Units (SHU), which makes them generally hotter than Korean hot pepper flakes or korean chili powder.

    They can be a good gochugaru substitute if you're seeking more heat, but they lack the sweet, fruity flavor of gochugaru. Crushed red pepper flakes work well in dishes like Homemade Mini Pizzas pasta sauces, and stir-fries.

    When substituting for gochugaru, start with about half the amount and adjust to taste, keeping in mind the higher spiciness.

    Crushed Red Pepper Flakes.

    9. Ancho Chili Powder

    Ancho Chili Powder is made from dried and ground Ancho chilies, which are ripened poblano peppers. This powder has a mild heat level, typically ranging from 1,000 to 2,000 Scoville Heat Units (SHU), and offers a sweet, smoky flavor with hints of raisin and chocolate.

    While it isn't as spicy as gochugaru, ancho chilipowder can add depth and richness to dishes like stews, soups, and marinades. It's a good alternative if you want to focus on flavor rather than heat.

    However, keep in mind that it won't provide the same level of spiciness as gochugaru. When substituting, you might want to use an equal amount and add extra heat with another chili if desired.

    Ancho Chili Peppers

    Make Homemade Gochugaru

    • Begin by sourcing quality dried Korean red chili peppers.
    • Remove the stems from the peppers. For a milder flavor, also remove the seeds and innards.
    • Dry the peppers using either sun drying or a dehydrator.
    • Once the peppers are fully dried, crush them to a coarse state.
    • Finely grind the crushed peppers to your preferred flake consistency.
    • To adjust the spiciness, remove more seeds and innards.
    • Experiment with other chili varieties if you want a different kind of heat.

    FAQ'S

    Is Gochugaru the Same as Regular Chili Powder?

    No, they are not the same. Chili powder is ground chili peppers, while Gochugaru is limited to a small range of chili peppers common in Korean cuisine.

    Do You Need Gochugaru In Korean Recipes?

    Yes, you need Gochugaru for authentic Korean dishes like gochujang, kimchi, and spicy soups and stews. It’s a key ingredient in many Korean recipes.

    What Does Gochugaru Taste Like?

    Gochugaru has a smoky flavor with a mild sweetness, and is moderately spicy without overpowering its unique flavor profile. It also features fruity and sweet notes, with a subtle heat offset by a mild smokiness.

    Enjoy the Best Options For Gochugaru!

    In conclusion, while Gochugaru holds a special place in Korean cuisine, there are several substitutes available that can replicate its unique flavor and heat.

    From Aleppo pepper flakes to Ancho chili powder, each substitute provides its unique characteristics, making them suitable for different Korean dishes.

    By adjusting heat levels, experimenting with homemade Gochugaru, and pairing these substitutes with other ingredients, you can create delectable Korean dishes right in your kitchen!

    More Substitutes For You To Try!

    • What To Substitute For Capers
    • Best Farro Substitutes And Cooking Times
    • Top 12 Paprika Substitutes
    • Best Liquid Smoke Substitute
    • Best Substitute For Lemon Pepper
    • Best Substitute For Juniper Berries

    What is bao? Method To Steam Bao Buns

    October 8, 2024 by Angela Milnes

    Bao ready to be served.

    What Is Bao? These delightful steamed buns are a staple in Asian cuisine, celebrated for their soft, airy texture and flavorful fillings. Bao holds cultural importance, often symbolizing comfort and sharing.

    Its popularity is soaring worldwide as more people embrace this versatile dish. Dive into what bao is and enjoy the blend of tradition and modern flavors it offers.

    What is bao
    [feast_advanced_jump_to]

    What Is Bao Bun?

    A bao bun is a soft, fluffy steamed bread that comes from Asian cuisine, especially China. Made from a basic dough of flour, yeast, and water, it's often filled with tasty ingredients like pork or sweet red bean paste.

    Bao buns are cherished in many cultures for their comforting and sharing nature. They're becoming more popular worldwide as people enjoy their unique texture and flavors.

    Origin of Bao

    It is believed to have bao originated in the Han Dynasty (206 BC - 220 AD). According to legend bao was invented by Zhuge Liang, a minister of war and strategist for the Kingdom of Shu.

    Liang is said to have created a type of steamed bread using millet flour, water, and yeast as an emergency ration for his troops. Since then steamed bao buns have become popular throughout the fujian province, northern China and beyond.

    How to Pronounce Bao?

    Bao is pronounced "bou" or "bow" with a rising intonation as if you are asking a question. The word is written in Chinese characters as 包, which can be translated as "bundle" or "wrapping."

    Bao buns are so named because they are traditionally made by wrapping the filling inside the dough and steaming it to cook.

    What Does Bao Taste Like?

    Bao tastes soft and fluffy, with a tender texture that melts in your mouth. Its flavor varies depending on the filling, from savory meats to sweet pastes, offering a deliciously unique experience.

    Different Types of Bao Bun

    1. Char Siu Bao: These buns are a staple in Cantonese cuisine, filled with sweet and savory barbecued pork. They are known for their rich taste and soft texture.
    2. Lotus Seed Paste Bao: Often served as a dessert, these buns are filled with a creamy and sweet lotus seed paste, popular in many Asian festivities.
    3. Pork and Cabbage Bao: A common variety, especially in Northern China, these buns are filled with a savory mix of minced pork and cabbage, providing a hearty meal.
    4. Gua Bao: Often known as a Taiwanese delight, this bao is filled with tender pork belly and topped with Pickled Vegetables and crushed peanuts, offering a savory and sweet taste with a hint of tanginess.
    5. BBQ Pork Bao: A popular choice, these buns are stuffed with sweet and savory BBQ pork, providing a rich, flavorful experience with every bite.
    6. Vegetable Bao: Traditionally filled with a mix of vegetables like cabbage, mushrooms, and carrots, these buns offer a vegetarian option with a wholesome taste.

    How To Cook Bao Buns?

    On average, the perfect bao should be steamed for about 15-20 minutes. No need for a bread maker or baking tray when it comes to Bao recipes - you simply need to steam it!

    Basic Bao Ingredients

    To make steamed buns from scratch, you will need the following ingredients:

    • 2 cups wheat flour (or gluten-free flour if desired)
    • ½ cup warm water
    • ¼ teaspoon active dry yeast
    • ¼ teaspoon caster sugar
    • ½ teaspoon salt

    Instructions

    1. In a lightly oiled bowl, combine the flour, yeast, sugar, and salt in a mixing bowl. Add the warm water and mix until a smooth bao dough forms.
    2. Knead the dough for about 5-10 minutes, until it becomes elastic and smooth.
    3. Cover the dough with a damp cloth and let it rise for about an hour, or until it has doubled in size.
    4. Once the dough has risen, divide it into small balls (about the size of a ping pong ball). Flatten each ball with a rolling pin and place a spoonful of your desired filling in the center.
    5. Fold the dough over the filling using an oiled chopstick and seal it shut, forming a bun shape.
    6. Your Chinese buns will now be ready to steam.
    7. Prepare a steamer by lining it with parchment paper or cabbage leaves to prevent sticking.
    8. Place the buns in the steamer, leaving space between each one to allow for expansion.
    9. Cover and steam over boiling water for 10-12 minutes until the buns are puffed and cooked through.
    Bao buns

    Cook bao Using Bamboo Steamer

    You can also use bamboo baskets as steamer. A bamboo steamer is a traditional cooking tool used to steam food, especially in Asian cuisine.

    It is made from natural bamboo, which allows steam to circulate and cook the food evenly. Using a bamboo steamer for bao buns helps maintain their soft texture and enhances their flavor.

    What To Serve With Bao Buns?

    1. Asian Slaw: A crunchy and refreshing mix of cabbage, carrots, and a Tangy Dressing. This slaw adds a zesty contrast to the soft texture of bao buns.
    2. Hot and Sour Soup: With its spicy and sour flavors, this soup is a great starter that complements the savory taste of bao buns.
    3. Cucumber Salad: Light and crisp, a Korean Cucumber Salad with sesame and soy dressing offers a cool balance to the rich fillings inside bao buns.
    4. Green Tea: A soothing cup of green tea pairs wonderfully with bao buns, cleansing the palate and enhancing the overall meal.
    5. Edamame: Lightly salted and steamed, these Edamame green soybeans make for a satisfying side, adding a good taste to your meal.

    How to Reheat Bao Buns For Later Use?

    There are several ways to reheat bao buns, depending on your preference and the equipment

    • Steaming Bao Buns: This is the traditional method for reheating bao buns and will help to preserve their soft and fluffy texture. Reheat for 5 minutes.
    • Microwave Bao Buns: If you are in a hurry, you can microwave bao buns to reheat them. Place the buns on a microwave-safe plate and microwave for about 15-30 seconds.
    • Pan Fry Bao Buns: Another option is to pan-fry the bao buns. Cook for about 1-2 minutes on each side, or until they are heated through and have a crispy exterior.

    FAQ'S

    Do I Need Baking Powder Or Rice Vinegar?

    Many recipes for bao buns will call for baking powder and rice vinegar, as it helps to give the dough a light and fluffy texture. However, this is not strictly necessary if you are using high-quality flour and have the right technique.

    Are Bao Buns Gluten-Free?

    Traditional bao buns are made with wheat flour, which contains gluten. Therefore, they are not suitable for those with gluten sensitivities or celiac disease.

    Are Bao Buns And Dumplings Same?

    Bao buns and dumplings are not the same; bao buns, also known as baozi, are fluffy, steamed buns filled with meat or vegetables, often sweet or savory.
    Dumplings, on the other hand, are made from thin dough wrappers filled with various ingredients, typically boiled, fried, or steamed.
    While both are staples in Asian cuisine, bao buns often have a bread-like texture, whereas dumplings are more pasta-like.

    Make Steamed Buns at Home Today!

    If you're looking for a delicious, easy-to-make snack or meal that is sure to impress your friends and family, then look no further than steamed bao buns. With their soft, fluffy texture and wide variety of fillings, these buns are perfect for any occasion or dinner.

    You may find the following articles useful?

    • Best Oil For Searing Steak
    • What Does Yorkshire Pudding Taste Like

    Does Beef Jerky Go Bad?

    October 8, 2024 by Angela Milnes

    sliced beef jerky.

    Beef jerky is a popular snack, but does it go bad? This article will discuss beef jerky, what it is, and how long it lasts. We'll also share some tips for making beef jerky and storing it properly.

    Does beef jerky go bad? beef jerky on a plate.
    [feast_advanced_jump_to]

    What Is Beef Jerky?

    Beef jerky is a dried and seasoned meat that is usually made from beef, but can also be made from other meats like pork, chicken, or turkey.

    The meat is cut into thin strips and then marinated in a mixture of spices and seasonings before being dried and smoked.

    It is also a convenient snack for people who are on the go or don't have time to prepare a meal.

    How Long Does Beef Jerky Last?

    Beef jerky can last for months or even years if it is stored properly. However, the quality of the beef jerky will degrade over time and it will eventually go bad.

    The shelf life of beef jerky depends on several factors, including how it was made, the ingredients used, and how it is stored.

    The Signs of Bad Beef Jerky

    If you see any of the following signs, then it's time to throw out your beef jerky. Here is how you tell if beef jerky is bad.

    The Beef Jerky Has a Strange Color.

    One sign of rotten beef jerky is when the color has changed. If you see any green, brown, or black spots on the beef jerky, then it has gone bad and should be thrown out.

    The Beef Jerky Has a Bad Odor.

    Another sign that your homemade beef jerky has gone bad is if it has a foul odor. If the beef jerky smells sour, rancid, or putrid, then it is not safe to eat.

    Don't eat spoiled beef jerky or old beef jerky as it could be bad for your health.

    The Beef Jerky Is Hard or Brittle.

    If the beef jerky is hard or brittle, then it has lost its moisture and is no longer safe to eat.

    The Beef Jerky Is Sticky or Slimy.

    If the beef jerky is sticky or gummy, then it means that there is mold growing on it. Mold can cause serious health problems, so it's best to avoid eating moldy beef jerky.

    beef jerky on a chopping board.

    Can I Eat Spoiled Beef Jerky?

    No, If you eat spoiled beef jerky, you may experience nausea, vomiting, and diarrhea. You may also experience headaches, dizziness, and fever. In severe cases, eating spoiled beef jerky can lead to food poisoning.

    To avoid these symptoms, it's important to throw out any beef jerky that shows signs of spoilage.

    Homemade jerky generally has a shorter shelf life than commercially packaged jerky or store-bought jerky. Don't eat spoiled jerky, it is not worth the risk.

    If the commercial jerky has passed its best-by date then it's not good to eat.

    How to Store Beef Jerky

    Beef jerky can last for a long time if it is stored properly. Here are some tips for storing beef jerky and prolonging shelf life.

    Store Beef Jerky in a Dry Place.

    Store the beef jerky in a cool, dry place. One way to extend the shelf life is to make sure the dehydrated food is vacuum-sealed.

    Unopened jerky which is vacuum-sealed can last up to 2 years, while opened packages will only be good for a few months.

    Use an Airtight Container

    You can store beef jerky in an airtight container. This will help beef jerky last for a longer period.

    beef jerky in a container.

    Refrigerate or Freezing Beef Jerky

    Another way to extend the shelf life of beef jerky is to refrigerate or freeze it.

    Refrigerated Beef Jerky

    Refrigerated beef jerky will last for about a month. Even dehydrated food can go bad if it's not stored properly.

    How to Freeze Beef Jerky

    Freezing beef jerky is a good way to extend its shelf life. Frozen beef jerky will last for 6 months to a year when frozen correctly.

    When freezing, make sure to place the beef jerky in a freezer-safe container or bag. Ensure there is plenty of freezer space for your dried meat and only store it in the freezer while the jerky is still good.

    beef jerky in a plastic container.

    Making Homemade Beef Jerky

    If you want to make your homemade jerky, then there are a few things you need to know.

    Choose The Right Meat

    First, you need to choose the right meat. The best cuts of beef for jerky are the leanest cuts, such as flank steak, round steak, or eye of round steak.

    Lean meat will result in the best beef jerky and make a delicious snack. Lean cuts also have less fat, which means the beef jerky will be lower in calories.

    Remove All the Fat

    Next, you need to trim off any fat from the meat. Fat will make the beef jerky go bad faster, so it's important to remove as much fat as possible before you store jerky.

    Slice Your Fresh Jerky

    After trimming the fat, you need to cut the meat into strips. The strips should be about ¼ inch thick and 3-4 inches long.

    You can use a sharp knife or a meat slicer to make the strips. If you're using a knife, then it's important to slice against the grain. Slicing with the grain will make the beef jerky tough and chewy.

    Once you've cut the meat into strips you're ready to season.

    Seasoning Your Edible Jerky

    The next step is to marinate the beef strips in a mixture of spices and seasonings.

    There are many different recipes for beef jerky seasoning, so you can experiment until you find one that you like.

    Drying Jerky (Dehydrating Jerky)

    After the beef strips are marinated, then they need to be dried. You can do this in a dehydrator or the oven set on the lowest setting with the door slightly open.

    Once the beef jerky is dry, then it is ready to eat.

    Preserving Beef Jerky

    Once the entire batch of homemade jerky is ready and the drying process is complete, place the jerky pieces into small bags or vacuum-sealed packs to preserve your beef jerky for longer.

    Now you know how long beef jerky lasts, you can label your jerky package with an expiration date so you don't end up eating jerky that has passed its best-by date.

    More About Beef Jerky

    What Makes Beef Jerky Good?

    Beef jerky is a good source of protein and it's a low-fat, high-protein snack. Jerky is also portable and easy to store.

    What's the Main Difference Between Commercial Beef Jerky and Homemade Beef Jerky?

    The main difference between commercial beef jerky and homemade beef jerky is that commercial beef jerky is made with leaner cuts of meat and it has a shorter shelf life.

    Is Beef Jerky Raw Meat?

    Beef jerky is not raw meat. Raw meat will spoil quickly and is not safe to eat. Beef jerky is cooked and dried meat. Beef jerky can become rotten meat if not cooked or dehydrated properly.

    Does Beef Jerky Have Blood in It?

    No, beef jerky does not have blood in it. The blood is removed when the meat is cooked during the drying process.

    Can I Lose Weight Eating Beef Jerky?

    Yes, you can lose weight by eating beef jerky. Jerky is a high-protein food that is low in fat and calories. It's a great snack and helps you feel fuller for longer between meals.

    Wrapping Up

    Whether you’re an athlete fueling up, a busy professional grabbing a quick bite, or a home cook experimenting with homemade batches, beef jerky brings something special to the table.

    So, next time you reach for a bag of that savory goodness, remember the journey it took to get there—from selecting the perfect cut of meat to the careful drying process that transforms it into the delicious, high-protein treat we all love.

    And as you savor each chewy bite, you can feel good knowing you’re enjoying a snack that’s not only tasty but also low in fat and packed with protein.

    So go ahead and relish that deliciousness—whether you're hiking, working, or just hanging out at home.

    Beef jerky is more than just a snack; it’s a little piece of joy that lasts! Happy snacking!

    You May Also Enjoy the Following Articles:

    • Best Seasoning For Scrambled Eggs
    • What Does Liver Taste Like
    • Does Fudge Go Bad
    • Do You Wash Onions

    Easy Air Fryer Steak Bites Recipe

    October 8, 2024 by Angela Milnes

    Air Fryer Steak Bites.

    Air Fryer Steak Bites are juicy, flavorful, and ready in minutes. When I’m craving steak without the fuss, this is my go-to—crispy on the outside, tender inside, and totally satisfying.

    Air fryer steak bites on a bite.

    Quick dinners don’t have to be boring, and these steak bites in the air fryer prove it. Perfectly seared with that crispy edge, they’re great for weeknights, game day snacks, or even as party appetizers.

    If you love high-protein, fast meals, check out my Air Fryer Cod Fillet or Air Fryer Yellow Squash too!

    [feast_advanced_jump_to]

    💖 Why This Recipe Works

    • Super Quick – 10 minutes from start to finish.
    • Incredibly Juicy – The air fryer locks in moisture for tender steak bites every time.
    • Crave-Worthy Crust – That seared outer layer? Perfection.

    ⭐ Star Ingredients

    Air Fryer Steak Bites Ingredients.
    • Ribeye Steak – I love how rich and marbled this cut is—flavor-packed and tender.
    • Garlic Powder – Gives a warm, savory depth without overpowering.
    • Worcestershire Sauce – A quick hit of umami magic.
    • Avocado Oil – High smoke point + buttery finish = ideal for air frying.
    • Butter & Parsley – Adds richness and a pop of fresh flavor before serving.

    For the complete list of ingredients with measurements and instructions, please see the recipe card at the bottom of the post.

    📖  Substitutions & Variations

    • Balsamic Glazed Steak Bites – Add a drizzle of balsamic before cooking for a sweet, tangy kick.
    • Rosemary Garlic Butter – Infuse your finishing butter with rosemary for steakhouse vibes.
    • Honey Soy Glaze – For a sticky, sweet-savory finish with sesame seeds.
    • Swap the Cut – Sirloin or tenderloin work just as well as ribeye.

    Want to go all out? Serve with Berry Salad With Goat Cheese or Garlic Rice with Cilantro for a killer combo.

    🔪 How To Air Fry Steak Bites

    Meat pieces on a chopping board.
    1. Step 1: Set your air fryer to 400°F (200°C) and allow it to warm up for approximately 5 minutes. Cut the ribeye steak into bite-sized pieces and place them in a bowl.
    Seasoning meat pieces in a bowl.
    1. Step 2: Add salt, black pepper, and garlic powder to the steak cubes in the bowl. Drizzle avocado oil and Worcestershire sauce over the seasoned steak bites, then toss to ensure each piece is evenly coated.
    Seasoned meat pieces in an sir fryer.
    1. Step 3: Cook the steak bites at 400°F (200°C) for 6-8 minutes, remembering to flip them halfway through for even cooking. Adjust the cooking time based on your preferred level of doneness. Cook the steak bites at 400°F (200°C) for 6-8 minutes, remembering to flip them halfway through for even cooking.
    Air fried steak bites.
    1. Step 4: Adjust the cooking time based on your preferred level of doneness. Once cooked, remove the steak bites from the air fryer and let them rest for a few minutes. Drizzle melted butter over the steak bites and toss to coat thoroughly. Sprinkle freshly chopped parsley over the steak bites as a garnish before serving.
    Serving air fried steaks with a fork.

    👩‍🍳 Expert Tips

    • Uniform Cuts – Keeps everything evenly cooked.
    • Flip Halfway – Promotes even browning on all sides.
    • Don’t Crowd the Basket – Give those bites some space to crisp up!

    💭 FAQs

    What’s the best cut of beef for steak bites?

    Tender cuts like sirloin, ribeye, or tenderloin are ideal for steak bites due to their tenderness and flavor. These cuts remain juicy and flavorful when cooked in the air fryer.

    How long should I cook steak bites in the air fryer?

    Cooking times can vary based on the size of the steak pieces and desired doneness. Generally, preheat your air fryer to 400°F (200°C) and cook the steak bites for 7-12 minutes, shaking the basket halfway through. For medium-rare, aim for 7-8 minutes; for medium, 9-10 minutes; and for medium-well, 11-12 minutes.

    Do I need to preheat the air fryer before cooking steak bites?

    Yes, preheating the air fryer to 400°F (200°C) for at least 5 minutes ensures even cooking and helps achieve a nice sear on the steak bites

    How should I season the steak bites?

    A simple seasoning of salt, pepper, and garlic powder works well. You can also marinate the steak bites in a mixture of olive oil, soy sauce, and your favorite herbs for added flavor.

    Best Way to Store Leftover Steak Bites

    Store in an airtight container for 3–4 days. Reheat in the air fryer for a quick meal later.

    💖 Serving Suggestions

    Serve the following sides with your air fryer steak bites:

    • Green Mashed Potatoes – Creamy and comforting.
    • Air Fryer Roasted Veggies – Try carrots, zucchini, or bell peppers.
    • Sweet Potato Fries – The perfect balance of savory steak and sweet, crispy fries.
    • Cheesy Mashed Cauliflower – A low-carb option that still feels indulgent.
    • Air Fryer Corn on the Cob – Add a little lime and chili powder for a smoky-sweet side.
    • Watermelon Feta Mint Salad – Light, cool, and refreshing—great contrast to the rich steak.
    • Creamed Spinach – A cozy, classic steakhouse-style pairing that’s super satisfying.
    Steak bites on a plate.

    🍽 Try More Fantastic Air Fryer Sides

    • Air Fryer Bok Choy on a white plate covered in paprika.
      Air Fryer Bok Choy
    • Air Fryer Carrot Fries.
      Crispy Air Fryer Carrot Fries
    • How To Roast Peppers In Air Fryer.
      How To Roast Peppers In Air Fryer
    • Air Fryer Crispy Chicken Wings.
      Air Fryer Crispy Chicken Wings

    Did you make this recipe? Leave a review and a ⭐⭐⭐⭐⭐ rating below, or tag us in our Facebook Group! Alternatively, bookmark it in your browser or save to Pinterest.

    Air Fryer Steak Bites.

    Air Fryer Steak Bites

    Angela Milnes
    Get ready for a flavorful and juicy bite with these Air Fried Steak Bites! Perfectly seared on the outside and tender on the inside, these steak bites are a quick and easy way to enjoy a steakhouse favorite at home. Ideal for a fast dinner or a tasty appetizer!
    5 from 5 votes
    Print Recipe Pin Recipe Rate this Recipe
    Prep Time 10 minutes mins
    Cook Time 8 minutes mins
    Additional Time 0 minutes mins
    Total Time 18 minutes mins
    Course Air Fryer Recipes
    Cuisine American
    Servings 2 Servings
    Calories 643 kcal

    Ingredients
      

    • 1 Pound Ribeye Steak
    • 1 Teaspoon Salt
    • ½ Teaspoon Black Pepper
    • ½ Teaspoon Garlic Powder
    • 1 Tablespoon Avocado Oil
    • 1 Tablespoon Worcestershire Sauce
    • 2 Tablespoons Butter melted
    • 1 Tablespoon Fresh Parsley

    Instructions
     

    • Set your air fryer to 400°F (200°C) and allow it to warm up for approximately 5 minutes.
    • Cut the ribeye steak into bite-sized pieces and place them in a bowl.
    • Add salt, black pepper, and garlic powder to the steak cubes in the bowl.
    • Drizzle avocado oil and Worcestershire sauce over the seasoned steak bites, then toss to ensure each piece is evenly coated.
    • Place the steak bites in the air fryer basket in a single layer to avoid overcrowding. Consider cooking them in batches if necessary.
    • Cook the steak bites at 400°F (200°C) for 6-8 minutes, remembering to flip them halfway through for even cooking. Adjust the cooking time based on your preferred level of doneness.
    • Once cooked, remove the steak bites from the air fryer and let them rest for a few minutes. Drizzle melted butter over the steak bites and toss to coat thoroughly.
    • Sprinkle freshly chopped parsley over the air fryer steak bites as a garnish before serving.

    Notes

    Uniform Steak Cuts: Cut the ribeye steak into uniform bite-sized pieces to ensure even cooking throughout.
    Mid-Cook Flip: Remember to flip while cooking steak to ensure they are cooked evenly on all sides.
    Use a Meat Thermometer: To cook your steak perfectly, use a meat thermometer to check the internal temperature and achieve the desired doneness.
     

    Nutrition

    Serving: 1gCalories: 643kcalCarbohydrates: 2gProtein: 46gFat: 50gSaturated Fat: 22gPolyunsaturated Fat: 3gMonounsaturated Fat: 23gTrans Fat: 0.5gCholesterol: 168mgSodium: 2063mgPotassium: 688mgFiber: 0.1gSugar: 1gVitamin A: 391IUVitamin C: 1mgCalcium: 30mgIron: 4mg
    Print Recipe Pin Recipe Rate this Recipe
    Tried this recipe?Let us know how it was!
    Cooked steak bites on a plate.

    Best Cheese for Charcuterie Boards

    October 6, 2024 by Angela Milnes

    Cheese for Charcuterie Boards.

    Cheese is one of the most essential elements when creating a charcuterie platter. But did you know that different cheeses have unique characteristics and tastes? Don't worry - we've done our research, so you don't have to!

    In this article, we'll look at the best types of cheese for a delicious, flavorful charcuterie platter and tips on presentation and pairing ideas for the perfect plate.

    Select Best Cheese for Charcuterie Boards.
    [feast_advanced_jump_to]

    What Is Charcuterie?

    Charcuterie, a French word that originally referred to the craft of preparing and arranging preserved meats, has evolved to encompass the creation of visually appealing and delicious charcuterie boards.

    Charcuterie with cheese is often referred to as a "cheese board," "cheese tray," or "cheese platter."

    These boards often include an assortment of Cheese for Charcuterie, carefully selected to complement the flavors of the meats. To choose the best cheeses for your board, consider a variety of textures and flavors. Also, be sure to purchase a good quality Charcuterie Board for placing all your yummy treats.

    Cheese and other ingredients on charcuterie boards.

    What Are The Two Main Charcuterie Items?

    Charcuterie is a delightful culinary art known for its two main components: cured meats and great cheese.

    Cured meats result from an age-old preservation technique that combines the flavors of salt, spices, and sometimes smoke to create mouthwatering, savory treats.

    On the other hand, cheese is an essential part of any charcuterie board, offering a diverse range of flavors, textures, and aromas.

    Charcuterie with cheese on a wooden board.

    The Right Cheese For Your Charcuterie Board

    Nuts, like almonds or walnuts, can also be added for an extra crunch. Consider adding honey, fruit preserves, or even dark chocolate for a touch of sweetness. Try this Air Fryer Pecans recipe, it will complement your cheeses perfectly.

    Elevate your next charcuterie board with a selection of good cheese that boasts distinct flavors and textures. These are some of the popular cheeses to include in a charcuterie platter.

    Goat Cheese

    Goat cheese is a delightful addition to cheese boards, offering a unique and slightly tangy flavor that pairs well with various accompaniments. This creamy and versatile cheese can elevate the overall experience of savoring a well-curated charcuterie spread made from goat's milk.

    The distinct taste of goat cheese sets it apart from other cheeses commonly found on cheese boards.

    Goat cheese block on a wooden board.

    Blue Cheese

    Blue Cheese is a bold and distinctive addition to any cheese board. Its complex flavor profile ranges from tangy and sharp to creamy and slightly sweet, with a characteristic blue or green veining of mold throughout.

    The texture of blue cheese can vary, but it's generally creamy and smooth, with some crumbly or semi-soft varieties available. Blue cheese is typically made from cow's milk, although some varieties are crafted from sheep or goat's milk, which can impart unique flavors and characteristics.

    When pairing this marvelous cheese with other elements on your cheese board, consider complementing its robust taste with sweet accompaniments, such as honey, fresh fruit, or preserves, to create a delightful balance of flavors.

    Blue cheese slice.

    Cheddar Cheese

    A charcuterie board is incomplete without the inclusion of hard cheese, and aged white cheddar is a perfect choice to elevate the overall experience.

    The taste of cheddar cheese ranges from mild to sharp cheddar, with the sharper flavor resulting from longer aging periods. This delicious cheese is made from cow's milk, which imparts a rich and creamy texture.

    Cheddar cheese portions on a plate.

    As the cheddar matures, its texture becomes firmer and crumbly, making it an ideal companion for other cheeses on the charcuterie board.

    Furthermore, the distinct flavor profile of sharp cheddar adds complexity and depth to the board, enticing your palate with every bite.

    Havarti Cheese

    Charcuterie can be both a meal and an appetizer, depending on the portion size and how it is served. As an appetizer, charcuterie boards usually feature a variety of cured meats, cheeses, olives, fruits, and crackers, intended for sharing among guests before the main course.

    When served as a meal, the charcuterie board or platter typically includes larger portions and a more extensive selection of items to make it more filling and satisfying.

    Havarti cheese is a delightful addition to any charcuterie board, as it is one of the best cheeses in the soft cheese category.

    Havarti cheese slices.

    Originating from Denmark, this creamy, buttery cheese is made from cow's milk, contributing to its rich and smooth texture. The taste of Havarti is often described as mild yet tangy, with a subtle sweetness that pairs exceptionally well with various meats, fruits, and crackers.

    Its semi-soft consistency allows it to be easily spread or sliced, making it a versatile and crowd-pleasing option for your next charcuterie board.

    Creamy Brie Cheese

    Creamy Brie Cheese is undoubtedly one of the favorite cheeses to include in a charcuterie board, and for good reason. This soft cheese has a rich, buttery texture and is a delightful contrast to the savory flavors of meat and tangy fruits.

    Related Article: Does Brie Cheese Go Bad?

    Made from cow's milk, brie offers a mild yet distinct taste that perfectly complements a variety of accompaniments. Brie is a wonderful board cheese because it pairs well with sweet and savory flavors.

    Brie cheese on a wooden board.

    Gouda Cheese

    Smoked Gouda is a well-liked option on charcuterie boards, a semi-soft cheese produced from cow's milk. With its enticing taste and texture, this cheese offers a unique sensory experience that will surely delight your palate.

    The aged Gouda, on the other hand, is a hard cheese with a more pronounced flavor, making it an excellent accompaniment to various cured meats and other delights. Both variations of Gouda cheese feature sweet notes that harmonize beautifully with their rich, creamy textures.

    Gouda cheese on a chopping board.

    Burrata Cheese

    Burrata cheese is a delicious addition to any charcuterie board, providing an exquisite taste and unique texture that will elevate your cheese boards to new heights.

    This soft Italian cheese is made from cow's milk and cream, creating a rich and creamy flavor that melts in your mouth. When sliced open, the outer layer of mozzarella gives way to a soft, spreadable cheese center that is perfect for pairing with crackers, bread, or fresh fruit.

    Among the best cheeses you can choose for your charcuterie board, Burrata's rich and smooth consistency provides a deluxe and indulgent experience that will captivate your guests, leaving them desiring more.

    Burrata cheese and bagel bread on a wooden board.

    Manchego Cheese

    Manchego cheese, originating from the La Mancha region of Spain, is a delightful addition to any charcuterie board. This exquisite sheep milk cheese offers a rich and savory flavor profile that perfectly complements the other elements on the board.

    Its firm texture provides a satisfying bite while the subtle tanginess of the cheese lingers on your taste buds. The use of sheep milk in the production of Manchego cheese imparts a distinctive creaminess that sets it apart from other cheeses, making it an undeniably unique and memorable choice for your next charcuterie board.

    Slices of Manchego cheese on a wooden board.

    Gorgonzola Cheese

    Gorgonzola is one of the semi-soft cheeses with distinctive blue cheese and is an essential addition to any charcuterie board. This delectable cheese boasts an irresistible creamy texture that melts in your mouth, enveloping your taste buds with its intense flavors.

    Made from cow's milk, Gorgonzola is carefully crafted to develop its characteristic blue veins, which impart a sharp, tangy taste that perfectly complements the cheese's rich, buttery undertones.

    Gorgonzola cheese sliced up on a chopping board.

    Gruyere Cheese

    Gruyere cheese, a classic Swiss variety, is an exceptional choice for any cheese board. This hard cheese, made from high-quality cow's milk, offers a delightful combination of taste and texture that will leave you craving more.

    As a firm cheese with a slightly grainy yet smooth mouthfeel, Gruyere provides a satisfying bite that showcases its complex flavor profile. The nutty, slightly sweet, and earthy notes mingle harmoniously on the palate, making it a versatile option for pairing with various accompaniments on your charcuterie board.

    Gruyere cheese on a wooden board.

    Is Charcuterie A Meal Or Appetizer?

    Charcuterie can be both a meal and an appetizer, depending on the portion size and how it is served. As an appetizer, charcuterie boards usually feature a variety of cured meats, cheeses, Olives, fruits, and crackers, intended for sharing among guests before the main course.

    When served as a meal, the charcuterie board or platter typically includes larger portions and a more extensive selection of items to make it more filling and satisfying.

    What Is Traditionally Found On Charcuterie Platters?

    A charcuterie platter is an enticing and aesthetically pleasing array of cured meats, cheeses, and accompaniments, traditionally served as an appetizer or a light meal.

    The star of the board is typically an array of high-quality, thinly sliced meats such as prosciutto, salami, and chorizo.

    Various kinds of cheese are complemented, ranging from soft and creamy brie to sharp cheddar or tangy blue cheese.

    A well-curated charcuterie board includes accompaniments such as crusty bread, crackers, olives, pickles, and dried or fresh fruits to enhance the flavors and textures.

    How To Build the Perfect Cheese Board?

    A charcuterie board is an excellent way to showcase a variety of specialty cheeses alongside an assortment of cured meats, fruits, nuts, and crackers. Follow these simple steps to impress your guests with a stunning cheese board at your next gathering.

    Choose Your Cheeses

    Select a variety of cheeses with different textures and flavors.

    • Soft cheese like Brie, Camembert, or Goat Cheese
    • Semi-soft cheese like Gouda or Havarti
    • Semi-hard cheese like Cheddar or Gruyère
    • Hard cheese like Parmesan or Manchego
    • Blue cheese like Roquefort or Gorgonzola

    Choose 3-5 different cheeses, depending on your board's dimensions and the guest count.

    Add Accompaniments

    Enhance the flavors of your cheeses by adding a variety of accompaniments to your board. These can include:

    • Crackers and bread: Offer a mix of plain and flavored crackers, as well as sliced baguette, French bread or Crusty Bread.
    • Charcuterie: Include a selection of cured meats like prosciutto, salami, and chorizo.
    • Fresh fruit: Grapes, apple slices, sliced pears, berries, and fresh figs add color and natural sweetness.
    • Dried fruits: Figs, apricots, and dates pair well with many types of cheese.
    • Nuts: Almonds, walnuts, and pecans provide a crunchy contrast to the creamy cheeses.
    • Olives and pickles: Briny, tangy flavors complement the richness of the cheese.
    • Spreads: Fig jam, honey, and Mango Chutney With Peppers can enhance and balance the flavors of the cheeses.

    Sun-dried tomatoes and quince paste also pair well with cheese boards.

    Arrange the Board

    When arranging your cheese board, keep these tips in mind:

    • Place the cheeses on the board first, spacing them out evenly.
    • Arrange accompaniments around the cheeses, grouping similar items together.
    • Use small bowls or ramekins for spreads, olives, and pickles to prevent them from mixing with other ingredients.
    • Add cheese knives, spreaders, and small tongs for easy serving.

    Label the Cheeses

    Help your guests identify the cheeses by labeling each one with a small card or tag. Include the name of the cheese and any interesting details, such as its origin or flavor profile.

    Serve at Room Temperature

    To thoroughly savor the tastes and sensations of the cheeses, remove the board from the refrigerator about 30-60 minutes before serving. This will allow the cheeses to come to room temperature.

    Now you're ready to serve and enjoy your perfect cheese board! Bon appétit!

    How Unhealthy Are Charcuterie Boards?

    Charcuterie boards, a popular choice for social gatherings and appetizers, have gained significant attention for their visually appealing presentation and variety of flavors. However, these boards may not always be the best option regarding health.

    The primary components of charcuterie boards, such as processed meats, cheeses, and crackers, are high in sodium, saturated fats, and refined carbohydrates. Consuming large amounts of these ingredients has been linked to increased risks of heart disease, high blood pressure, and weight gain.

    Conclusion

    Creating a charcuterie board with a variety of cheeses is an art that delights both the eyes and the palate.

    From the tangy richness of goat cheese to the smoky sweetness of Gouda, each cheese adds its unique flavor and texture to your board.

    By pairing cheeses with complementary fruits, nuts, and spreads, you can create a balanced and flavorful charcuterie platter that will impress your guests.

    Remember to mix and match textures, balance bold and mild flavors, and add a touch of creativity to your presentation.

    With the cheeses and tips mentioned in this guide, you’re well on your way to building a charcuterie board that’s both delicious and visually stunning.

    So, get your cheeses, cured meats, and accompaniments ready, and let the charcuterie-making begin!

    Air Fryer Yorkshire Pudding

    October 5, 2024 by Angela Milnes

    Air Fryer Yorkshire Pudding.

    Ever tried making Yorkshire pudding in an air fryer? It's a game-changer! This Air Fryer Yorkshire Pudding recipe comes out perfectly golden and fluffy, making them the ideal side for your Sunday roast or any meal. Easy to make and absolutely delicious, you’ll wonder why you haven’t tried this sooner.

    I was born in Yorkshire and grew up eating Yorkshire Puddings..which is why I'm so excited to share this easy Yorkshire pudding recipe today!

    Air Fryer Yorkshire Pudding On A Plate.
    [feast_advanced_jump_to]

    Why This Recipe Works

    • Effortless Preparation: Say goodbye to traditional baking methods; the air fryer streamlines the process, making Yorkshire pudding easier and quicker to prepare.
    • Uniform Cooking: Achieve consistent results every time with the air fryer, ensuring that each Yorkshire pudding is cooked to perfection without any hot spots or uneven baking.
    • Healthier Alternative: By using the air fryer, you can enjoy the goodness of air fryer Yorkshire pudding with less oil, making it a healthier choice compared to traditional frying methods.

    🥘 Ingredients

    Air Fryer Yorkshire Pudding Ingredients.
    • Large Egg: Acts as a binder in the batter, helping the air fryer Yorkshire pudding to rise and maintain its structure while adding richness.
    • Flour: Provides the essential structure for the air fryer Yorkshire pudding, forming the base of the batter. The gluten in the flour helps to trap air and moisture, which contributes to the rise and fluffy texture.
    • Milk: Adds moisture and lightness to the batter, and its fat content contributes to the overall creamy texture of the pudding. The milk also helps to balance the flavors and aids in achieving a golden-brown finish.
    • Salt: A small but crucial ingredient, salt enhances the flavors of the other ingredients and adds depth to the overall taste of the Yorkshire pudding.

    For the complete list of ingredients with measurements and instructions, please see the recipe card at the bottom of the post.

    📖  Substitutions & Variations

    • Spiced Oil Drizzle: Create a spiced vegetable oil drizzle by mixing chili flakes or smoked paprika into the oil before greasing the muffin tins, adding a subtle heat to your Yorkshire puddings.
    • Cheesy Twist: Stir in a handful of grated cheddar or Parmesan cheese into the plain flour batter for a cheesy Yorkshire pudding delight.
    • Crispy Herb Infusion: Brush the muffin tins with extra virgin olive oil infused with herbs like thyme or rosemary before pouring in the batter for an extra layer of flavor and a crispy texture.

    🔪 How To Make Air Fryer Yorkshire Pudding?

    Mixing the flour, salt. egg, and milk in a bowl.

    Step One: In a mixing bowl, combine the flour and salt. Add the egg and a small amount of milk; whisk together to break the yolk and begin forming the batter. Gradually pour in the remaining milk while continuing to whisk. Keep whisking until the batter is smooth. Allow the batter to rest for 30 minutes; this helps develop the structure for a better rise.

    Four small ramekins in an air fryer basket.

    Step Two: Five minutes before you're ready to cook, place the ramekins in the air fryer basket and generously spray them with oil to coat the insides. Preheat the air fryer to 380°F (193°C) with the ramekins inside for 5 minutes.

    Pouring Yorkshire pudding in ramekin bowls.

    Step Three: After preheating, give the Yorkshire pudding batter a quick whisk and pour it into the ramekins, filling them halfway. Cook Yorkshire puddings in an air fryer at 380°F (193°C) for 8 minutes. Then, gently flip the puddings using tongs and cook for an additional 3-5 minutes.

    Cooked Yorkshire pudding in an air fryer.

    Step Four: After three minutes, use the tongs to check the puddings by feeling their weight. They should feel light; if they feel heavy, continue cooking for up to 2 more minutes. Serve the Air Fryer Yorkshire Pudding hot and fresh alongside your favorite roast. Add a simple brown gravy to enhance the savory flavors.

    Air fried Yorkshire pudding on a plate.

    👩‍🍳 Expert Tips

    • Proper Mixture Consistency: Ensure your batter is smooth and lump-free by whisking together the flour, eggs, and semi-skimmed milk until well combined.
    • Use Yorkshire Pudding Tins: Opt for Yorkshire pudding tins or similar shallow, round tins to create the classic shape and size of Yorkshire puddings.

    💭 FAQs

    What Is Yorkshire Pudding?

    Yorkshire pudding is a traditional British side dish that is usually served with a Sunday roast. It consists of an egg-based batter that is cooked in hot fat such as beef dripping, lard or vegetable oil. As the batter cooks and rises, it creates a large, fluffy ‘pudding’ with a crisp, golden-brown surface. It is often served with other side dishes such as mashed potatoes and roasted vegetables.

    What Does Yorkshire Pudding Taste Like?

    Yorkshire pudding is a light and fluffy pastry-like cake, made with eggs, milk, flour, and salt. The batter is similar to pancake batter but is much denser than pancake mixture. It’s not overpoweringly sweet, and it has a mild flavor that pairs nicely with savory dishes like roasted meats or gravy.

    What Is Yorkshire Pudding Called In America?

    Yorkshire pudding is known as in the United States. However, it's important to note that a popover is much sweeter than a traditional Yorkshire pudding and therefore produces a different flavor when served with savory dishes.

    Should I Check On The Yorkshire Puddings While They Are Cooking In The Air Fryer?

    Avoid opening the air fryer during cooking to prevent temperature fluctuations that may affect the rise of the puddings.

    Can I Make Gluten Free Yorkshire Puddings In The Air Fryer?

    Yes, you can use gluten-free flour alternatives to create delicious gluten-free Yorkshire puddings.

    How To Make Yorkshire Pudding In The Oven?

    You can use this Yorkshire pudding batter recipe in the oven. Preheat the oven to 375°F and lightly grease a 12-cup muffin tin or popover pan with cooking spray or butter. Whisk together the flour, salt, eggs and milk until you have a smooth batter.

    Make sure you have a hot oven and the oil is hot before adding batter. Divide the batter evenly between the prepared cups in the tin. Bake for 25 minutes until puffed and golden brown on top.

    Be sure to keep the oven door closed so the batter rises and become light and fluffy. Open the oven door and remove the Yorkshires. Serve warm with your favorite accompaniments.

    Best Way to Store Yorkshire Pudding

    Allow the Air fryer Yorkshire Pudding to cool completely at room temperature before storing. If you have leftovers, place the air fried Yorkshire puddings in an airtight container and store them in the refrigerator. They can typically last for 2-3 days when refrigerated. To store air fryer Yorkshire puddings for a longer period, consider freezing them. Place the cooled puddings in a freezer-safe bag or container, ensuring they are well-sealed to prevent freezer burn. Yorkshire puddings can be frozen for up to 1 month.

    🧂Serving Suggestions

    Here are my favorite sides to serve with Air Fryer Yorkshire Pudding:

    • Gravy: Drizzle rich gravy over Yorkshire puddings to enhance their flavor and add a savory touch.
    • Creamed Spinach: Pair air fryer Yorkshire pudding with creamy and flavorful spinach for a tasty and nutritious side dish.
    • Cranberry Sauce: Add a touch of sweetness by serving air fryer Yorkshire pudding with a side of tangy cranberry sauce.
    • Cheese Sauce: Indulge in a decadent treat by drizzling warm cheese sauce over Yorkshire puddings for a deliciously cheesy twist.
    • Beef Stew: Accompany air fryer Yorkshire pudding with a hearty beef stew, allowing the puddings to soak up the flavorful broth for a comforting meal.
    • Air fryer Roast Beef: Pair your Yorkshire puddings with air fryer roast beef for a traditional and comforting meal.
    Air fried Yorkshire pudding on a plate.

    🍽 Related Recipes

    • edamame stir fry in a white bowl.
      Easy Edamame Stir Fry (15-Minute Protein-Packed Side Dish)
    • Chicken And Cabbage Stir Fry Recipe.
      Chicken And Cabbage Stir Fry Recipe
    • Zucchini Egg Bake Recipe.
      Best Zucchini Egg Bake Recipe
    • New Years charcuterie Board.
      New Years Charcuterie Board

    Did you make this recipe? Leave a review and a ⭐⭐⭐⭐⭐ rating below, or tag us in our Facebook Group! Alternatively, bookmark it in your browser or save to Pinterest.

    Air Fryer Yorkshire Pudding.

    Air Fryer Yorkshire Pudding

    Angela Milnes
    Enjoy a classic British favorite with a modern twist—Air Fryer Yorkshire Pudding! These golden, crispy puddings are light and fluffy on the inside, making them the perfect side dish for your Sunday roast. Quick, easy, and irresistibly delicious!
    5 from 26 votes
    Print Recipe Pin Recipe Rate this Recipe
    Prep Time 5 minutes mins
    Cook Time 12 minutes mins
    Additional Time 30 minutes mins
    Total Time 47 minutes mins
    Course Air Fryer Recipes
    Cuisine British
    Servings 4 Servings
    Calories 91 kcal

    Ingredients
      

    • 1 Egg
    • ½ cup Flour
    • ½ cup Milk
    • ¼ teaspoon Salt

    Instructions
     

    • In a mixing bowl, combine the flour and salt. Add the egg and a small amount of milk; whisk together to break the yolk and begin forming the batter.
    • Gradually pour in the remaining milk while continuing to whisk. Keep whisking until the batter is smooth. Allow the batter to rest for 30 minutes; this helps develop the structure for a better rise.
    • Five minutes before you're ready to cook, place the ramekins in the air fryer basket and generously spray them with oil to coat the insides. Preheat the air fryer to 380°F (193°C) with the ramekins inside for 5 minutes.
    • After preheating, give the Yorkshire pudding batter a quick whisk and pour it into the ramekins, filling them halfway.
    • Cook Yorkshire puddings in air fryer at 380°F (193°C) for 8 minutes. Then, gently flip the puddings using tongs and cook for an additional 3-5 minutes.
    • After three minutes, use the tongs to check the puddings by feeling their weight. They should feel light; if they feel heavy, continue cooking for up to 2 more minutes.
    • Serve the Air Fryer Yorkshire Pudding hot and fresh alongside your favorite roast. Add a simple brown gravy to enhance the savory flavors.

    Notes

    Proper Mixture Consistency: Ensure your batter is smooth and lump-free by whisking together the flour, eggs, and semi-skimmed milk until well combined.
    Use Yorkshire Pudding Tins: Opt for Yorkshire pudding tins or similar shallow, round tins to create the classic shape and size of Yorkshire puddings.

    Nutrition

    Serving: 1gCalories: 91kcalCarbohydrates: 13gProtein: 4gFat: 2gSaturated Fat: 1gPolyunsaturated Fat: 0.3gMonounsaturated Fat: 1gTrans Fat: 0.01gCholesterol: 45mgSodium: 173mgPotassium: 78mgFiber: 0.4gSugar: 2gVitamin A: 109IUCalcium: 46mgIron: 1mg
    Print Recipe Pin Recipe Rate this Recipe
    Tried this recipe?Let us know how it was!

    More Air Fryer Recipes To Add To Your Dinner Menu:

    • Air Fryer Baked Potato Recipe
    • Air Fryer Corn On The Cob
    • Air Fryer Asparagus With Parmesan
    • Thin Sliced Chicken Breast Recipe
    • Air Fryer Cauliflower With Teriyaki Sauce
    • Air Fryer Cod Fillet

    Air Fryer Baked Potato Recipe

    October 5, 2024 by Angela Milnes

    Air Fryer Baked Potato Recipe.

    This Air Fryer Baked Potato Recipe is the shortcut to that crispy baked potato on the outside, fluffy potato on the inside magic—ready in just 60 minutes. It’s the ultimate easy air fryer recipe for when you want comfort food without the oven drama.

    Air Fryer Baked Potato Recipe.

    Oven-baked potatoes are great… but who wants to wait 90 minutes and heat up the whole kitchen? This method gets you fluffy potatoes with crispy skins using just your air fryer. It’s the perfect easy side for weeknight dinners, BBQs, or when you're feeling too cozy to cook.

    Pair them with my Thin Sliced Chicken Breast, Creamy Pan Fried Salmon, or even a big Stuffed Portobello Mushroom for a full-on air fryer dinner party.

    [feast_advanced_jump_to]

    💖 Why This Recipe Works

    • Crispy outside, fluffy inside: The air fryer nails that perfect texture every time.
    • Hands-off cooking: Just prep, pop them in, and chill until dinner.
    • Customizable: From classic butter to full-on chili-loaded, the topping combos are endless.

    ⭐ Star Ingredients

    Ingredients to make air fryer baked potato.
    • Russet Potatoes: The starchy queen of baked spuds—perfect for a pillowy-soft inside and crispy, golden skin.
    • Olive Oil or Spray Oil: A little goes a long way to crisp up the skin and lock in flavor.
    • Salt: Don’t skip it—this simple seasoning helps develop that crave-worthy crust.

    🥔 Bonus tip: Russets are also low-moisture, which makes them ideal for crispy potato recipes like Air Fryer Hasselback Potatoes or Air Fryer Wedges.

    For the complete list of ingredients with measurements and instructions, please see the recipe card at the bottom of the post.

    🔄 Substitutions & Variations

    • No Russets? Try Yukon Gold for a creamier center or sweet potatoes for a cozy, naturally sweet swap.
    • Oil-free? Use aquafaba (chickpea water!) for crispy skins without added fat.
    • Feeling spicy? Add garlic powder, smoked paprika, or rosemary before cooking.
    • Make it a meal: Top with leftover Shredded Chicken, Baked Beans, or chili.
    • Loaded-style: Stuff with Air Fryer Mushrooms, green onions, and spicy queso for baked potato bar magic.

    Hungry for more? You’ll love my Air Fryer Zucchini Fritters or Crispy Okra Chips for crunchy sides!g.

    🔪How To Make Air Fryer Baked Potato

    Three potatoes in air fryer basket.
    1. Step 1: Thoroughly wash the potatoes under running water and dry them with a paper towel. Use a fork to prick each potato multiple times; this allows steam to release while they cook.
    Adding salt to air fryer baked potato.
    1. Step 2: Season each potato with salt.
    spraying oil over potatoes in air fryer basket.
    1. Step 3: Coat potatoes with olive oil or spray oil. Heat the air fryer to 385°F for about 3-5 minutes.
    Turning cooked potatoes in air fryer with tongs.
    1. Step 4: Arrange the potatoes in the air fryer basket, spaced so they do not touch. Cook the potatoes at 385°F for about 60 minutes, adjusting the time based on their size.
    Potatoes baked in air fryer.
    1. Step 5: Turn the potatoes over halfway through the cooking time to cook evenly. Test the potatoes for doneness by piercing them with a fork; they should be soft.
    Air fried baked potato.
    1. Step 6: Remove the potatoes from the air fryer and let them sit for a few minutes before cutting them open. Add butter, herbs, and any other garnish you wish to your air-fried baked potato.

    💡Hint: For extra crispy skins, use a coarse sea salt and don’t wrap them in foil—let them breathe!

    Reheating Baked Potatoes

    Wondering how to reheat a baked potato?

    • To reheat baked potatoes in the air fryer, start by preheating the air fryer to 350°F (175°C) for a few minutes.
    • Place the baked potatoes in the air fryer basket, making sure they are not overcrowded. Reheat baked potatoes at 350°F (175°C) for 8-10 minutes, flipping them halfway through for even heating.
    • If needed, reheat for an additional 2-3 minutes until they are hot. Enjoy your perfectly reheated baked potatoes!
    Making air fryer baked potato.

    👩‍🍳 Expert Tips

    • Use large Russets: They crisp better than waxy varieties and give you that fluffy baked potato interior.
    • Don’t crowd the basket: Space = crispy skin. Overcrowding = steamed potatoes.
    • Reheat like a pro: Pop leftovers back in the air fryer at 350°F for 8–10 minutes to restore crispness.

    💭 FAQs

    Can I use other types of potatoes instead of Russet potatoes?

    While Russet potatoes are ideal for achieving a crispy skin and fluffy interior, you can also use Yukon Gold potatoes. However, they may not get as crispy.

    How do I ensure my potatoes cook evenly in the air fryer?

    Make sure to leave enough space between the potatoes in the air fryer basket to allow the hot air to circulate evenly, which helps them cook evenly.

    How should I store leftover baked potatoes?

    Cool completely, then wrap individually or store in an airtight container in the fridge for up to 5 days. Freeze for up to 3 months.

    💖 Serving Suggestions

    What should I share with this air fryer baked potato recipe:

    • Go classic: Top with butter, sour cream, shredded cheddar, and chives.
    • Make a baked potato bar: Offer toppings like Air Fryer Broccolini, bacon, Red Cabbage Coleslaw, or Air Fryer Mushrooms.
    • Pair it up: Serve alongside Air Fryer Corn on the Cob or Creamy Mashed Cauliflower.
    • Turn it into dinner: Pile on leftover White Chicken Chili, Shredded Chicken, or Black Beans for a full meal.
    • Lighten it up: Pair with a crisp green salad for balance.
    Baked potato ready to be served.

    🍽 More Fantastic Potato Recipes

    • Twice Baked Potatoes.
      Twice Baked Potatoes
    • Crispy Garlic Smashed Potatoes With Parmesan.
      Crispy Garlic Smashed Potatoes With Parmesan
    • Almond Milk Mashed Potatoes.
      Best Almond Milk Mashed Potatoes (Dairy Free)
    • Best Spanish Roast Potatoes.
      Crispy Spanish Roasted Potatoes With Smoky Spices

    Did you make this recipe? Leave a review and a ⭐⭐⭐⭐⭐ rating below, or tag us in our Facebook Group! Alternatively, bookmark it in your browser or save to Pinterest.

    Air Fryer Baked Potato Recipe.

    Air Fryer Baked Potato Recipe

    Angela Milnes
    Enjoy perfectly crispy and fluffy potatoes with these Air Fryer Baked Potatoes! With a golden, crunchy skin and tender inside, these baked potatoes are quick, easy, and a delicious side for any meal. Top them with your favorite toppings for a satisfying treat!
    5 from 5 votes
    Print Recipe Pin Recipe Rate this Recipe
    Prep Time 5 minutes mins
    Cook Time 1 hour hr
    Additional Time 0 minutes mins
    Total Time 1 hour hr 5 minutes mins
    Course Vegetables
    Cuisine American
    Servings 3 servings
    Calories 212 kcal

    Ingredients
      

    • 3 Russet Potatoes
    • 1 tablespoon Olive Oil
    • 1 Cooking Spray Optional instead of Olive Oil
    • ½ teaspoon Salt to taste

    Instructions
     

    • Thoroughly wash the potatoes under running water and dry them with a paper towel.
    • Use a fork to prick each potato multiple times; this allows steam to release while they cook.
    • Coat each potato with olive oil or a spray oil, then season with salt.
    • Heat the air fryer to 385°F for about 3-5 minutes.
    • Arrange the potatoes in the air fryer basket, spaced so they do not touch.
    • Cook the potatoes at 385°F for about 60 minutes, adjusting the time based on their size.
    • Turn the potatoes over halfway through the cooking time to cook evenly.
    • Test the potatoes for doneness by piercing them with a fork; they should be soft.
    • Remove the potatoes from the air fryer and let them sit for a few minutes before cutting them open.

    Notes

    To reheat baked potatoes in the air fryer, start by preheating the air fryer to 350°F (175°C) for a few minutes. Place the baked potatoes in the air fryer basket, making sure they are not overcrowded. Reheat them at 350°F (175°C) for 8-10 minutes, flipping them halfway through for even heating. If needed, reheat for an additional 2-3 minutes until they are hot. Enjoy your perfectly reheated baked potatoes!

    Nutrition

    Calories: 212kcalCarbohydrates: 39gProtein: 5gFat: 5gSaturated Fat: 1gPolyunsaturated Fat: 1gMonounsaturated Fat: 4gSodium: 399mgPotassium: 888mgFiber: 3gSugar: 1gVitamin A: 2IUVitamin C: 12mgCalcium: 28mgIron: 2mg
    Print Recipe Pin Recipe Rate this Recipe
    Tried this recipe?Let us know how it was!

    Air Fryer Onion Rings (With Cheese!)

    October 5, 2024 by Angela Milnes

    Best Air Fryer Onion Rings.

    If you're craving crispy, golden onion rings without the greasy mess of deep frying—this Air Fryer Onion Ring Recipe is your new best friend. Better yet? These bad boys are stuffed with gooey cheese. They're crunchy, melty, and seriously addictive.

    Best Air Fryer Onion Rings.

    Air fryer onion rings are the ultimate upgrade to your snack game—less oil, less mess, and all the crunch. Perfect for game days, summer BBQs, or just a Netflix-and-munch moment. These cheesy onion rings are a next-level twist that’s surprisingly easy to pull off.

    If you're into air fryer snacks, you're also going to love these recipes: Air Fryer Beef Taquitos, Air Fryer Cauliflower Pizza, and Air Fryer Cod Fillet.

    [feast_advanced_jump_to]

    💖 Why This Recipe Works

    • Crispy Perfection: Get that satisfying crunch without the oil bath.
    • Healthier Snacking: Less grease, same great taste.
    • Easy Ingredients: You’ve probably already got most of these on hand!

    Learn how to make the best Air Fryer Onion Rings from scratch—cheese-stuffed or classic style.

    🧅 Star Ingredients

    Air Fryer onion ring ingredients.

    Here are the ingredients for your homemade onion rings:

    • Yellow or Sweet Onions: Choose yellow onions for that classic sharp bite or go with sweet onions for a more mellow, caramelized flavor. Either way, they’re the MVP of every crunchy ring.
    • Mozzarella or Cheddar Cheese: Want creamy and mild? Go with mozzarella. Craving bold and tangy? Cheddar’s your best bet. Both melt beautifully into that cheesy center.
    • Panko & Spices: This triple-threat combo—cornstarch, flour, and airy panko—delivers unbeatable crunch. Paprika and turmeric bring warmth and color, garlic powder punches up the flavor, and a pinch of salt and pepper pulls it all together.

    For the complete list of ingredients with measurements and instructions, please see the recipe card at the bottom of the post.

    📖  Substitutions & Variations

    • No Cheese? Skip it! These onion rings are just as good without. Use vegan mayo for a dairy-free option.
    • Switch Up the Spices: Smoked paprika, chipotle, curry powder—customize your coating!

    If you're loving this recipe, you'll also want to check out our Air Fryer Huli Huli Chicken, Air Fryer Salmon Fillets, or Air Fryer Baby Bella Mushrooms for your next crispy fix.

    🔪 How To Make Air Fryer Onion Rings Stuffed With Cheese

    Making cheese-stuffed air fryer onion rings is so simple and takes just a few steps. Learn how to make onion rings in the air fryer here:

    Onions chopped into rings for making air fryer onion rings.
    1. Step 1: Slice onions into thick rings and separate layers. Match pairs with space for cheese in between.
    Preparing onion rings on a wooden board.
    1. Step 2: Cut cheese slices to fit between rings. Nestle cheese inside each onion pair. Skip steps two and three if you don't want onion rings with no cheese!
    Breading onion rings before air frying.
    1. Step 3: Mix flour, cornstarch, water, and spices into a thick batter. Place panko in a separate bowl.
    Placing onion rings into bread crumbs.
    1. Step 4: Dip each cheese-stuffed ring into the batter, then roll in panko to coat.
    Onion rings in air fryer basket.
    1. Step 5: Spray the air fryer basket and onion rings with oil. Cook at 400°F for 15 minutes, flipping halfway.
    Dipping sauce mixture in a bowl.
    1. Step 6: While they crisp up, mix mayo, sweet chili sauce, and minced garlic for the dipping sauce.

    💡 Hint: Keep your cheese slices snug between the onion rings to avoid melty blowouts.

    👩‍🍳 Expert Tips

    • Pick the Right Onion: Yellow or sweet onions caramelize best and taste amazing.
    • Double Coat = Double Crunch: Batter then panko for that pro-level crisp.
    • Cheese Control: Match the cheese to the ring size so it melts, not oozes.
    • Reheat Like a Pro: Air fry leftovers for 10 mins to bring back the crunch.
    Air fried onion rings in a pile on a chopping board.

    💭 Cheesy Onion Rings FAQs

    Can I prep air fryer onion rings ahead of time?

    Yes! Assemble and freeze them in a single layer, then transfer to a freezer bag. Air fry from frozen, adding 2–3 minutes to the cooking time.

    How do I keep them crispy after cooking?

    Serve immediately or keep them warm in the air fryer at 250°F. Don’t cover them—they’ll steam and lose their crunch.

    Why are my onion rings falling apart?

    Your batter might be too thin or the cheese too small. Keep the cheese snug inside and make sure your batter coats every crevice before adding panko.

    Can I use a different type of cheese to make cheesy onion rings?

    Absolutely. Pepper jack adds spice, provolone melts beautifully, and vegan cheeses work well too—just make sure they’re sliceable and firm.

    💖 Serving Suggestions

    Here’s what to pair with your crispy air fryer onion rings:

    • Air Fryer BBQ Chicken Wings – The ultimate party combo.
    • Beetroot and Black Bean Burgers – Plant-based perfection.
    • Bacon-Wrapped Hot Dogs – Classic summer vibes.
    • Antipasto Kabobs – Great for grazing boards.
    • Kale Apple Salad with Pomegranates – For a fresh contrast.
    • Crispy Air Fryer Carrot Fries – Double the crunch.

    Once you've finished making crispy onion rings in the air fryer serve them with a side of ketchup, BBQ sauce, Honey Mustard Salad Dressing, Herby Ranch Dressing or Lemon Beet Hummus.

    Air fried onion rings and dip.

    🍽 Serve With These Fantastic Dips

    • Greek Beetroot Dip.
      Best Beetroot Dip Recipe (Greek Dip)
    • Easy Smoked Salmon Dip Recipe.
      Easy Smoked Salmon Dip With Capers
    • Instant pot buffalo chicken dip in a dish.
      Instant Pot Buffalo Chicken Dip
    • Whipped Feta Dip.
      Creamy Whipped Feta Dip (With Greek Yogurt & Garlic)

    Did you make this recipe? Leave a review and a ⭐ ⭐ ⭐ ⭐ ⭐ rating below, or tag us in our Facebook Group! Alternatively, bookmark it in your browser or save it to Pinterest.

    Best Air Fryer Onion Rings.

    Air Fryer Onion Rings

    Angela Milnes
    These Air Fryer Onion Rings are crispy, golden, and guilt-free! Made with simple ingredients and no deep frying, they’re a perfect snack or side dish that's easy to whip up and deliciously crunchy every time!
    5 from 3 votes
    Print Recipe Pin Recipe Rate this Recipe
    Prep Time 10 minutes mins
    Cook Time 15 minutes mins
    Total Time 25 minutes mins
    Course Appetizer
    Cuisine American
    Servings 8 Servings
    Calories 327 kcal

    Ingredients
      

    • 2 Large Yellow Onions Or Sweet Onions
    • 8 Oz Block Of Cheese Mozzarella, Or Cheddar
    • ½ Cup Cornstarch
    • ½ Cup Flour
    • 1 Teaspoon Paprika
    • 1 Teaspoon Turmeric
    • ½ Teaspoon Garlic Powder
    • ½ Teaspoon Salt
    • ½ Teaspoon Pepper
    • ¼ Cup Water
    • 2 Cups Panko Breadcrumbs
    • ½ Cup Mayonaise
    • 3 Tablespoons Sweet Chili Sauce
    • 1 Tablespoon Garlic Minced

    Instructions
     

    • Slice the onion horizontally into 1 - ½-inch-thick slices. Using the widest rings first, separate the layers. Pair every other layer of the onion.
    • You want an onion layer-sized space between rings. Save the remaining smaller onion slices for composting, freeze for vegetable broth, or use in another recipe. 
    • Slice the cheese into ⅛-inch-thick slices, then cut the slices to match the height of the ring. Skip steps two and three if you don't want onion rings with no cheese!
    • Place the slices of cheese between the rings filling the void. You may need to slice smaller pieces of cheese to fill any gaps. 
    • In one shallow dish, mix the cornstarch, flour, and spices. Add water until the flour mixture resembles a thick batter.
    • In another shallow dish, add the panko mixture. 
    • Dip onion rings carefully through the batter fully coating them. Then place the coated rings in the panko bread crumbs fully coating them.
    • Fill any space not coated with crumbs. It’s best to coat the assembled rings one or two at a time. 
    • Place the coated onion ring in your oil-sprayed air fryer basket. The. Spray the top of the rings with olive oil. 
    • Cook at 400° for 15 minutes. Flip gently halfway through cooking. 
    • While the onion rings are cooking, mix the mayonnaise, chilli sauce, and minced garlic in a bowl for the dipping sauce. 
    • Once cooked, remove onion rings from the air fryer basket. Allow the onion rings to cool. Serve the cooled onion rings with the dipping sauce. Enjoy!

    Notes

    This recipe is for cheese-stuffed onion rings and is worth a try! If you don't want the added cheese or are looking for a dairy-free recipe, it's okay, you can make these air fryer onion rings without the cheese and replace the mayo with some Vegan Mayo.

    Nutrition

    Calories: 327kcalCarbohydrates: 31gProtein: 10gFat: 18gSaturated Fat: 6gPolyunsaturated Fat: 7gMonounsaturated Fat: 4gTrans Fat: 0.03gCholesterol: 28mgSodium: 588mgPotassium: 122mgFiber: 2gSugar: 6gVitamin A: 325IUVitamin C: 2mgCalcium: 183mgIron: 2mg
    Print Recipe Pin Recipe Rate this Recipe
    Tried this recipe?Let us know how it was!

    Air Fryer Asparagus with Parmesan

    October 5, 2024 by Angela Milnes

    Air Fryer Asparagus with Parmesan.

    Craving a crunchy, cheesy veggie side that’s on the table in under 10 minutes? This Air Fryer Asparagus with Parmesan is crispy, golden, and totally addictive—without turning on the oven!

    Air Fryer Asparagus with Parmesan.

    Think of this as your back-pocket veggie upgrade—fancy enough for date night, fast enough for weeknight dinners, and fabulous alongside almost anything. Roasted flavor, minimal mess, and just the right crunch thanks to the air fryer.

    Try it with a cozy dinner of Chicken Stuffed with Spinach and Dates, a Mediterranean spread with Homemade Olive Tapenade, or something bright and fresh like a Mango Arugula Salad.

    Need a sippable sidekick? Don’t skip the Cranberry Lime Mocktail or my favorite Brazilian Limeade Recipe.

    [feast_advanced_jump_to]

    💖 Why This Recipe Works

    • Super quick & easy with minimal cleanup.
    • Crispy texture + cheesy Parmesan topping = veggie heaven.
    • Healthy, low-carb, and totally kid-approved.

    🛒 Star Ingredients

    air fryer asparagus ingredients.
    • Asparagus Spears – Crisp, grassy, and perfect for air frying—go for medium-thick stalks for best results.
    • Avocado Oil – Helps the cheese stick and crisps everything up without burning.
    • Parmesan Cheese – Adds nutty, salty goodness that turns irresistibly golden in the air fryer.

    For the complete list of ingredients with measurements and instructions, please see the recipe card at the bottom of the post.

    📖  Substitutions & Variations

    • Wrapping Asparagus With Bacon: Try making air fryer asparagus with bacon for a savory treat. Wrap the asparagus spears with bacon and air fry at 400°F for 10-12 minutes until you get crispy bacon-wrapped asparagus.
    • Try Air Fryer Asparagus With Mushrooms: For a delicious and easy side dish, try Air Fryer Asparagus with Mushrooms: simply toss asparagus spears and sliced mushrooms with a bit of olive oil and your favorite seasonings, then air fry at 400°F for about 8-10 minutes until tender and golden.
    • Bacon-Wrapped – Wrap asparagus in bacon and air fry at 400°F for 10–12 mins.
    • Asparagus with Mushrooms – Toss with sliced mushrooms and cook for 8–10 mins.
    • Lemon Zing – Add lemon zest after air frying for a bright finish.
    • Spicy Kick – A pinch of chili flakes before cooking adds heat!
    • Vegan Version – Swap Parmesan for nutritional yeast.

    Love air fryer veggie sides? You’ll also enjoy Crispy Okra Chips, Air Fryer Corn on the Cob, and Air Fryer Potato Wedges.


    🔪 How To Make Air Fryer Asparagus with Parmesan

    Use this section for process shots, alternating between the step and image showing the step. Users don't like seeing process shots cluttering up the recipe card, so include your process shots here.

    air fryer asparagus on chopping board.
    1. Step 1: Preheat air fryer to 400°F (200°C). Trim tough ends off the asparagus.
    asparagus in the air fryer.
    1. Step 2: Place the trimmed asparagus spears in the air fryer basket in a single layer.
    air fryer asparagus with oil on it.
    1. Step 3: Brush the asparagus spears with avocado oil to coat them lightly. Sprinkle salt and black pepper over the oiled asparagus. Toss the spears to ensure the seasonings are evenly distributed. Air fry the asparagus for 6-8 minutes, shaking the basket halfway through the cooking time to promote even cooking.
    cooked asparagus in the air fryer.
    1. Step 4: The asparagus should become tender-crisp and slightly charred, remove the asparagus from the air fryer. Garnish with grated parmesan and serve immediately, while the roasted asparagus is still hot and fresh.

    💡 Hint: Make sure your asparagus is super dry before air frying for the crispiest tips!

    Air Fried Asparagus with Parmesan.

    👩‍🍳 Expert Tips

    • Preheat The Air Fryer: Start by preheating your air fryer to ensure a consistent cooking temperature, which helps the asparagus crisp up better.
    • Dry The Asparagus Thoroughly: Whether fresh or frozen, ensure the asparagus is dry to prevent steam from forming, which can make it soggy instead of crispy.
    • Don’t Overcrowd: Place the asparagus in a single layer with some space between each spear. This allows the hot air to circulate freely, ensuring even cooking and crispiness.

    💭 FAQs

    Can I cook air fryer asparagus with parmesan ahead of time?

    It’s best served fresh, but you can prep everything ahead and cook just before serving.

    Can I cook canned asparagus in air fryer?

    Yes, you can cook canned asparagus in an air fryer; just drain it well, use gentle seasoning, and air fry briefly at a low temperature to warm it up without making it soggy.

    Can I cook frozen asparagus in the air fryer?

    Yes, to make an air fryer frozen asparagus, place the asparagus Yes, but thaw and pat dry before cooking to avoid sogginess.

    Is asparagus keto friendly?

    Yes, asparagus is keto-friendly. It's low in carbohydrates and high in fiber, making it a great vegetable choice for the ketogenic diet. Asparagus also provides a Good Source Of Vitamins A, C, E, K, And Folate, along with various antioxidants, all beneficial in a nutrient-rich, low-carb diet.

    💖 Serving Suggestions

    Here’s what to serve with Air Fryer Asparagus with Parmesan:

    • Pan-Fried Salmon in Creamy Sauce – Buttery and crisp.
    • Thin Sliced Chicken Breast – Quick, lean protein.
    • Cured Beet Salmon – Bright and gourmet.
    • Sabana de Res – Juicy steak with bold flavor.
    • Creamy Mashed Cauliflower – Smooth and low-carb.
    • Easy Oven Baked Chicken – Sweet and savory.
    • Chilean Seabass With Lime And Chili – Zesty and fresh.
    air fried asparagus on a plate.

    🍽 More Delicious Veggie Sides

    • Air Fryer Sweet Potato Fries.
      Air Fryer Sweet Potato Fries
    • Easy Air Fryer Broccolini.
      Easy Air Fryer Broccolini
    • best stuffed mushrooms.
      The Best Stuffed Mushrooms
    • Air fried yellow squash served on plate.
      Air Fryer Yellow Squash (Crispy Slices in 15 Minutes!)

    Did you make this recipe? Leave a review and a ⭐ ⭐ ⭐ ⭐ ⭐ rating below, or tag us in our Facebook Group! Alternatively, bookmark it in your browser or save it to Pinterest.

    Air Fryer Asparagus with Parmesan.

    Air Fryer Asparagus With Parmesan

    Angela Milnes
    Elevate your side dish game with this Air Fryer Asparagus with Parmesan! Crispy on the outside and tender on the inside, this asparagus is perfectly seasoned and sprinkled with savory Parmesan cheese. Quick to make and full of flavor, it's the perfect healthy and delicious addition to any meal. Ideal for weeknight dinners or as a tasty snack!
    5 from 3 votes
    Print Recipe Pin Recipe Rate this Recipe
    Prep Time 5 minutes mins
    Cook Time 8 minutes mins
    Total Time 13 minutes mins
    Course Vegetables
    Cuisine American
    Servings 4 Servings
    Calories 59 kcal

    Ingredients
      

    • 1 lb Asparagus Spears
    • 1 tablespoon Avocado Oil or any high-smoke-point oil
    • ½ teaspoon Salt
    • ¼ teaspoon Black Pepper
    • 1 Tablespoon Grated Parmesan

    Instructions
     

    • Preheat the Air Fryer: Set your air fryer to 400°F (200°C) and allow it to heat up for about 5 minutes.
    • Prepare the Asparagus: Trim the tough ends off the asparagus spears, either by snapping or cutting them.
    • Arrange in the Air Fryer: Place the trimmed asparagus spears in the air fryer basket in a single layer.
    • Oil the Asparagus: Brush the asparagus spears with avocado oil to coat them lightly.
    • Season: Sprinkle salt and black pepper over the oiled asparagus. Toss the spears to ensure the seasonings are evenly distributed.
    • Cook: Air fry the asparagus for 6-8 minutes, shaking the basket halfway through the cooking time to promote even cooking. The asparagus should become tender-crisp and slightly charred.
    • Serve: Remove the asparagus from the air fryer. Garnish with parmesan cheese and serve immediately, while they are still hot and fresh.

    Notes

    Whether using fresh or frozen, ensure the asparagus is dry to prevent steam from forming, which can make it soggy instead of crispy. Cook frizen asparagus for a further 4 -5 minutes

    Nutrition

    Serving: 1gCalories: 59kcalCarbohydrates: 5gProtein: 3gFat: 4gSaturated Fat: 1gPolyunsaturated Fat: 1gMonounsaturated Fat: 3gCholesterol: 1mgSodium: 460mgPotassium: 231mgFiber: 2gSugar: 2gVitamin A: 868IUVitamin C: 6mgCalcium: 39mgIron: 2mg
    Print Recipe Pin Recipe Rate this Recipe
    Tried this recipe?Let us know how it was!

    Best Chinese Dumpling Soup (Instant Pot Recipe)

    October 5, 2024 by Angela Milnes

    Instant Pot Chinese Dumpling Soup.

    Looking for a cozy, flavor-packed meal that’s ready in 30 minutes or less? This Instant Pot Chinese Dumpling Soup is pure comfort in a bowl—and the Instant Pot makes it faster and easier than ever.

    Whether you call it Asian Dumpling Soup, Potsticker Soup, or just “a hug in a bowl,” this one’s going straight into your Instant Pot favorites.

    Instant Pot Chinese Dumpling Soup.

    Dumpling soup is a classic in Chinese cuisine and a winter favorite in our house—though honestly, I make it all year round. It’s quick, soothing, and endlessly customizable.

    If you love this dumpling soup recipe you'll want to try our Air Fryer Bok Choy, and this soup pairs beautifully with simple sides like Spicy Korean Cucumber Salad or Instant Pot Char Siu.

    [feast_advanced_jump_to]

    💖 Why This Recipe Works

    • Fast & fuss-free: Ready in 30 minutes using frozen dumplings and the Instant Pot.
    • Comfort in a bowl: Cozy broth, chewy noodles, and tender dumplings = ultimate comfort food.
    • Family-friendly: Easy to customize and always a hit with kids and adults alike.

    ⭐ Star Ingredients

    instant pot chinese dumpling soup ingredients.
    • Frozen Dumplings: Quick and convenient. They soak up the flavorful broth while holding their shape.
    • Chicken Broth or Vegetable Stock: A rich, savory base. I use low-sodium to control seasoning and boost it with soy sauce and ginger.
    • Baby Bok Choy: Adds crunch, freshness, and nutrients. Softens quickly and pairs perfectly with the dumplings.

    📖  Substitutions & Variations

    • Vegetarian-Friendly – Use veggie broth and plant-based dumplings. Still cozy, still delicious.
    • No Bok Choy? – Try napa cabbage, spinach, or even Chinese broccoli (gai lan).
    • Low Carb Swap – Skip the noodles and add spiralized zucchini or shredded cabbage.
    • Add Protein – Shredded rotisserie chicken or cooked shrimp work great stirred in at the end.
    • Extra Flavor – Add a splash of sesame oil, chili crisp, or rice vinegar when serving.

    If you love Instant Pot soup recipes, you'll want to try Instant Pot Enchilada Soup, Instant Pot Butternut Soup or Instant Pot Chicken Noodle Soup.

    🔪How To Make Chinese Dumpling Soup In The Instant Pot

    1. Step 1: Place your chicken stock or broth, spices, and soy sauce into the Instant Pot. Close your Instant Pot Lid and set the pressure cook button for 0 minutes. Once the pot beeps, perform a quick release of the pressure.
    1. Step 2: While cooking your soup, chop the green onions and clean the bok choy.
    1. Step 3: To clean the baby bok choy, remove the bottom 1 inch of the stalk. Separate and rinse the leaves. Add the bok choy, onions and noodles to the soup pot.
    1. Step 4: Use a slotted spoon to carefully add the frozen dumplings into the large pot. Let the hot pot thaw the dumplings for 10 minutes. Serve your tasty soup and enjoy the wonderful Asian flavors.

    💡 Hint: Setting the cook time to zero in the Instant Pot is a clever trick—it heats the broth perfectly without overcooking the veggies or dumplings.

    👩‍🍳 Expert Tips

    • Don’t Thaw The Dumplings: They’ll soften perfectly in the hot broth.
    • Udon Noodles Cook Fast, so don’t add them until after pressure cooking.
    • Want Spice? Top with chili crisp or sriracha for an extra kick.
    • Storing Leftovers? Add extra broth when reheating as the noodles soak up a lot.
    Instant Pot Chinese Dumpling Soup in a bowl.

    💭 FAQs

    Can I Use Frozen Dumplings In Chinese Soup?

    Yes! Using frozen potstickers for Chinese dumpling soup is quite common and even preferred by some, as it cuts down on time you would need to make homemade dumplings.

    Difference Between Wontons And Dumplings?

    The main difference between Chinese wontons and Chinese dumplings is the shape and filling. Wonton soup dumplings are typically small, square-shaped wrappers filled with ground meat or shrimp mixture while Chinese soup dumplings can come in various shapes and have a variety of fillings including both meat and vegetables.

    Can I Use Another Type of Noodle In This Chinese Soup?

    Yes, feel free to switch up the type of noodles used in this Chinese soup recipe. Rice noodles or lo mein noodles would also make for delicious additions to the chicken broth.

    Can I Add Pan-Fried Dumplings To The Soup?

    Yes, pan-fried Chinese dumplings can also be added to this Chinese soup recipe. Simply pan-fry the dumplings in sesame oil and then add them to the broth before serving.

    How To Store Potsticker Soup

    After preparing Instant Pot Dumpling Soup, store any leftovers in an airtight container and refrigerate for up to three days. The soup may thicken upon cooling, so add a bit of water or broth during reheating, if needed.

    Can I Freeze Instant Pot Dumpling Soup?

    Yes! Let it cool completely, portion into containers, and freeze for up to 3 months. Thaw overnight and reheat gently.

    💖 Serving Suggestions

    Wondering what to eat with Chinese dumpling soup? Here are some suggestions:

    • Asian Cucumber Salad: Tangy and refreshing.
    • Stir Fry Edamame: Protein-packed and snackable.
    • Instant Pot Wild Rice: Great for soaking up that delicious broth.
    • Baked Crispy Salmon Bites: Crispy and satisfying.
    • Instant Pot Kalua Pork: For a meatier contrast.

    Instant Pot Chinese Dumpling Soup in a bowl.

    🍽 More Chinese Recipes To Try

    • Sheet Pan Chinese Chicken With Green Beans.
      Sheet Pan Chinese Chicken With Green Beans
    • Fiery Ginger Garlic Shrimp (Chinese Shrimp).
      Fiery Ginger Garlic Shrimp (Chinese Shrimp)
    • Easy Chinese Chicken Salad.
      Easy Chinese Chicken Salad
    • Instant Pot Asian Pulled Pork.
      Instant Pot Asian Pulled Pork

    Did you make this recipe? Leave a review and a ⭐⭐⭐⭐⭐ rating below, or tag us in our Facebook Group! Alternatively, bookmark it in your browser or save to Pinterest.

    Instant Pot Chinese Dumpling Soup.

    Instant Pot Chinese Dumpling Soup

    Angela Milnes
    Savor the ultimate comfort food with this Instant Pot Chicken Dumpling Soup! Tender chicken, fluffy dumplings, and a flavorful broth come together in this hearty, homemade soup. It’s a quick and easy way to enjoy a classic dish that’s perfect for chilly days or when you need a little comfort in a bowl!
    5 from 3 votes
    Print Recipe Pin Recipe Rate this Recipe
    Prep Time 10 minutes mins
    Cook Time 0 minutes mins
    Total Time 10 minutes mins
    Course Soup
    Cuisine Asian
    Servings 6 Servings
    Calories 359 kcal

    Ingredients
      

    • 10 Cups Chicken or Vegetable Broth
    • 2 tablespoon Soy Sauce
    • 1 Head of Baby Bok Choy
    • 5 Stalks of Green Onions
    • 20 Frozen Dumplings
    • 10 oz Udon Noodles
    • 1 teaspoon Salt
    • 1 teaspoon White Pepper
    • 1 teaspoon Ground Ginger

    Instructions
     

    • Place broth, spices, and soy sauce in the instant pot. Cook on high pressure for 0 minutes. Quick release pressure.
    • While cooking, chop the green onions and clean the bok choy. To clean the bok choy, remove the bottom 1 inch of the stalk.
    • Separate and rinse the leaves. 
    • Add the bok choy, onions, noodles, and dumplings.
    • Let the hot pot thaw the dumplings for 10 minutes. Serve. 

    Notes

    Setting the Instant Pot to zero minutes of cook time is a quick way to bring the pot up to pressure and heat up the broth. This Potsticker soup recipe uses frozen dumplings and does not require any additional cooking time, as the dumplings will thaw in the hot broth when served.

    Nutrition

    Calories: 359kcalCarbohydrates: 62gProtein: 15gFat: 7gSaturated Fat: 1gPolyunsaturated Fat: 0.05gMonounsaturated Fat: 0.1gCholesterol: 11mgSodium: 3066mgPotassium: 116mgFiber: 5gSugar: 9gVitamin A: 946IUVitamin C: 18mgCalcium: 70mgIron: 2mg
    Print Recipe Pin Recipe Rate this Recipe
    Tried this recipe?Let us know how it was!

    More Fantastic Recipes:

    • Bang Bang Salmon
    • Air Fryer Pot Pies Recipe
    • Instant Pot Cacio E Pepe Pasta
    • Instant Pot Kalua Pork
    • Kale Apple Salad With Pomegranates
    • Chicken Caesar Salad Air Fryer Recipe
    • Citrus And Honey Roasted Beets

    Did you make this Instant Pot Chinese Dumpling Soup? Leave a comment and rating below to let us know how it turned out!

    Instant Pot Kalua Pork

    October 5, 2024 by Angela Milnes

    Instant Pot Kalua Pork.

    One of my favorite Pork recipes to make is Instant Pot Kalua Pork. This Hawaiian dish traditionally cooks in an underground oven, or imu, for hours until the meat becomes tender with a smoky flavor.

    With pressure cooking power, this Instant Pot Kalua Pig dish can be made in a fraction of the time without sacrificing any of its delicious taste. A perfect dish to serve with Red Cabbage Coleslaw.

    Instant Pot Kalua Pork on a white plate with pineapple pieces.
    [feast_advanced_jump_to]

    💖 Why This Recipe Works

    You'll love this Kalua Pork recipe because it's incredibly easy to make and packed with smoky, tender flavor. Whether you're cooking for your family or hosting friends, this dish is a crowd-pleaser that takes minimal effort. It's perfect for busy days when you want a hearty, homemade meal without spending hours in the kitchen. Plus, it pairs well with all your favorite sides like rice, veggies, or even in tacos!

    ⭐ Star Ingredients

    Instant Pot Kalua Pork ingredients

    Here are the ingredients you will need for this Kalua Pork recipe.

    • Olive Oil: Infuses richness and a smooth texture to the pork, contributing to the overall succulence.
    • Pork Butt (Whole roast, bone out): A choice cut, boneless for convenient preparation, ensuring tenderness and ease of shredding.
    • Liquid Smoke: Imparts the quintessential smoky flavor reminiscent of traditional imu-roasted pork.
    • Salt (Coarse kosher or Alaea sea salt): Enhances the natural flavors of the pork and adds a perfect touch of seasoning.
    • Water: Facilitates the cooking process, ensuring the pork is tender and juicy in the Instant Pot.

    So few ingredients but a delicious recipe cooked in no time. You don't even need chicken broth!

    For the complete list of ingredients with measurements and instructions, please see the recipe card at the bottom of the post.

    📖  Substitutions & Variations

    • Bacon Instead Of Liquid Smoke: You can certainly use bacon to add smoky flavor, however the taste of your butt roast will not be quite the same as a traditional Kalua pig.
    • Alea Salt Substitute: If you can't get any Hawaiian salt, try using coarse kosher salt instead.
    • Kalua Pig Sauce: While some enjoy the smoky, salty flavors of Kalua pork on their own, others like to add a sauce for added flavor. Traditional Hawaiian sauces that pair well with Kalua pig include teriyaki or sweet chili sauce. For a more unique twist, try adding barbecue or Korean gochujang sauce. Enjoy experimenting with different sauces to find your favorite combination!

    🔪 How To Make Kalua Pork In The Instant Pot

    saute pork in instant pot.
    1. Step 1: Set your Instant Pot to sauté and add the oil. Once the Instant Pot gets hot, place the pork whole into the Instant Pot. Sear all sides of the pork for 3-5 minutes each side. Once seared, remove the pork and set aside. Using a wooden spatula and a little liquid, scrape the pot to prevent a burn notice.
    instant pot deglaze pot.
    1. Step 2: Add the liquid smoke and return the pork to the Instant Pot. Salt the top of the pork. Seal the lid and pressure valve. Set the Instant Pot to 90 minutes on high pressure.
    cooked pork in instant pot.
    1. Step 3: Once finished, let the Instant Pot have a natural release pressure for 15 minutes, then manually release.
    shredded kalua pork on a chopping board.
    1. Step 4: Remove the pork from the Instant Pot onto a cutting board. Using some forks, shred the pork. Add the shredded pork to a plate for serving. Serve pork with steamed rice and peppers, and pineapple.
    kalua pork on a plate with a fork.

    Enjoy your tasty Instant Pot Kalua pork! With this easy cooking method, it's now easier than ever to enjoy this traditional Hawaiian dish in the comfort of your own home. It's absolutely delicious and you won't be disappointed!

    👩‍🍳 Expert Tips

    • Note: If you want the true traditional Kalua pork experience, try cooking Kalua Pork with banana leaves. You can wrap and cook the pork in the leaves.
    • Feel free to add diced onions as well as liquid smoke for added flavor before cooking.

    Don't forget to serve this with a tasty dessert. You'll love our Hawaiian Pumpkin Crunch Cake. It's the bomb!

    💭 FAQs

    What Is Kalua Pork?

    Also known as Hawaiian Pork or Kalua Pig, traditional Kalua pork is a delicious dish made by cooking a pork shoulder. The Kalua pig meat is usually rubbed with Alea sea salt before being cooked for several hours until it becomes tender and infused with smoky flavors.

    What Does Kalua Pork Taste Like?

    Kalua pork is incredibly tender and has a smoky, salty flavor. It pairs well with Hawaiian sides such as lomi tomato, poi, and macaroni salad. Kalua pork is similar to pulled pork and can be used in a variety of dishes such as tacos, sandwiches, salads, or even pizza toppings.

    Why Make Pressure Cooker Kalua Pork?

    Not only is the Instant Pot a quick and easy cooking method, it also helps to infuse flavor into the meat by trapping in moisture while pressure cooking. The result is a tender and delicious Kalua pork dish that can be made in a fraction of the time compared to traditional Kalua pig cooking methods.

    What Is Alea Sea Salt?

    Known as Hawaiian Sea Salt, this salt is made from seawater that is evaporated in the sun and mixed with red volcanic clay known as Alaea. This type of salt gives Kalua pork its distinct reddish color and adds a slightly earthy flavor.

    Do I Have To Perform A Natural Pressure Release?

    No, you can manually release the pressure immediately after cooking for a quicker meal, however, it is recommended to allow for natural release as it results in more tender meat.

    Is Kalua Pork Keto Friendly?

    Yes, this Instant Pot Kalua pork recipe is keto-friendly as it is low in carbs and high in protein. Serve with low-carb sides such as cauliflower rice or salad to make a complete keto meal.

    Is Kalua Pork Gluten Free?

    Yes, this Instant Pot Kalua pork recipe is gluten-free. For a completely gluten-free meal, serve with rice and veggies instead of bread or buns.

    Do I Have To Use A Whole Pork Roast?

    While using a whole roast gives the traditional flavors and texture, feel free to use any cut of pork. For a quicker cooking time, try using boneless pork shoulder roast, cubed pork shoulder, pork loin, pork tenderloin or pork chops. Just adjust the cooking time accordingly.

    How To Cook Kalua Pork In The Slow Cooker?

    If you don't want to use an Instant pot to cook this kalua pork recipe then you might want to try the slow cooker version of kalua pig. To cook slow cooker Kalua Pork , place the pork butt in the slow cooker and mix liquid smoke, sea salt, garlic powder, and onion powder. Cook on low for 8-10 hours or high for 4-6 hours until tender and easily shredded. Serve as desired.

    The Best Way To Store Kalua Pork

    Leftovers can be stored in the refrigerator for up to 4 days or frozen for up to 2 months. Reheat as desired before serving again. Enjoy!
    To freeze Kalua pork, place it into a sealed container or freezer bag for up to 2 months. Thaw before reheating and serving again.

    💖 Serving Suggestions

    These are my favorite dishes to serve with kalua pork:

    • As A Filling: Traditionally, Kalua Pork is served as an entrée with sides to accompany it. However, it can also be added as a protein to a Greek Feta Salad or wraps, served on a bun for sandwiches, or used as a filling for Breakfast Tacos or burritos.
    • Hawaiian Rolls: Kalua Pork Shoulder is great on Hawaiian rolls! Get our Instant Pot Hawaiian Rolls recipe here!
    • Rice and Pasta: Some sides that pair well with Instant Pot Kalua pork include Steamed White Rice, lomi tomato, poi, and Macaroni Salad. For added flavor and texture, serve the Kalua pig with fresh pineapple or sliced bell peppers.
    • Kalua Pig And Cabbage: Another popular dish often served alongside Kalua pork is steamed cabbage, also cooked in the Instant Pot. Simply add cabbage wedges to the pot with the pork during pressure cooking for a tasty and easy side dish. As the cabbage cooks at the same time as the pork butt, it will pick up the smoky flavor of the liquid smoke and create a delicious, tender cabbage dish.
    Instant pot kalua pork on a plate with pineapple pieces.

    🍽 More Instant Pot Recipes

    • Instant Pot Cajun Chicken and Rice.
      Instant Pot Cajun Chicken and Rice
    • Creamy Instant Pot Tortellini Recipe.
      Creamy Instant Pot Tortellini Recipe
    • Instant Pot Kielbasa And Cabbage.
      Instant Pot Kielbasa And Cabbage
    • Instant Pot Enchilada Soup.
      Instant Pot Enchilada Soup

    Did you make this recipe? Leave a review and a ⭐⭐⭐⭐⭐ rating below, or tag us in our Facebook Group! Alternatively, bookmark it in your browser or save to Pinterest.

    Instant Pot Kalua Pork.

    Instant Pot Kalua Pork

    Angela Milnes
    Ready to give this Kalua Pig recipe a try? Check out my favorite Instant Pot Kalua Pork recipe here. You won't be disappointed!
    5 from 3 votes
    Print Recipe Pin Recipe Rate this Recipe
    Prep Time 15 minutes mins
    Cook Time 30 minutes mins
    Total Time 45 minutes mins
    Course Dinners
    Cuisine Hawaiian
    Servings 6 Servings
    Calories 341 kcal

    Ingredients
      

    • 2 Tablespoons Olive Oil
    • 3 Pounds Pork Butt whole roast, bone out
    • 2 Tablespoons Liquid Smoke mesquite, or any flavor
    • 1 Teaspoon Salt coarse kosher or Alaea sea salt
    • ⅔ Cups Water

    Instructions
     

    • Set your Instant Pot to sauté and add the oil.
    • Once the Instant Pot gets hot, place the pork whole into the instant pot. Sear all the sides of the pork for 3-5 minutes each side.
    • Once seared. Remove the pork and set aside. Add the water and cancel the instant pot setting. Using a wooden spatula, scrape any seared meat remnants to prevent a burn notice.
    • Add the liquid smoke and return the pork to the instant pot. Salt the top of the pork.
    • Seal the lid and pressure valve. Set the instant pot to 90 minutes on high pressure.
    • Once finished, let the Instant Pot have a natural release pressure for 15 minutes then manually release.
    • Remove the pork from the Instant Pot onto a cutting board. Using some forks shred the pork. Add the shredded pork to a plate for serving.
    • Serve pork with steamed rice and peppers and pineapple.

    Notes

    If you want the true traditional Kalua pork experience, try cooking Kalua Pork with banana leaves. You can wrap and cook the pork in the leaves.
    Feel free to add diced onions as well as liquid smoke for added flavor before cooking.

    Nutrition

    Calories: 341kcalProtein: 42gFat: 18gSaturated Fat: 5gPolyunsaturated Fat: 2gMonounsaturated Fat: 9gTrans Fat: 0.1gCholesterol: 136mgSodium: 548mgPotassium: 769mgCalcium: 33mgIron: 3mg
    Print Recipe Pin Recipe Rate this Recipe
    Tried this recipe?Let us know how it was!

    More Instant Pot Pork Meals

    Ready to give this Kalua Pig recipe a try? Check out my favorite Instant Pot Kalua Pork recipe here. You'll also love the following recipes.

    • Easy Slow Cooker Keto Pulled Pork
    • Instant Pot Kielbasa And Cabbage
    • Slow Cooker Pot Roast With Beer
    • Instant Pot Pesto Chicken
    • Instant Pot Chicken Adobo
    • Instant Pot Chicken Barley Soup
    Instant pot kalua pork on a plate.

    Instant Pot Cacio E Pepe Pasta

    October 5, 2024 by Angela Milnes

    Instant Pot Cacio E Pepe Pasta.

    This creamy Instant Pot Cacio E Pepe is bold, peppery, and beautifully simple—a Roman classic made even easier with pressure cooking. Ready in under 15 minutes, it’s your new go-to for an authentic cheesy pasta dinner with barely any effort.

    Instant Pot Cacio E Pepe Pasta.

    Whether you’re craving a quick weeknight dinner or an elevated pasta side dish, this Instant Pot Cacio E Pepe delivers classic comfort with minimal ingredients. It’s rich, salty, and deeply satisfying—with the Instant Pot doing all the work.

    Serve it as-is, or dress it up with shrimp, chicken, or veggies for a main dish twist like Chicken Cacio E Pepe. Pair it with Air Fryer Paprika Shrimp or Air Fryer Steak Bites for a restaurant-worthy meal at home.

    [feast_advanced_jump_to]

    💖 Why This Recipe Works

    • Authentic Italian Flavor: Recreates the Roman street food favorite with classic ingredients.
    • Faster with the Instant Pot: No stirring or pasta watching—just set and go.
    • Creamy and Comforting: Silky cheese, fragrant pepper, and tender pasta every time.

    ⭐ Star Ingredients

    Ingredients To Make Cacio E Pepe Pasta.
    • Spaghetti Noodles – I like using classic spaghetti, but tonnarelli or bucatini also work beautifully.
    • Pecorino Romano Cheese – Salty, sharp, and key to that traditional flavor. Always grate it fresh!
    • Freshly Cracked Black Pepper – Coarse cracked pepper gives the dish its signature punch.
    • Chicken Broth – Adds rich, savory flavor to the pasta as it cooks—way better than plain water.

    📌 Want to turn this into Chicken Cacio E Pepe? Add cooked, shredded chicken or seared chicken breast at the end for a full meal in one bowl.

    For the complete list of ingredients with measurements and instructions, please see the recipe card at the bottom of the post.

    📖  Substitutions & Variations

    • Use vegetable broth for a vegetarian-friendly version.
    • Swap noodles: Try bucatini, fettuccini, or angel hair—just adjust cook times slightly.
    • Try parmesan if Pecorino isn’t available, or mix the two for balance.
    • Add protein: Stir in cooked shrimp, sautéed mushrooms, or pre-cooked chicken for easy variations like chicken cacio e pepe.
    • Want it spicy? Add red pepper flakes or a dash of chili oil at the end.
    • Seasonal Veggie Variation: Toss in halved cherry tomatoes, blanched asparagus, or even baby spinach at the end for a pop of freshness and color.

    Craving more pasta? Try these reader favorites from the blog: Spicy Lasagna Soup with Oregano, Slow Cooker Cowboy Butter Pasta or Italian Sausage And Broccoli Pasta.

    🔪 How To Make Instant Pot Cacio E Pepe

    Spaghetti noodles and chicken broth in an Instant Pot.
    1. Step 1: First, add the spaghetti noodles and chicken broth to your inner pot. Be sure to break the noodles up and submerge them in the broth. Next, close the Instant Pot lid, push the pressure valve to the sealing position, hit the manual or pressure cook button, and set the timer for 8 minutes.
    Cooked noodles in Instant Pot.
    1. Step 2: Once your Instant Pot beeps, do a quick release by pushing the pressure valve to the venting position to release the pressure. Let the noodles cool for 1 minute. Then, add ⅓ cup of the pecorino romano at a time to your noodles.
    Pasta combined with other ingredients and cheese.
    1. Step 3: Mix everything well with tongs. Repeat until all the cheese is mixed into your pasta.
    Cacio E Pepe Pasta Cooked In Instant Pot.
    1. Step 4: Finally, add your desired amount of freshly cracked black pepper to your noodles. Serve your cheesy spaghetti noodles in a bowl alongside your favorite protein or green salad.

    💡Bonus tip: Swirl in 1 tablespoon of butter or a drizzle of olive oil before serving to elevate richness and create an extra silky sauce.

    Cacio E Pepe Pasta.

    👩‍🍳 Expert Tips

    • Turn OFF the heat before adding cheese – residual heat is enough to melt the cheese without making it clump.
    • Add cheese slowly – mixing gradually helps create that silky sauce instead of a sticky mess.
    • Grate your own cheese and pepper – pre-grated just doesn’t deliver the same flavor punch.
    • Double the batch – leftovers reheat surprisingly well with a splash of broth or milk.
    Instant Pot Cacio E Pepe Pasta In A Bowl.

    💭 FAQs

    What does “Cacio E Pepe” mean?

    It means “cheese and pepper” in Italian. This classic Roman pasta dish uses just a few ingredients but packs tons of flavor.

    How To Pronounce Cacio E Pepe?

    This Italian pasta dish is pronounced as ca-cho ee pepe.

    Is Cacio Pepe Vegetarian?

    Cacio e pepe is typically made with Pecorino Romano cheese, which is made from sheep's milk and therefore not technically vegetarian.

    However, you can easily substitute the Pecorino for a vegetarian alternative such as Parmesan or nutritional yeast to make this dish vegetarian-friendly!

    Can I Use Rigatoni Or Fresh Pasta For Cacio E Pepe?

    Yes! Just adjust the cook time. Fresh pasta needs about 2–3 minutes under pressure, and rigatoni needs 10–11 minutes.

    Why Is My Cheese Clumping?

    Your pot may have been too hot. Always turn it off before adding the cheese to your cacio e pepe and stir in slowly.

    Can I make Chicken Cacio E Pepe in the Instant Pot?

    Yes! Sear thinly sliced chicken first, set aside, and stir it back in after the pasta is cooked and cheese is added.

    💖 Serving Suggestions

    Serve this creamy Instant Pot Cacio e Pepe with:

    • Air Fryer Asparagus with Parmesan for a quick, garlicky green veggie.
    • Roasted Beet Salad with Feta and Walnuts for a sweet-savory contrast.
    • Air Fryer Zucchini Fritters to add a crispy, veggie-packed side.
    • Kale Butternut Squash Salad with Blueberries for a fresh, vibrant pairing.
    Cacio E Pepe Pasta In A Bowl.

    🍽 Enjoy These Easy Pasta Dishes

    • Italian sausage and broccoli pasta in a skillet.
      Creamy Italian Sausage And Broccoli Pasta (With Mascarpone)
    • Ground Turkey Pasta.
      Ground Turkey Pasta
    • Cowboy Butter Pasta In Creamy Sauce, Topped with sliced lemons.
      Cowboy Butter Pasta In Creamy Sauce
    • Jamaican Jerk Pasta With Shrimp.
      Jamaican Jerk Pasta With Shrimp

    Did you make this recipe? Leave a review and a ⭐⭐⭐⭐⭐ rating below, or tag us in our Facebook Group! Alternatively, bookmark it in your browser or save to Pinterest.

    Instant Pot Cacio E Pepe Pasta.

    Instant Pot Cacio E Pepe

    Angela Milnes
    This Cacio e Pepe Instant Pot Recipe is the ultimate easy comfort food! This classic Italian dish features perfectly cooked pasta tossed in a creamy, cheesy sauce with a kick of black pepper, all made in just minutes using your Instant Pot.
    5 from 4 votes
    Print Recipe Pin Recipe Rate this Recipe
    Prep Time 15 minutes mins
    Cook Time 6 minutes mins
    Total Time 5 minutes mins
    Course Dinners
    Cuisine Italian
    Servings 4 Servings
    Calories 453 kcal

    Ingredients
      

    • 8 oz Spaghetti Noodles Uncooked, broken in half
    • 2, ½ Cups Chicken Broth
    • 2.5 Cups Pecorino Romano grated, fresh
    • ¼ Teaspoon Black Pepper

    Instructions
     

    • Add to your instant pot your spaghetti noodles and chicken broth. Close the lid on your instant pot and make sure your sealing valve is closed as well. Set your instant pot to high-pressure for 8 minutes.
    • Once your instant pot is done cooking, do a quick release by bringing the sealing valve toward you and releasing the pressure.
    • Wait about one minute to allow the noodles to cool. Add ⅓ cup of cheese at a time to your spaghetti noodles and broth mixture. Mix well with tongs. Repeat until cheese is done.
    • Add in your desired amount of cracked pepper to your instant pot. I did about 2 tablespoons cracked pepper for the entire pot, but you may enjoy more or less. You can also add more to each prepared dish. 
    • Transfer to your serving bowl and enjoy!

    Notes

    Turn Your Instant Pot Off: Before adding the Pecorino Romano, make sure the Instant Pot is turned off and not on keep warm. If you don’t turn the Instant pot off the cheese will clump together.
    Add Cheese to Warm Noodles: Don’t let the noodles cool longer than a minute otherwise the cheese won’t melt easily.
    Use Freshly Grated Peppercorns: Freshly cracked peppercorns have much more flavor than the pre-grated containers.
    For Best Flavor: Top with extra cracked black pepper, grated pecorino romano cheese, and some fresh parsley for added flavor and garnish. Yum!

    Nutrition

    Calories: 453kcalCarbohydrates: 45gProtein: 27gFat: 18gSaturated Fat: 11gPolyunsaturated Fat: 1gMonounsaturated Fat: 5gCholesterol: 65mgSodium: 756mgPotassium: 184mgFiber: 2gSugar: 2gVitamin A: 261IUCalcium: 678mgIron: 1mg
    Print Recipe Pin Recipe Rate this Recipe
    Tried this recipe?Let us know how it was!
    Cacio E Pepe Pasta In Bowl Served With A Fork And A Spoon.

    Best Instant Pot Pesto Chicken 

    October 5, 2024 by Angela Milnes

    Instant Pot Recipes.

    If you're looking for a delicious chicken recipe to try in your pressure cooker then you'll love this Instant Pot Pesto Chicken! It's made with simple ingredients and you can simply set it and forget it! This pesto chicken Instant Pot recipe is amazing.

    PESTO WHOLE CHICKEN
    [feast_advanced_jump_to]

    💖 Why This Recipe Works

    • Incredibly Flavorful: The pesto gives the chicken a robust, herby taste that's simply irresistible.
    • Effortless Cooking: With the Instant Pot, you get tender, juicy chicken in less time.
    • Versatile Dish: This Pesto Whole Chicken pairs well with pasta, salad, or on its own.

    ⭐ Star Ingredients

    instant pot pesto chicken ingredients
    • Whole Chicken: Provides juicy and flavorful meat that absorbs the pesto flavors, resulting in a delicious and satisfying dish.
    • Head of Garlic: Infuses the chicken with a mild and aromatic garlic flavor, adding depth and enhancing the overall taste profile.
    • Lemon: Adds a tangy and refreshing element to balance the richness of the chicken and complement the pesto sauce.
    • Salt and Black Pepper: Seasonings that enhance the natural flavors of the chicken, ensuring a savory and well-rounded taste.
    • Dried Basil: Introduces an earthy and herbaceous flavor that complements the pesto, creating a delightful blend of aromas in every bite.
    • Water: Provides moisture for cooking the chicken, resulting in tender and juicy meat while infusing the flavors of other ingredients.
    • Prepared Basil Pesto: The star ingredient that coats the chicken with vibrant and fragrant flavors, elevating the dish to new heights of deliciousness.

    For the complete list of ingredients with measurements and instructions, please see the recipe card at the bottom of the post.

    📖  Substitutions & Variations

    • Swap water for chicken broth when pressure cooking for an extra boost of savory flavor—because more flavor is always a win! 🍗✨
    • No whole chicken? No problem! Use boneless, skinless chicken breasts or thighs for easy pesto chicken—just set your pressure cooker to 12 minutes on high and let the magic happen!

    🔪 How To Make Instant Pot Pesto Chicken

    Remove giblets from the cavity of the chicken. Stuff the chicken with the garlic and lemon.

    Season the outside of the chicken with salt, black pepper, and basil.

    whole chicken in instant pot

    Pour 1 cup of water into the electric pressure cooker. Lower the chicken into the pressure cooker using a trivet. Cover the electric pressure cooker with the lid and set the valve to “sealing.” Program the electric pressure to cook on “manual” or “pressure cook” for 25 minutes.

    whole chicken in instant pot

    When the cooking cycle is complete, allow the pressure to naturally release for 15 minutes before performing a quick release of the remaining pressure.

    Check the internal temperature of the chicken to verify it is 165 degrees in the dark meat without touching the bone. Preheat the oven to broil. Prepare a baking sheet with aluminum foil for easy cleanup. Carefully remove the lid of the electric pressure cooker and transfer the chicken to the prepared baking sheet.

    whole chicken in instant pot

    Broil the chicken for 5 to 10 minutes, watching closely to avoid burning.

    whole chicken in instant pot

    Spread the basil pesto sauce over the top of the chicken. Slice and serve with additional basil pesto if desired.

    whole chicken in instant pot with pesto

    This Instant Pot Pesto Chicken recipe is perfect for a weeknight meal or to serve at a dinner party! It's always a hit and so easy to make. Enjoy!

    👩‍🍳 Expert Tips

    • Boost Flavor with Chicken Broth: Instead of water, use chicken broth for cooking the chicken in the Instant Pot. It enhances the depth of flavor and makes the dish even more savory.
    • Broil for Extra Crispness: After cooking in the Instant Pot, broil the chicken for 5-10 minutes to crisp up the skin. This adds texture and a delicious contrast to the tender chicken.
    • Use Fresh Pesto for Better Taste: Homemade pesto is highly recommended for the freshest, most vibrant flavor. It allows you to control the balance of ingredients, especially the garlic and olive oil ratio.
    • Rest the Chicken Before Serving: Let the chicken rest for a few minutes after cooking and before slicing. This allows the juices to redistribute, making the meat more moist and flavorful.

    💭 FAQs

    What Is Pesto Chicken?

    Pesto chicken is chicken that has been cooked with pesto sauce. The pesto sauce is usually made from fresh basil, garlic, olive oil, and Parmesan cheese. Some recipes also call for pine nuts. Pesto chicken can be served hot or cold and is often served over pasta, rice, or potatoes.

    Best Pesto For Chicken

    There are many different types of pesto sauce, but the best pesto for chicken is probably a traditional basil pesto. If you want to change things up, though, you could try a sun-dried tomato pesto or even a spinach pesto. I like to use homemade pesto sauce so I can control the taste.

    How Long Does Pesto Last?

    Pesto sauce can last in the fridge for up to a week, but it's best if used within 3-4 days. If you want it to last longer, you can freeze it in an airtight container for up to 6 months.

    Can I Make Pesto Chicken Without A Pressure Cooker?

    Yes! If you don't have a pressure cooker, you can make this dish in the oven. Just roast the chicken at 425 degrees Fahrenheit for about 45 minutes to an hour, or until it's cooked through. Then, follow the rest of the recipe as directed.

    💖 Serving Suggestions

    Pair Instant Pot Pesto Chicken with these vegetables:

    • Roasted Vegetables: Toss a mix of zucchini, cherry tomatoes, and bell peppers with olive oil, garlic, and Parmesan. Roast until golden.
    • Mashed Potatoes: Try serving your pesto chicken with mashed potatoes and veg for a hearty meal.
    • Mushroom Risotto: Create a luscious mushroom risotto using Arborio rice, mushrooms, and a splash of white wine in the Instant Pot.
    • Cauliflower Mash: Make a low-carb alternative to mashed potatoes by blending cooked cauliflower with cream, butter, and garlic.
    whole chicken in instant pot with pesto

    🍽 More Instant Pot Recipes

    • Instant Pot Cajun Chicken and Rice.
      Instant Pot Cajun Chicken and Rice
    • Creamy Instant Pot Tortellini Recipe.
      Creamy Instant Pot Tortellini Recipe
    • Instant Pot Kielbasa And Cabbage.
      Instant Pot Kielbasa And Cabbage
    • Instant Pot Enchilada Soup.
      Instant Pot Enchilada Soup

    Did you make this recipe? Leave a review and a ⭐⭐⭐⭐⭐ rating below, or tag us in our Facebook Group! Alternatively, bookmark it in your browser or save to Pinterest.

    Instant Pot Recipes.

    Instant Pot Pesto Chicken

    Angela Milnes
    Whip up a quick and flavorful meal with this Instant Pot Pesto Chicken! Juicy chicken breasts are cooked to perfection in the Instant Pot and smothered in a vibrant, herby pesto sauce. It’s a simple yet delicious dish that’s perfect for busy weeknights, and pairs wonderfully with pasta, rice, or a fresh salad. Easy, flavorful, and sure to become a family favorite!
    5 from 4 votes
    Print Recipe Pin Recipe Rate this Recipe
    Prep Time 5 minutes mins
    Cook Time 25 minutes mins
    Additional Time 25 minutes mins
    Total Time 55 minutes mins
    Course Dinners
    Cuisine American
    Servings 8 Servings
    Calories 359 kcal

    Ingredients
      

    • 4 pounds Whole Chicken
    • 1 Bulb Garlic
    • 1 Lemon cut in half through the width
    • pinch Salt to taste
    • 1 pinch Pepper
    • ½ Teaspoon Dried Basil
    • 1 Cup Water
    • 1 Cup Basil Pesto

    Instructions
     

    • Remove giblets from the cavity of the chicken. Stuff the chicken with the garlic and lemon. Season the outside of the chicken with salt, black pepper, and basil.
    • Pour 1 cup of water into the electric pressure cooker. Lower the chicken into the pressure cooker using a trivet.
    • Cover the electric pressure cooker with the lid and set the valve to “sealing.” Program the electric pressure to cook on “manual” or “pressure cook” for 25 minutes.
    • When the cooking cycle is complete, allow the pressure to naturally release for 15 minutes before performing a quick release of the remaining pressure.
    • Check the internal temperature of the chicken to verify it is 165 degrees in the dark meat without touching the bone.
    • Preheat the oven to broil. Prepare a baking sheet with aluminum foil for easy cleanup.
    • Carefully remove the lid of the electric pressure cooker and transfer the chicken to the prepared baking sheet.
    • Broil the chicken for 5 to 10 minutes, watching closely to avoid burning.
    • Spread the basil pesto over the top of the chicken. Slice and serve with additional basil pesto if desired.

    Nutrition

    Serving: 1gCalories: 359kcalCarbohydrates: 4gProtein: 22gFat: 28gSaturated Fat: 7gPolyunsaturated Fat: 4gMonounsaturated Fat: 7gTrans Fat: 0.1gCholesterol: 84mgSodium: 368mgPotassium: 228mgFiber: 1gSugar: 1gVitamin A: 781IUVitamin C: 9mgCalcium: 68mgIron: 1mg
    Print Recipe Pin Recipe Rate this Recipe
    Tried this recipe?Let us know how it was!

    More Instant Pot Recipes

    • Instant Pot Wild Rice Blend With Pomegranates
    • Long Grain White Rice Instant Pot Recipe
    • Instant Pot Cajun Rice And Beans Recipe
    • Instant Pot Chicken Noodle Soup
    • Baked Crispy Salmon Bites On Rice
    • Instant Pot Cajun Chicken and Rice

    Best Cheese Fondue Recipe (Three Cheeses) Instant Pot

    October 5, 2024 by Angela Milnes

    creamy cheese fondue in an instant pot surrounded by crunchy vegetables in bowls.

    This Cheese Fondue Recipe is what comfort food dreams are made of—rich, gooey cheese with everything from pretzels to apples getting the dip treatment. And thanks to the Instant Pot, it’s way easier than you’d think.

    creamy cheese fondue in an instant pot surrounded by crunchy vegetables in bowls.
    [feast_advanced_jump_to]

    Cheese fondue is having a serious moment—and honestly, it’s about time. This Instant Pot version delivers that silky, restaurant-style texture without the hassle of a traditional fondue pot. It’s quick, foolproof, and way more fun than another basic cheese dip.

    If cozy, dippable things make you happy (same!), check out my Birthday Charcuterie Board, Smoked Salmon Dip, or Air Fryer Zucchini Fritters for more snacky inspiration.

    💖 Why This Recipe Works

    • Restaurant-style fondue at home – no fancy equipment needed.
    • Three cheeses = depth, creaminess, and balance.
    • Foolproof method using the Instant Pot’s sauté function.

    🥘 Ingredients

    instant pot fondue cheese ingredients.
    • Swiss Cheese – This one’s a fondue staple in my kitchen. It’s nutty, mellow, and melts like a dream. That classic cheese pull everyone loves? Thank Swiss for that.
    • Gouda – I’m a big fan of using mild Gouda here—it’s rich, buttery, and adds that super creamy texture. I always shred it fresh because the pre-shredded stuff just doesn’t melt the same.
    • Gruyère – This is where the magic happens. Gruyère brings just enough saltiness with a subtle sweet note that balances out the richness of the other cheeses. It gives your fondue that depth people can’t quite put their finger on—but they always go back for more.

    For the complete list of ingredients with measurements and instructions, please see the recipe card at the bottom of the post.

    📖  Substitutions & Variations

    • Swap in beer for wine for a fun pub-style twist.
    • Add jalapeños or hot sauce if you like it spicy.
    • Fancy it up with truffle oil or smoked paprika.
    • No wine? Use broth with lemon juice—still dreamy.

    Texture is everything when it comes to a great fondue spread. The creamy cheese pairs best with a mix of crunchy, crispy, and soft dippers. Try it with my Air Fryer Beet Chips, Cheesy Mashed Potato Pancakes, or Air Fryer Chimichangas for a satisfying mix of flavors and textures that make every dip better.

    🔪How To Make Instant Pot Fondue

    Are you ready to learn how to make your own fondue easily at home? It's so simple to do! You're going to love it!

    Cheese in a bowl.
    1. Step 1: Mix the cheeses with the cornstarch.
    Water, garlic, and lemon juice in the Instant Pot.
    1. Step 2: Set your Instant Pot to sauté and add the wine, water, garlic, and lemon juice. Bring to a boil.
    Melting and whisking cheese with other cooked ingredients.
    1. Step 3: Once boiling, add the cheese and stir until melted. Add nutmeg and mustard to the cheese melting pot. 
    Broccoli dipped in cheese fondue.
    1. Step 4: Dip your favorite veggies, apples, and bread in the Instant Pot.
    Serving broccoli floret dipped in cheese fondue.

    👩‍🍳 Expert Tips

    • Use cornstarch—it keeps everything silky and prevents separation.
    • Go low and slow—stir gently and don’t let it overheat.
    • Use a wooden spoon or silicone whisk to avoid scratching the Instant Pot and keep the mix smooth.
    Instant pot cheese fondue with broccoli dipped in.

    💭 FAQs

    Can I make this without an Instant Pot?

    Absolutely! Use a saucepan on the stove or a classic fondue pot.

    Why is my fondue clumpy?

    If your fondue is lumpy and not smooth, then you more than likely have overcooked your fondue. Be careful and pay attention to cook times and temperatures.

    What cheeses work best in a cheese fondue recipe?

    This one uses Swiss, Gouda, and Gruyère—but Fontina or Emmental are great too.

    How do I keep this cheese fondue recipe warm?

    Use the Instant Pot’s "Keep Warm" setting or place the bowl over simmering water. A tea light fondue set also works!

    How do I reheat cheese fondue?

    To reheat, gently warm the refrigerated cheese fondue on the stovetop over low to medium heat, stirring continuously. Add a splash of white wine or broth if the consistency needs adjusting. Reheat it slowly to prevent the cheese from becoming grainy or seizing up.

    💖 Serving Suggestions

    • Soft Pretzel Bites – Chewy, salty, and perfect for scooping up cheese.
    • Steamed Broccoli & Cauliflower – Veggie dippers that hold their shape.
    • Sliced Apples or Pears – Sweet and fresh for contrast.
    • Toasted Baguette Slices – Crunchy and classic.
    • Boiled Baby Potatoes – Hearty and filling.
    • Air Fryer Zucchini Fritters – Crispy and packed with hidden veggies.
    veggies in different bowls and cheese fondue in an Instant Pot.

    🍽 You'll Love These Easy Dip Recipes

    • Best Caramelized Onion Dip With Chives.
      Best Caramelized Onion Dip With Chives
    • Greek Beetroot Dip.
      Best Beetroot Dip Recipe (Greek Dip)
    • Whipped Feta Dip.
      Creamy Whipped Feta Dip (With Greek Yogurt & Garlic)
    • Instant pot buffalo chicken dip in a dish.
      Instant Pot Buffalo Chicken Dip

    Did you make this recipe? Leave a review and a ⭐⭐⭐⭐⭐ rating below, or tag us in our Facebook Group! Alternatively, bookmark it in your browser or save to Pinterest.

    Instant Pot Fondue Cheese Recipe.

    Best Cheese Fondue Recipe - Instant Pot

    Angela Milnes
    Enjoy this delicious 3 cheese fondue recipe. It will have everyone coming back for more!
    5 from 4 votes
    Print Recipe Pin Recipe Rate this Recipe
    Prep Time 15 minutes mins
    Cook Time 20 minutes mins
    Total Time 35 minutes mins
    Course Condiments
    Cuisine American
    Servings 6 Servings
    Calories 504 kcal

    Ingredients
      

    • 1. ½ Cup Shredded Swiss Cheese
    • 1, ½ Cups Shredded Gouda Cheese
    • 1, ½ Cup Shredded Gruyere Cheese
    • 6 Tablespoons Corn-starch
    • 1 Cup Of White Or Rose Wine
    • 1 Cup Of Water Or Chicken Broth
    • 2 Tablespoons Minced Garlic
    • 3 Tablespoon Lemon Juice
    • ½ Teaspoon Nutmeg
    • 1, ½ Teaspoon Dijon Mustard

    Instructions
     

    • Mix the cheeses with the corn starch.
    • Set your instant pot to sauté and add the wine, water, garlic, and lemon juice.
    • Bring to a boil.
    • Once boiling, add the cheese and stir until melted. 
    • Once melted add the nutmeg and mustard. 
    • Dip your favorite veggies, apples, and bread in the instant pot.

    Notes

    Shredded Cheese: To speed up the process use pre shredded cheese. This will help cut down on preparation time and get your cheese fondue ready to enjoy even faster.

    Nutrition

    Calories: 504kcalCarbohydrates: 12gProtein: 33gFat: 35gSaturated Fat: 22gPolyunsaturated Fat: 1gMonounsaturated Fat: 10gCholesterol: 130mgSodium: 934mgPotassium: 171mgFiber: 0.3gSugar: 2gVitamin A: 873IUVitamin C: 5mgCalcium: 1002mgIron: 1mg
    Print Recipe Pin Recipe Rate this Recipe
    Tried this recipe?Let us know how it was!

    Air Fryer Bang Bang Salmon (Fast, Spicy & Crispy!)

    October 5, 2024 by Angela Milnes

    Best Air Fryer Salmon Recipe: Bang Bang Salmon.

    Ready to take your salmon game to the next level? This Air Fryer Bang Bang Salmon is spicy, creamy, and irresistibly crispy on the outside while staying juicy inside. Best part? It’s ready in just 10 minutes! You'll never want to make salmon any other way again!

    Best Air Fryer Salmon Recipe: Bang Bang Salmon.

    We love a fast, flavorful dinner, and this bang bang air fryer salmon checks all the boxes. It’s loaded with bold Asian-inspired flavors, super easy to cook, and healthier than traditional fried versions. The spicy bang bang sauce caramelizes slightly in the air fryer, creating a crave-worthy crust.

    If you love this recipe be sure to check out our Chilean Sea Bass With Lime, Chili And Ginger. You'll also want to check out how to Air Fry Cod Fillets or Baked Seabass With Lemon and Herbs (Chilean)

    [feast_advanced_jump_to]

    💖 Why This Recipe Works

    • Big Flavor, Minimal Effort: Just 5 main ingredients and 10 minutes in the air fryer.
    • Bold, Creamy Sauce: Bang bang sauce delivers the perfect balance of heat, sweetness, and tang.
    • Perfect Texture: Crispy on the outside, tender and flaky inside—no flipping required!

    ⭐ Star Ingredients

    Air fryer salmon recipe ingredients.
    • Salmon Filets: Fresh or frozen, salmon provides healthy omega-3s and a rich, satisfying base.
    • Sriracha: Brings the bang! A spicy kick that balances the creamy mayo.
    • Nori or Green Onion (Garnish): Optional, but adds freshness, crunch, and visual appeal.

    For the complete list of ingredients with measurements and instructions, please see the recipe card at the bottom of the post.

    📖  Substitutions & Variations

    • Make It Spicier: Add crushed red pepper flakes or a dash of hot sauce.
    • Dairy-Free Option: Use vegan mayo to keep it fully plant-based.
    • Low-Carb Friendly: Serve with cauliflower rice or zucchini noodles.
    • Smoky Twist: Add a sprinkle of smoked paprika to the salmon before air frying.
    • Kid-Friendly: Use less sriracha or replace with ketchup for a mild version.
    • Want Extra Crunch? Sprinkle with panko or crushed rice cakes before cooking.

    For a tasty seafood alternative, try my Salmon Gravlax or Air Fryer Catfish Nuggets!

    🔪 How To Make Air Fryer Bang Bang Salmon

    Bang bang sauce for salmon.
    1. Step 1: Preheat the air fryer to 400 degrees. The bang-bang sauce is what makes this dish special. In a bowl, stir together mayo, chili sauce, and sriracha until well combined.
    Bang bang salmon in air fryer basket.
    1. Step 2: Spread a large spoonful of the bang-bang sauce on each Salmon filet and reserve some sauce for serving.
    Cooked salmon in air fryer.
    1. Step 3: Spray the air fryer basket with nonstick spray. You can also spray with olive oil. Place the salmon fillet in the air fryer, sauce side up. Cook salmon for 10 minutes.
    Air fried salmon fillets on a plate.
    1. Step 4: Place the salmon fillet in the air fryer, sauce side up. Cook salmon for 10 minutes. If desired, drizzle on the reserved sauce and garnish with green onion. Serve your air fryer salmon immediately and enjoy!

    💡Hint: No need to flip! Cooking skin-side down (or sauce-side up) keeps the salmon juicy and the topping crisp.

    Salmon made with air fryer salmon recipe.

    👩‍🍳 Expert Tips

    • Use Wild-Caught Salmon: It has firmer texture and more flavor—ideal for air frying.
    • Don't Overcrowd: Leave space between fillets for even cooking.
    • Make Extra Sauce: It’s perfect for dipping veggies or drizzling over rice bowls!

    💭 FAQs

    Can I use frozen salmon for banng bang salmon?

    Yes! Just thaw completely and pat dry before adding sauce to ensure even cooking and crisp edges.

    How long should I cook salmon in the air fryer?

    10 minutes at 400°F is ideal for fillets that are about 1-inch thick. Adjust time for thicker cuts.

    Can I make this bang bang air fryer salmon ahead of time?

    It’s best fresh, but you can store leftovers in the fridge for up to 3 days and reheat in the air fryer.

    Is this bang bang salmon air fryer recipe gluten-free?

    Yes—just double-check your chili sauce and mayo are certified gluten-free.

    Air Fryer Bang Bang Salmon with herbs on a plate.

    💖 Serving Suggestions

    • Cauliflower Rice: Light, low-carb, and perfect for soaking up sauce.
    • Air Fryer Roasted Potatoes: Crispy on the outside, fluffy inside—pair perfectly with bold salmon.
    • Roasted Carrots or Broccolini: Add color and sweetness to balance the spice.
    • Jalepeno Slaw or Korean Cucumber Salad: Cool and crunchy contrast to the spicy glaze.
    • Steamed Jasmine Rice: A classic, comforting side.
    Serving bang bang salmon with a fork.

    🍽 Try These Great Salmon Dishes

    • Best Air Fryer Salmon Recipe: Bang Bang Salmon.
      Air Fryer Bang Bang Salmon (Fast, Spicy & Crispy!)
    • Baked Crispy Salmon Bites on Rice.
      Baked Crispy Salmon Bites on Rice
    • Baked Salmon Cauliflower Rice Sushi on a plate.
      Cauliflower Rice Sushi (With Salmon)
    • Easy Beet Cured Salmon Recipe.
      Easy Beet Cured Salmon Recipe

    Did you make this recipe? Leave a review and a ⭐⭐⭐⭐⭐ rating below, or tag us in our Facebook Group! Alternatively, bookmark it in your browser or save to Pinterest.

    Best Air Fryer Salmon Recipe: Bang Bang Salmon.

    Air Fryer Salmon Recipe

    Angela Milnes
    This Bang Bang Air Fryer Salmon is a flavor-packed meal that's quick and easy! Coated in a spicy, sweet sauce and perfectly cooked in the air fryer, it’s a delicious, healthy dinner option that’s ready in minutes!
    5 from 4 votes
    Print Recipe Pin Recipe Rate this Recipe
    Prep Time 5 minutes mins
    Cook Time 10 minutes mins
    Total Time 15 minutes mins
    Course Air Fryer Recipes
    Cuisine American
    Servings 4 Servings
    Calories 395 kcal

    Ingredients
      

    • 4 Salmon Fillets
    • ⅓ Cup Mayonnaise
    • 3 tablespoon Sweet Chili Sauce
    • 1-2 tablespoon Sriracha
    • 1 tablespoon Green Onion

    Instructions
     

    • Preheat the air fryer to 400 degrees.
    • The bang-bang sauce is what makes this dish special. In a bowl stir together mayo, chili sauce, and sriracha until well combined.
    • Spread a large spoonful of the bang-bang sauce on each Salmon filet and reserve some sauce for serving.
    • Spray the air fryer basket with nonstick spray. You can also spray with olive oil.
    • Place the salmon fillet in the air fryer, sauce side up. Cook salmon for 10 minutes.
    • If desired, drizzle on the reserved sauce and garnish with green onion. Serve your air fryer salmon immediately and enjoy!

    Notes

    Choosing wild-caught salmon over farm-raised can offer a more intense flavor and firmer texture, perfect for air frying.
    For a creamier bang-bang sauce, opt for full-fat mayo which provides a richer flavor and smoother texture.

    Nutrition

    Calories: 395kcalCarbohydrates: 7gProtein: 34gFat: 25gSaturated Fat: 4gPolyunsaturated Fat: 13gMonounsaturated Fat: 7gTrans Fat: 0.04gCholesterol: 101mgSodium: 407mgPotassium: 846mgFiber: 0.1gSugar: 6gVitamin A: 100IUVitamin C: 3mgCalcium: 23mgIron: 1mg
    Print Recipe Pin Recipe Rate this Recipe
    Tried this recipe?Let us know how it was!

    Perfect Air Fryer Baked Sweet Potatoes (Crispy Skin + Fluffy Inside!)

    October 5, 2024 by Angela Milnes

    Best Air Fryer Sweet Potatoes.

    These Best Air Fryer Sweet Potatoes come out perfectly tender inside with irresistibly crispy skins—and they’re ready in just 30 minutes. Whether you’re meal prepping or looking for a comforting side dish, this simple air fryer recipe hits the spot!

    Best Air Fryer Sweet Potatoes.
    [feast_advanced_jump_to]

    💖 Why This Recipe Works

    • Crispy Skins, Creamy Center: The air fryer locks in moisture while crisping the outside.
    • Nutritious & Satisfying: High in fiber, beta-carotene, and slow-digesting carbs—ideal for bariatric meal plans.
    • Super Versatile: Dress them up sweet or savory to match any meal.

    ⭐ Star Ingredients

    Ingredients for baked sweet potatoes.
    • Medium Sweet Potatoes: Naturally sweet and nutrient-dense, sweet potatoes are full of vitamin A, fiber, and potassium. Choose smaller to medium ones so they cook evenly and fit in the air fryer.
    • Olive Oil (or Avocado Oil): Just a light coating helps the skins crisp up without needing butter or deep frying. Great for heart health and adds healthy fats.
    • Salt or Sea Salt: Enhances the natural sweetness and boosts flavor without extra calories.
    • Butter (Optional): A touch of salted butter can elevate flavor—use sparingly or swap for a dollop of plain Greek yogurt if you're watching fat intake.

    For the complete list of ingredients with measurements and instructions, please see the recipe card at the bottom of the post.

    🔪 How To Make The Best Air Fryer Sweet Potatoes

    Sweet potatoes in bowl with oil and salt seasoning.
    1. Step 1: Clean and dry the sweet potatoes, ensuring to remove any root strands and dirt pockets. Clean the sweet potato with warm water and scrub with your hands.
    Sweet potatoes in air fryer basket.
    1. Step 2: Pat the sweet potatoes completely dry to prevent steaming in the air fryer. Thoroughly coat the dried potatoes with olive oil, season with salt, and puncture a hole with a fork along the top.
    Cooked sweet potatoes in air fryer.
    1. Step 3: Cook the sweet potatoes in the air fryer at 400°F for 30 minutes. Rotate them at the 15-minute mark.
    Air fried sweet potatoes on a plate.
    1. Step 4: Let the sweet potatoes cool, then slice them open and mash the inside. Season with butter and salt for a sweeter experience, and sprinkle with brown sugar. Enjoy!

    💡Hint: Choose evenly-sized sweet potatoes for consistent cooking, and avoid overloading the basket.

    Air fried sweet potatoes on a plate served with a fork.

    👩‍🍳 Expert Tips

    • Bariatric Tip: Keep toppings minimal. A sprinkle of cinnamon or a spoon of plain Greek yogurt adds flavor without extra sugar or fat.
    • Go Small: Smaller potatoes cook faster and offer better portion control.
    • Check Doneness: A knife should glide through easily—add 5 minutes if needed for larger potatoes.

    💭 FAQs

    Why make sweet potatoes in the air fryer instead of the oven?

    The air fryer cooks faster and gives crispier skin without drying out the inside. It’s also energy-efficient and great for summer.

    What oil works best for air frying sweet potatoes?

    Olive oil and avocado oil are both excellent. Avocado oil has a high smoke point, making it perfect for crisping at 400°F.

    Can I make sweet potato chunks in the air fryer?

    Yes! Dice into 1-inch cubes, toss with oil, and air fry at 375°F for 15–20 minutes. Flip halfway through.

    How do I store leftover sweet potato?

    Store cooled sweet potatoes in an airtight container for up to 4 days in the fridge. Reheat in the air fryer for 3–5 minutes.

    Can you freeze air fryer baked sweet potatoes?

    Absolutely. Wrap in foil or store in a freezer-safe bag for up to 3 months. Thaw in the fridge and reheat as needed.

    Air fryer sweet potatoes on a white plate.

    💖 Serving Suggestions

    These are my favorite dishes to serve with sweet potatoes:

    • Apple Stuffed Chicken Breast or Air Fried Cod: Serve baked sweet potatoes as a side dish with grilled chicken or fish.
    • Texas Smoked Turkey Breast: Sweet potatoes go great with turkey breast and Apple Kale Salad.
    • Instant Pot White Chicken Chili: Top your air fried sweet potatoes with chili and grilled cheese for a delicious and easy meal.
    • Black Beans: Make sweet potato nachos by topping them with black beans, Mango and Pineapple Salsa, and cheese.
    • Slow Cooker Ribs: Add some baby back ribs to your plate as a perfect combination for your sweet potatoes.
    Baked sweet potatoes.

    🍽 More Healthy And Tasty Recipes

    • Air Fryer egg plant, seasoned with salt and pepper in a bowl.
      Crispy Air Fryer Eggplant in Just 10 Minutes
    • Mushroom Risotto in a bowl.
      Creamy Spinach Mushroom Risotto (Easy & Ready in 30 Minutes!)
    • edamame stir fry in a white bowl.
      Easy Edamame Stir Fry (15-Minute Protein-Packed Side Dish)
    • Air Fryer Sweet And Sour Chicken.
      Air Fryer Sweet And Sour Chicken

    Did you make this recipe? Leave a review and a ⭐⭐⭐⭐⭐ rating below, or tag us in our Facebook Group! Alternatively, bookmark it in your browser or save to Pinterest.

    Best Air Fryer Sweet Potatoes.

    Best Air Fryer Sweet Potatoes

    Angela Milnes
    These Air Fryer Sweet Potatoes are crispy on the outside, tender on the inside, and packed with natural sweetness. They make the perfect accompaniment to any meal and can be whipped up in no time! Whether you're looking for a healthy snack or an easy side, this recipe is a winner.
    5 from 4 votes
    Print Recipe Pin Recipe Rate this Recipe
    Prep Time 5 minutes mins
    Cook Time 29 minutes mins
    Total Time 35 minutes mins
    Course Air Fryer Recipes
    Cuisine American
    Servings 3 Servings
    Calories 269 kcal

    Ingredients
      

    • 3 Sweet Potatoes
    • 1 tablespoon Olive Oil
    • 1 teaspoon Kosher Salt
    • 1 tablespoon Butter

    Instructions
     

    • Clean and dry potatoes. Make sure to remove any root strands and dirt pockets. Clean with warm water and scrub with your hands. Pat completely dry to prevent steaming in the air fryer. Thoroughly coat dried potatoes with olive oil—season with salt and puncture the hole with a fork along the top.
    • Cook in air fryer at 400°f for 30 minutes. Rotate at 15 minutes.
    • Let cool, slice open and mash the inside. Season with butter and salt or for a sweeter experience, spring with brown sugar!

    Notes

    This is the air fryer I used: Chefman TurboFry Touch 8 Quart

    Nutrition

    Calories: 269kcalCarbohydrates: 45gProtein: 4gFat: 9gSaturated Fat: 3gPolyunsaturated Fat: 1gMonounsaturated Fat: 4gTrans Fat: 0.2gCholesterol: 10mgSodium: 930mgPotassium: 763mgFiber: 7gSugar: 9gVitamin A: 32179IUVitamin C: 5mgCalcium: 69mgIron: 1mg
    Print Recipe Pin Recipe Rate this Recipe
    Tried this recipe?Let us know how it was!

    Best Sausage Gravy Recipe

    October 5, 2024 by Angela Milnes

    Best Sausage Gravy Recipe.

    If you're a fan of Sausage Gravy, get ready to crave this easy breakfast recipe! Every bite is loaded with sausage and creaminess! When you're wanting a fast and simple breakfast recipe, this Homemade Sausage Gravy is sure to hit the spot.

    Sausage Gravy is a Southern classic. It's easy to make, and it tastes great over homemade biscuits or cornbread! Enjoy!

    Sausage Gravy.
    [feast_advanced_jump_to]

    The Best Sausage Gravy Recipe

    While this may be an American Southern standard, everyone enjoys this for breakfast. A simple combination of gravy and breakfast sausage with your favorite biscuit is the perfect way to start your day!

    💖 Why This Recipe Works

    • Simplicity At Its Best: This pork breakfast sausage recipe is made in 7 simple steps.
    • Rich And Creamy: You can cook sausage and gravy that tastes amazing.
    • Versatile Dish: Perfect as a biscuit topping, or over mashed potatoes, this cooked sausage recipe is great for breakfast or lunch.

    ⭐ Star Ingredients

    Sausage Gravy ingredients.
    • Sausage Meat: The foundation of the gravy, it provides a savory, hearty flavor.
    • Flour: Acts as a thickener to achieve the desired creamy consistency of the gravy.
    • Milk: Adds creaminess and richness to the gravy, balancing out the robust flavor of the sausage.
    • Freshly Ground Black Pepper: Gives the gravy a mild heat and aromatic kick, enhancing the overall flavor.

    For the complete list of ingredients with measurements and instructions, please see the recipe card at the bottom of the post.

    🔄 Substitutions & Variations

    • Meat Swap: Use turkey sausage or plant-based sausage for a leaner or vegetarian option.
    • Dairy-Free Alternative: Replace milk with unsweetened almond, oat, or coconut milk for a creamy, dairy-free gravy.
    • Flavor Boost: Add sage, thyme, or a splash of hot sauce for an extra depth of flavor.

    🔪 How To Make Sausage Gravy

    Cooking ground sausage in a skillet.
    1. Step 1: Using a large skillet, cook the sausage over medium-high heat.
    Flour sprinkled over cooked sausage.
    1. Step 2: Once the sausage is cooked and broken down, sprinkle flour over the sausage meat. Ensure the flour soaks up all the oil.
    Making sausage gravy in a skillet pan.
    1. Step 3: Once the flour has soaked up the oil, allow it to bake off for 1-2 minutes. This will ensure the gravy doesn't taste like flour. Slowly add your milk to the pan, mixing until everything is combined. If you want to add pepper after pouring in your milk, do so then.
    Cooked sausage gravy in a skillet pan.
    1. Step 4: Add 1 ½ tablespoons of pepper to the sausage gravy recipe. Turn your heat down to low and allow the sausage gravy to bubble. Once bubbled, turn off the heat. Allow your sausage gravy to thicken.
    Sausage Gravy On Biscuits.

    👩‍🍳 Expert Tips

    • Thickness: If your gravy is too thick, add more milk to the flour and fat mixture. If it's too thin, add more flour.
    • Taste: Taste the gravy as you go, adding more seasoning if necessary. If you want a smoother gravy, use a whisk to break up any clumps of flour.
    • Wooden Spoon: Use a wooden spoon to break down the cooked sausage.
    • Add Heat: If you wish to add heat to your flour mixture, add some crushed red pepper flakes for a kick of spice.

    💭 FAQs

    What Is Sausage Gravy?

    Sausage gravy is a thick, rich gravy made from sausage, flour, milk, and seasonings. It's traditionally served over hot biscuits or cornbread.

    Can I Make Sausage Gravy Ahead of Time?

    Yes, you can make sausage gravy ahead of time. Just reheat it over low heat, stirring occasionally, until it's heated through.

    Best Sausage To Use?

    For the best flavor, start with a good-quality sausage. I like to use a bulk pork sausage, but you can also use breakfast sausage. Avoid using pre-packaged sausage crumbles - they just don't have the same flavor. Try maple sausage or sage sausage for the best flavor.

    The Best Way To Store Homemade Sausage Gravy

    Sausage Gravy is best served fresh, but it will keep in the fridge for up to 3 days.
    You can freeze sausage gravy. Just place it in an airtight container and store it in the freezer for up to 3 months.

    💖 Serving Suggestions

    These are my favorite dishes to serve with homemade sausage gravy:

    • Buttermilk Biscuits: Fluffy biscuits are the perfect vessel to soak up the rich and savory sausage gravy. I like to use jumbo buttermilk biscuits.
    • Hash Browns: Crispy golden brown hash browns add a delightful crunch to complement the creamy gravy.
    • Southern Grits: Creamy Southern-style grits provide a hearty base that pairs wonderfully with the sausage-infused goodness.
    • Fried Potatoes: Add fried potatoes to the sausage gravy for the ultimate comfort food.
    Pouring sausage gravy with a spoon.

    🍽 Try These Recipes Next

    • roasted harissa sweet potatoes on a plate, drizzles with honey and pistachio nuts.
      Harissa Sweet Potato Recipe (Crispy, Spicy & Easy)
    • Cranberry Lime Mocktail.
      Easy Cranberry Lime Mocktail Recipe – No Alcohol, All Sparkle!
    • Food to Your Loved Ones this Holiday Season.
      Give from Your Heart: Give Food to Your Loved Ones this Holiday Season
    • MIni Rainbow Pizza.
      How To Revamp Leftover Pizza

    D id you make this recipe? Leave a review and a ⭐⭐⭐⭐⭐ rating below, or tag us in our Facebook Group! Alternatively, bookmark it in your browser or save to Pinterest.

    Best Sausage Gravy Recipe.

    Sausage Gravy

    Angela Milnes
    This homemade sausage gravy is a Southern classic that’s rich, creamy, and loaded with savory sausage flavor. Perfect for pouring over fluffy biscuits, it’s a hearty and comforting dish that’s surprisingly simple to make. Whether for breakfast or brunch, this easy sausage gravy is sure to become a favorite!
    5 from 5 votes
    Print Recipe Pin Recipe Rate this Recipe
    Prep Time 10 minutes mins
    Cook Time 10 minutes mins
    Total Time 20 minutes mins
    Course Dinners
    Cuisine American
    Servings 4 Servings
    Calories 478 kcal

    Ingredients
      

    • 16 Oz Sausage Meat
    • ⅓ Cup Flour
    • 2, ½ Cups Milk
    • 1, ½ Teaspoons Black Pepper

    Instructions
     

    • Using a large skillet, cook the sausage over medium-high heat.
    • Once the sausage is cooked and broken down, sprinkle flour over the sausage. Ensure the flour soaks up all the oil.
    • Once the flour has soaked up the oil, allow it to bake off for 1-2 minutes. This will ensure the gravy doesn't taste like flour.
    • Slowly add your milk to the pan, mixing until everything is combined. If you want to add pepper after pouring in your milk, do so then.
    • Add 1 ½ tablespoons of pepper to the sausage gravy recipe.
    • Turn your heat down to low and allow the sausage gravy to bubble. Once bubbled turn off the heat.
    • Allow your sausage gravy to thicken.

    Notes

    Thickness: If your gravy is too thick, add more milk to the flour and fat mixture. If it's too thin, add more flour.
    Taste: Taste the gravy as you go, adding more seasoning if necessary. If you want a smoother gravy, use a whisk to break up any clumps of flour.
    Wooden Spoon: Use a wooden spoon to break down the cooked sausage.

    Nutrition

    Calories: 478kcalCarbohydrates: 16gProtein: 23gFat: 35gSaturated Fat: 13gPolyunsaturated Fat: 4gMonounsaturated Fat: 14gTrans Fat: 0.2gCholesterol: 100mgSodium: 780mgPotassium: 543mgFiber: 1gSugar: 7gVitamin A: 341IUVitamin C: 1mgCalcium: 207mgIron: 2mg
    Print Recipe Pin Recipe Rate this Recipe
    Tried this recipe?Let us know how it was!

    More Sausage Recipes:

    • Easy Air Fryer Sausage Quiche
    • Best Sausage Cannelloni Recipe
    • Air Fryer Breakfast Casserole With Sausage
    • Easy Air Fryer Tater Tot Casserole
    • Italian Sausage And Broccoli Pasta
    • Oven Baked Sausage Casserole
    • Bacon Wrapped Air Fryer Hot Dogs
    • Instant Pot Kielbasa And Cabbage
    Sausage Gravy On Biscuits.

    Pumpkin Crunch Cake

    October 5, 2024 by Angela Milnes

    Indulge your taste buds in our Pumpkin Crunch Cake! This treat blends spiced pumpkin with a heavenly crunch for a bite-sized taste of autumn joy. Satisfy your cravings with each moist, flavorful slice – If you love pumpkin desserts then you'll love this pumpkin dream!

    Pumpkin Crunch Cake in a dessert bowl.
    [feast_advanced_jump_to]

    Why This Recipe Works

    • Tropical Twist: This Pumpkin Crunch Cake brings a taste of Hawaii to your kitchen.
    • Seasonal Delight: A perfect way to incorporate pumpkin into your fall and winter baking.
    • Crunchy and Creamy: Enjoy the harmonious texture mix of crunchy topping and creamy filling.

    🥘 Ingredients

    Hawaiian pumpkin crunch cake ingredients.
    • Pumpkin Puree: Aka Pumpkin pie filling. Gives your cake a rich, moist texture and a deliciously earthy, autumnal flavor.
    • Evaporated Milk: Adds depth and creaminess to your cake, enhancing the texture and flavor of the pumpkin.
    • Eggs: Act as the binding agent in your cake, helping to hold all the ingredients together while also contributing to its structure and rise.
    • White Sugar: Balances out the natural earthiness of the pumpkin and the tanginess of the evaporated milk.
    • Pumpkin Pie Spice: This warming blend of spices perfectly complements the pumpkin, giving your cake that classic fall flavor.
    • Salt: Enhances all the other flavors in your cake, making them even more delicious.
    • Yellow Cake Mix: Is a great shortcut that saves you time while ensuring your cake has the perfect texture and a sweet, vanilla flavor.
    • Chopped Pecans: Add a delightful crunch to your cake, their nutty flavor pairing beautifully with the pumpkin and spices.
    • Melted Butter: Contributes to the moist, rich texture of your cake and helps bind the cake mix and pecans into a flavorful topping.
    • Frozen Whipped Topping (Thawed): Adding this on top enhances your cake with a light and creamy contrast, making each bite irresistible.

    For the complete list of ingredients with measurements and instructions, please see the recipe card at the bottom of the post.

    📖  Substitutions & Variations

    • There are a few different ways that you can make this crunch cake recipe even more delicious. One option is to add a layer of chocolate ganache.
    • Another option is to add a layer of dulce de leche or caramel sauce on top of the cake. You could also opt for cream cheese if you prefer this to cool whip.
    • Lastly, you could top it with a layer of fruit like strawberries or raspberries.
    • Whichever way you choose to enjoy it, we know that you'll love this Hawaii Pumpkin Crunch Cake recipe!

    Be sure to learn How To Freeze Pumpkin too. Frozen pumpkin can come in handy for baking tasty treats,

    🔪 How To Make Pumpkin Crunch Cake?

    pumpkin crunch cake ingredients in a bowl.

    Step One: Preheat the oven to 350 degrees°. Lightly grease one 9x13 inch baking pan. In a large bowl, combine pumpkin puree, evaporated milk, eggs, sugar, pumpkin pie spice, and salt.

    pumpkin puree layer on pumpkin crunch cake.

    Step Two: Mix well and then spread into the prepared pan.

    pumpkin crunch cake layered with whipped topping.

    Step Three: Sprinkle cake mix over the top of the pumpkin mixture, and pat down. Do not mix!

    Pumpkin Crunch Cake in a baking dish.

    Step Four: Sprinkle chopped pecans evenly over the top of the cake, then drizzle melted butter or margarine on top.

    Pumpkin Crunch Cake in a baking dish.

    Step Five: Bake the Pumpkin crunch cake for 60 to 80 minutes, or until done. Top with cool whip when ready to serve.

    👩‍🍳 Expert Tips

    • Use Quality Pumpkin Puree: Opt for 100% unsweetened pumpkin puree—whether homemade or canned—to ensure a pure, natural flavor that serves as the perfect base for your spices and sweet elements.
    • Enhance with Warm Spices: Toast your spices (like cinnamon, nutmeg, or ginger) briefly in a dry pan before adding them to the batter. This simple step helps release their essential oils and deepens the overall flavor of your cake.
    • Master the Crunch Topping: For that irresistible crunch, combine old-fashioned oats, chopped nuts, and a bit of brown sugar with melted butter. Spread the mixture evenly over the batter, ensuring it bakes into a crisp, contrasting layer that elevates every bite.
    • Monitor for Moisture: Keep a close eye on the baking time—start checking a few minutes early to ensure the cake remains moist inside. The goal is a tender, flavorful crumb paired with a delightfully crunchy top.

    💭 FAQs

    What Is Crunch Cake?

    Crunch Cake is a dessert that originates from Hawaii. It consists of a layer of cake, followed by a layer of whipped cream, and then topped with a layer of crunchy graham crackers or pecans. The result is a delicious and unique cake that is sure to please any sweet tooth!

    Do I Have To Use Graham Crackers For Crunch Cake?

    No, you don't have to use graham crackers for Crunch Cake. You can use any type of crunchy cookie or nut that you like. Pecans work great and that's what we use in this delicious Hawaiian pumpkin crunch cake recipe.

    Can I Make Crunch Cake Ahead Of Time?

    Yes, you can make Crunch Cake ahead of time. Simply bake the cake and then store it in the fridge until you're ready to serve. When you're ready to serve, simply top with the whipped cream and crumbs.

    Can I Use Pumpkin Pie Filling In This Recipe?

    Yes, you can use pumpkin pie filling as a substitute for pumpkin puree in this recipe. However, keep in mind that pumpkin pie filling is usually sweetened and already contains spices like cinnamon, nutmeg, and cloves. Adjust the sugar and spice quantities in your recipe accordingly to avoid over-sweetening or over-spicing the final dish.

    Can I Use Fresh Pumpkin In This Recipe?

    Certainly! You can use fresh pumpkin in the recipe as a substitute for canned pumpkin puree. To do so, peel and dice the fresh pumpkin, then cook or steam it until it's tender. Afterward, mash or puree the cooked pumpkin to achieve a texture similar to canned pumpkin puree. Using fresh pumpkin can add a slightly different flavor and texture to your dish, providing a more homemade touch to your recipe.

    Can I Omit The Pecans?

    Certainly! If you're not a fan of pecans or have a preference to omit them, feel free to do so. You can still enjoy the essence of the recipe without pecans, and it won't significantly impact the overall outcome.

    Best Way To Store Pumpkin Crunch Cake?

    The best way to store Crunch Cake is in the fridge. Simply cover it tightly with plastic wrap or aluminium foil and it will stay fresh for up to 3 days.

    🧂Serving Suggestions

    • Serve with Whipped Topping: Add a generous dollop of whipped cream or Cool Whip on top of each slice for extra creaminess and contrast.
    • Pair with a Hot Drink: Enjoy a slice of this pumpkin cake alongside a warm cup of spiced chai tea or hot chocolate to enhance the fall flavors.
    • As a Holiday Dessert: This cake makes a great addition to holiday gatherings like Thanksgiving or Halloween, offering a comforting dessert for guests.
    • Top with Caramel or Chocolate Drizzle: For an indulgent twist, drizzle some caramel or chocolate sauce over the cake before serving.
    Pumpkin Crunch Cake in a dessert bowl.

    🍽 Related Recipes

    • One Pan Chicken And Asparagus.
      One Pan Chicken And Asparagus
    • Honey Roasted Parsnips and Carrots on a white plate.
      Honey Roasted Parsnips and Carrots
    • Wholewheat Einkorn Crackers.
      Whole Grain Einkorn Crackers With Chia Seeds And Parmesan
    • Best Butternut Squash Soup.
      Best Butternut Squash Soup

    Did you make this recipe? Leave a review and a ⭐⭐⭐⭐⭐ rating below, or tag us in our Facebook Group! Alternatively, bookmark it in your browser or save to Pinterest.

    Pumpkin Crunch Cake

    Angela Milnes
    This Pumpkin Crunch Cake is the ultimate fall dessert! With a rich, spiced pumpkin base and a crunchy, buttery topping, it's the perfect blend of flavors and textures. Easy to make and always a crowd favorite!
    5 from 3 votes
    Print Recipe Pin Recipe Rate this Recipe
    Cook Time 1 hour hr 17 minutes mins
    Total Time 25 minutes mins
    Course Desserts
    Cuisine American
    Servings 20 Servings
    Calories 243 kcal

    Ingredients
      

    • 1 Can Pumpkin Puree
    • 1 Can Evaporated Milk 12 Fluid Ounce
    • 4 Eggs
    • 1 ½ Cups White Sugar
    • 2 Teaspoons Pumpkin Pie Spice
    • 1 Teaspoon Salt
    • 1 Cup Pecans Chopped
    • 1 Cup Margarine Melted
    • 8 Ounce Frozen Whipped Topping Thawed

    Instructions
     

    • Preheat the oven to 350 degrees°. Lightly grease one 9x13 inch baking pan.
    • In a large bowl, combine pumpkin, evaporated milk, eggs, sugar, pumpkin pie spice, and salt. Mix well and then spread into the prepared pan.
    • Sprinkle cake mix over the top of the pumpkin mixture, and pat down. Do not mix! Sprinkle chopped pecans evenly over the cake mix, then drizzle with melted margarine.
    • Bake for 60 to 80 minutes, or until done. Top with whipped topping when ready to serve.

    Notes

    There are a few different ways that you can make this crunch cake recipe even more delicious. One option is to top it with a layer of chocolate ganache.
    Another option is to add a layer of dulce de leche or caramel sauce. And lastly, you could top it with a layer of fruit like strawberries or raspberries.

    Nutrition

    Calories: 243kcalCarbohydrates: 22gProtein: 3gFat: 16gSaturated Fat: 5gPolyunsaturated Fat: 4gMonounsaturated Fat: 7gTrans Fat: 0.004gCholesterol: 38mgSodium: 264mgPotassium: 148mgFiber: 1gSugar: 20gVitamin A: 3815IUVitamin C: 1mgCalcium: 73mgIron: 1mg
    Print Recipe Pin Recipe Rate this Recipe
    Tried this recipe?Let us know how it was!

    More Pumpkin Recipes

    • Pumpkin French Toast Casserole
    • Weight Watchers Crustless Pumpkin Pie
    • Pumpkin Treats for Dogs
    • Vegan Pumpkin Waffles
    • Pumpkin Spice Latte
    Hawaiian Pumpkin Crunch Cake in a baking dish.

    Buffalo Chicken Tenders Air Fryer Recipe (Crispy & Easy!)

    October 5, 2024 by Angela Milnes

    Air Fryer Chicken Tenders With Buffalo Sauce.

    These crispy Buffalo Chicken Tenders Air Fryer style are the ultimate game day snack—hot, saucy, and full of flavor. They're quick to make, fun to dip, and guaranteed to disappear faster than halftime.

    Air Fryer Chicken Tenders With Buffalo Sauce.

    Whether it’s game day, movie night, or just a “we need something fun for dinner” kind of evening, this Buffalo Chicken Tenders Air Fryer recipe always hit the spot. They’re spicy, crispy, and way easier than deep frying—but still pack all the bold flavor you crave.

    We love serving them with Air Fryer Sweet Potato Fries, Red Cabbage Coleslaw, or tucked into wraps with a drizzle of Herby Ranch Dressing. Building out a party platter? Add Air Fryer Chimichangas and BBQ Chicken Wings for an epic spread everyone will be talking about.

    [feast_advanced_jump_to]

    💖 Why This Recipe Works

    • Easy: No fancy steps—just dip, bread, air fry, and coat.
    • Fast: They’re hot and crispy in under 20 minutes!
    • Crowd-Pleaser: Everyone loves that spicy, tangy kick of buffalo sauce.

    ⭐ Star Ingredients

    Buffalo chicken tenders ingredients.
    • Chicken Tenders – I always use fresh, thin-sliced tenderloins—they cook fast and stay juicy. Just don’t forget to pull out the tendons first (trust me, it makes a difference in texture!).
    • Flour & Cornstarch – This combo is my go-to for that signature crispy coating. The cornstarch adds a light crunch that regular flour alone just can’t deliver.
    • Buffalo Sauce – I like to brush it on twice during cooking so it bakes into the crust without making the tenders soggy. It’s the key to getting that tangy, spicy kick in every bite.

    For the complete list of ingredients with measurements and instructions, please see the recipe card at the bottom of the post.

    📖  Substitutions & Variations

    • 📖 Substitutions & Variations
    • Use Panko for extra crispiness—trust me, it’s worth it.
    • Skip the breading for a keto-friendly buffalo chicken tender version.
    • Spice it up with a pinch of cayenne or Cajun seasoning in the flour mix.
    • Make it gluten-free with almond flour or a GF flour blend.
    • Try different sauces like honey mustard, BBQ, or garlic Parmesan instead of buffalo.

    🔥 Sauce Swap Ideas

    Sauce TypeFlavor Vibe
    Buffalo (classic)Tangy, spicy, iconic
    Honey BBQSweet and smoky
    Garlic ParmesanCreamy and savory
    Sweet ChiliSweet with a mild kick
    Lemon PepperZesty and refreshing

    💡 Use the same air fryer method and just brush your favorite sauce on during the last 5 minutes!

    Hosting a crowd? Make a batch of these tenders and serve them alongside Air Fryer Bacon Wrapped Hot Dogs, Air Fryer Cheesesteak Egg Rolls, and a trio of dipping sauces. Keep everything warm in the oven at 200°F until kickoff!

    🔪 How to Make Buffalo Chicken Tenders in the Air Fryer

    Removing the tendon from the chicken on a wooden board.
    1. Step 1: To remove the tendon from the chicken, lace the tender on a cutting board, grip the tendon with a paper towel, place a knife edge on the tendon forcefully against the cutting board, and pull the tendon away from the chicken. Do this to all the tenders.
    Egg and hot sauce in a bowl and in other bowl there flour mixture for coating.
    1. Step 2: In a shallow dish, mix the eggs with the hot sauce. This is your egg wash. In another dish, mix the flour, cornstarch, and spices. This is your breading.
    Breading the chicken tenders.
    1. Step 3: Dip chicken in the breading, then the egg washes, and then again in the breading. Make sure the tenders are fully coated after each step. 
    Cooked chicken tenders in an air fryer basket.
    1. Step 4: Place the tenders in your oil-sprayed air fryer basket in a single layer. Spray the tenders with oil and then cook at 400°f for 10 minutes flipping halfway. 
    Brushing the chicken tenders with buffalo sauce.
    1. Step 5: Brush each tender with Buffalo sauce, cook for 2 ½ minutes, flip and brush with Buffalo sauce and finish cooking for 2 ½ minutes. 
    Dipping chicken tender in sauce.
    1. Step 6: Remove tenders and let cool. Enjoy with Herby Ranch Dressing or blue cheese. 

    💡Hint: Don’t overcrowd your air fryer! If needed, cook in batches for even crispiness.

    Chicken tenders on a plate.

    👩‍🍳 Expert Tips

    • Panko = Crunch Gold: For seriously crispy chicken, always go Panko over regular breadcrumbs.
    • Marinate if you can: A quick soak in buttermilk or hot sauce helps tenderize and flavor the meat.
    • Layering is key: Double dredging (flour, egg, flour) gives you that pro-level crust.
    • Use a rack: If your air fryer allows it, use a wire rack insert for max air circulation.

    💭 FAQs

    Can I use frozen chicken tenders for this recipe?

    Yes! Just thaw them fully first, pat dry, and proceed with breading and air frying.

    How can I make the buffalo chicken tenders extra crispy?

    For an extra crispy coating, use Panko breadcrumbs instead of regular breadcrumbs. This will help achieve a lighter and crunchier texture.

    Can I use a different sauce instead of buffalo sauce?

    Totally! Try garlic Parmesan, honey BBQ, or even sweet chili for fun flavor twists.

    How should I store and reheat leftover chicken tenders?

    Pop cooled tenders into an airtight container. Refrigerate up to 5 days or freeze for up to 2 months. Reheat in the air fryer at 375°F until warm and crispy.

    💖 Serving Suggestions

    Wondering what else to serve with this Buffalo Chicken Tenders Air Fryer Recipe?

    • Serve with Creamy Cucumber Salad to cool down the heat.
    • Enjoy with Slow Cooker Chili Mac and Cheese for a comfort food upgrade.
    • Slice into wraps with Pickled Beets and Creamy Jalapeno Slaw.
    • Turn into sliders with Mini Whole Wheat Buns and ranch.

    Got leftovers? Chop them up for buffalo chicken tacos, slice into a buffalo chicken salad, or reheat and serve in a wrap for lunch the next day.

    Dipping chicken tender in buffalo sauce.

    🍽 Try These Tasty Air Fryer Recipes

    • Air Fryer Butterfly Chicken With Citrus.
      Air Fryer Butterfly Chicken With Citrus
    • Air Fryer Green Beans Crispy & Delicious.
      Air Fryer Green Beans Crispy & Delicious
    • Air Fryer Chicken Cutlets Panko Recipe.
      Air Fryer Chicken Cutlets Panko Recipe
    • Air Fryer Salmon Fillets.
      Air Fryer Salmon Fillets (Fresh or Frozen)

    Did you make this recipe? Leave a review and a ⭐⭐⭐⭐⭐ rating below, or tag us in our Facebook Group! Alternatively, bookmark it in your browser or save to Pinterest.

    Air Fryer Chicken Tenders With Buffalo Sauce.

    Buffalo Chicken Tenders Air Fryer Recipe

    Angela Milnes
    Delicious chicken strips are air fried to perfection and coated in a spicy, tangy buffalo sauce in this easy Air Fryer chicken tenders recipe.
    5 from 4 votes
    Print Recipe Pin Recipe Rate this Recipe
    Prep Time 10 minutes mins
    Cook Time 15 minutes mins
    Total Time 24 minutes mins
    Course Air Fryer Recipes
    Cuisine American
    Servings 12 Servings
    Calories 106 kcal

    Ingredients
      

    • 1 ½ lbs Chicken Tenders
    • ½ Cup Flour
    • ½ Cup Cornstarch
    • 1 teaspoon Garlic Powder
    • 1 teaspoon Onion Powder
    • 1 tablespoon Parsley
    • ½ teaspoon Pepper
    • 2 Whole Eggs
    • 1 teaspoon Hot Sauce
    • ½ Cup Buffalo Sauce

    Instructions
     

    • Once you have your ingredients ready, here's what you'll need to do to make these crispy chicken tenders.
    • To remove the tendon from the chicken, lace the tender on a cutting board, grip the tendon with a paper towel, place a knife edge on the tendon forcefully against the cutting board and pull the tendon away from the chicken. Do this to all the tenders.
    • In a shallow dish, mix the eggs with the hot sauce. This is your egg wash.
    • In another dish, mix the flour, cornstarch, and spices. This is your breading. 
    • Dip chicken in the breading, then the egg washes, and then again in the breading. Make sure the tenders are fully coated after each step. 
    • Place the tenders in your oil-sprayed air fryer basket in a single layer. Spray the tenders with oil and then cook at 400°f for 10 minutes flipping halfway. 
    • Brush each tender with Buffalo sauce, cook for 2 ½ minutes, flip and brush with Buffalo sauce and finish cooking for 2 ½ minutes. 
    • Remove tenders and let cool.  Enjoy with ranch or blue cheese. 

    Notes

    • Panko = Crunch Gold: For seriously crispy chicken, always go Panko over regular breadcrumbs.
    • Marinate if you can: A quick soak in buttermilk or hot sauce helps tenderize and flavor the meat.
    • Layering is key: Double dredging (flour, egg, flour) gives you that pro-level crust.
    • Use a rack: If your air fryer allows it, use a wire rack insert for max air circulation.

    Nutrition

    Calories: 106kcalCarbohydrates: 9gProtein: 13gFat: 2gSaturated Fat: 0.3gPolyunsaturated Fat: 0.3gMonounsaturated Fat: 0.4gTrans Fat: 0.01gCholesterol: 37mgSodium: 386mgPotassium: 223mgFiber: 0.3gSugar: 0.04gVitamin A: 46IUVitamin C: 1mgCalcium: 5mgIron: 1mg
    Print Recipe Pin Recipe Rate this Recipe
    Tried this recipe?Let us know how it was!

    Air Fryer Enchiladas (Better Than Oven-Baked!)

    October 5, 2024 by Angela Milnes

    Air Fryer Enchiladas With Turkey and Black Beans.

    Quick, crispy, and full of flavor—these Air Fryer Enchiladas are my go-to for taco night when I want something fun, fast, and totally satisfying.

    Air Fryer Enchiladas With Turkey and Black Beans.

    Growing up, enchiladas were always a weekend treat—slow-cooked and bubbling in the oven. These days, I lean on my air fryer to bring all that flavor in a fraction of the time. With tender tortillas, melty cheese, and saucy goodness, they’re a lifesaver on busy weeknights or last-minute Taco Tuesdays.

    Love this kind of cozy meal? Try my Air Fryer Korean Beef, Air Fryer Thin Sliced Chicken Breast, or Air Fryer Cheese Bread next—they’re just as easy and totally crave-worthy!

    [feast_advanced_jump_to]

    💖 Why This Recipe Works

    • Delicious and Protein-Packed: Ground turkey and black beans make it hearty and healthy.
    • Quick and Simple: Ready in under 30 minutes using the air fryer.
    • Customizable: Great for picky eaters—just let everyone build their own!

    ⭐ Star Ingredients

    Air Fryer Enchiladas ingredients.
    • Ground Turkey: Lean but still flavorful—perfect base for the filling.
    • Black Beans: For extra fiber and heartiness.
    • Corn Tortillas: Classic texture and flavor. Microwave to make them pliable.
    • Green Enchilada Sauce: Zesty and tangy—adds that essential enchilada kick.
    • Shredded Cheese: Melty goodness on top.

    For the complete list of ingredients with measurements and instructions, please see the recipe card at the bottom of the post.

    📖  Substitutions & Variations

    • No Turkey? Use rotisserie chicken, shredded beef, or keep it veggie with more beans and corn.
    • Tortilla Swap: Use flour tortillas or gluten-free if preferred.
    • Sauce Options: Red enchilada sauce or homemade both work great.
    • Cheese Lovers: Add cream cheese or go bold with pepper jack.

    Looking for more mealtime inspiration? You’ll love these flavor-packed recipes: Zucchini Egg Bake, Creamy Tuscan Salmon, and Best Creamy Broccoli with Bacon.

    🔪 How To Make Air Fryer Enchiladas

    Cooking turkey mince in the skillet.
    1. Step 1: Add oil to a skillet over medium-high heat. Dice the onion and add it to the skillet and sauté for 6-8 minutes until the diced onions are translucent.
    Cooking turkey mince in the skillet.
    1. Step 2: Add the ground turkey and chop it up. Add the spices and tomato paste and mix. 
    Adding black beans to enchilada mixture in a skillet.
    1. Step 3: Add the canned black beans and Caldo de Pollo, and mix. Light coat the pan in enchilada sauce. Microwave the corn tortillas for 1 minute. They will be hot but as they cool, they will be pliable enough to roll and not break.
    Spreading enchilada mixture over tortilla.
    1. Step 4: Add the ground turkey and chop it up. Add the spices and tomato paste and mix. 
    Uncooked enchiladas in air fryer basket.
    1. Step 5: Fill the pan with enchiladas, then add more of the remaining enchilada sauce to the tops of the enchiladas. Cook at 375°f for 6-8 minutes, add cheese, and then cook for 3 minutes.
    Cooked enchiladas in air fryer basket.
    1. Step 6: Let cool then enjoy topped with sour cream, chives, and or cilantro. 

    💡 Hint: To keep your enchiladas from unrolling in the air fryer, place them seam-side down and don’t overfill. Warming the tortillas beforehand helps them stay pliable and easier to roll without cracking.

    Air fried turkey enchiladas on a plate.

    👩‍🍳 Expert Tips

    While making the Air Fryer enchiladas is super easy, you might want to take note of these tips and tricks too.

    • Microwave tortillas before filling to make rolling easier.
    • Drain beans well to avoid soggy filling.
    • Parchment paper liner helps with easy cleanup.
    • Season chicken or beef before using to build in more flavor.
    • If you want to swap the seasonings, you can simply use a taco seasoning. Try this Homemade Taco Seasoning recipe here!

    💭 FAQs

    Can I use flour tortillas for air fryer enchiladas?

    Yes, both flour and corn tortillas can be used for air fryer enchiladas. Flour tortillas are softer and easier to roll. Corn is more traditional and flavorful, but both work.

    How do I keep enchiladas from getting soggy?

    Avoid over-saucing before cooking. Save some sauce for the top after they cook.

    How long should I cook enchiladas in the air fryer?

    Start with 6–8 minutes at 375°F, then add cheese and air fry 2–3 minutes more.

    Can I freeze air fryer enchiladas?

    Yes! Assemble, freeze individually, and air fry straight from frozen for a quick meal.

    💖 Serving Suggestions

    • Mexican Rice: Classic, comforting, and perfect for soaking up all that saucy goodness.
    • Fresh Salsa + Guacamole: Bright, bold, and the easiest way to upgrade your enchilada night.
    • Simple Green Salad with Lime Vinaigrette: Light, zippy, and just the right crunch to balance the cheesy enchiladas.
    • Refried Beans or Grilled Veggies: Cozy or smoky—pick your sidekick and dig in!
    Air fried enchiladas on a plate ready to be served.

    🍽 Tasty Air Fryer Recipe Ideas

    • Air Fryer Butterfly Chicken With Citrus.
      Air Fryer Butterfly Chicken With Citrus
    • Air Fryer Green Beans Crispy & Delicious.
      Air Fryer Green Beans Crispy & Delicious
    • Air Fryer Chicken Cutlets Panko Recipe.
      Air Fryer Chicken Cutlets Panko Recipe
    • Air Fryer Salmon Fillets.
      Air Fryer Salmon Fillets (Fresh or Frozen)

    Did you make this recipe? Leave a review and a ⭐⭐⭐⭐⭐ rating below, or tag us in our Facebook Group! Alternatively, bookmark it in your browser or save to Pinterest.

    Air Fryer Enchiladas With Turkey and Black Beans.

    Air Fryer Enchiladas With Turkey And Black Beans

    Angela Milnes
    If you're craving a flavorful and easy dinner, these Air Fryer Enchiladas with Turkey and Black Beans are perfect! Packed with seasoned turkey, hearty black beans, and smothered in enchilada sauce and melted cheese, they come together quickly in the air fryer. It's a delicious twist on a classic dish that the whole family will love!
    5 from 4 votes
    Print Recipe Pin Recipe Rate this Recipe
    Prep Time 15 minutes mins
    Cook Time 11 minutes mins
    Total Time 26 minutes mins
    Course Air Fryer Recipes
    Cuisine American
    Servings 12 Servings
    Calories 168 kcal

    Ingredients
      

    • 2 Teaspoon Olive Oil
    • 1 Large Yellow Onion Diced
    • 1 Teaspoon Garlic Minced
    • 1 Pound Ground Turkey
    • 1 Teaspoon Chili Powder
    • ½ Teaspoon Ground Pepper
    • 2 Teaspoons Tomato Paste
    • 1 Can Of Black Beans rinsed well and drained
    • 1 Teaspoon Knorr Caldo De Pollo
    • 1 Whole Lime Juiced
    • 12 Yellow Corn Tortillas
    • 1 Cup Shredded Cheese
    • 1, 14 Oz Can Of Green Enchilada Sauce

    Instructions
     

    • Sauté Onions: Add oil to a skillet over medium-high heat. Dice the onion and add it to the skillet and sauté for 6-8 minutes until the diced onions are translucent.
    • Add Turkey and Spices: Add the ground turkey and chop it up. Add the spices and tomato paste and mix.
    • Add Beans and Sauce: Add the canned black beans and Caldo de Pollo, and mix. Light coat the pan in enchilada sauce. 
    • Heat Tortillas: Microwave the corn tortillas for 1 minute. They will be hot but as they cool, they will be pliable enough to roll and not break.
    • Fill Up the Tortillas & Roll: Add a heaping tablespoon of meat and beans to the center of the tortilla and roll. Dab a little enchilada sauce on the inside lip of the tortilla so as you roll flour tortillas over the outside lip, the sauce keeps it rolled close.
    • Top with Enchilada Sauce and Cheese and Cook. Fill the pan with enchiladas, then add more of the remaining enchilada sauce to the tops of the enchiladas.  Cook at 375°f for 6-8 minutes, add cheese, and then cook for 3 minutes.
    • Top and Serve: Let cool then enjoy topped with sour cream, chives, and or cilantro.

    Notes

    When you make Air Fryer enchiladas, remember to line Air Fryer basket with some parchment paper before you layer the tortilla rolls.
    Stick to a thin layer of the enchiladas to get that perfect crisp texture you're looking for.
    If you're using cooked chicken breasts, just remember to season it well before you load it into the tortillas. Using seasoned chicken will ensure that your enchiladas are full of flavor.
    If you want to swap the seasonings, you can simply use a taco seasoning. Try this Homemade Taco Seasoning recipe here!

    Nutrition

    Calories: 168kcalCarbohydrates: 17gProtein: 14gFat: 5gSaturated Fat: 2gPolyunsaturated Fat: 1gMonounsaturated Fat: 2gTrans Fat: 0.01gCholesterol: 30mgSodium: 469mgPotassium: 222mgFiber: 3gSugar: 3gVitamin A: 412IUVitamin C: 4mgCalcium: 97mgIron: 1mg
    Print Recipe Pin Recipe Rate this Recipe
    Tried this recipe?Let us know how it was!

    Instant Pot Chicken Adobo

    October 5, 2024 by Angela Milnes

    Instant Pot Chicken Adobo.

    Are you looking for a quick and flavorful dinner recipe? Look no further than Instant Pot Chicken Adobo! This classic Filipino dish is simple to make, packed with bold flavors, and beloved by many. Get ready to savor the taste of tradition with this delicious and easy-to-make Chicken Adobo

    Instant Pot chicken adobo in a bowl.
    [feast_advanced_jump_to]

    💖 Why This Recipe Works

    • Authentic Flavor: This Chicken Adobo recipe captures the classic, savory-sweet taste of Filipino chicken adobo.
    • Effortless Cooking: The Instant Pot makes this traditional dish simple and quick to prepare.
    • Dinner Solution: It's a complete meal when served with rice, perfect for busy evenings.

    ⭐ Star Ingredients

    Chicken adobo ingredients.

    Here are the ingredients for your Chicken Adobo Instant Pot dish:

    • Chicken Thighs: The main protein source, they provide a juicy, flavorful base for the adobo sauce.
    • Olive Oil: Used to sear the chicken, it adds richness and helps to lock in the juices.
    • Salt, Kosher & Black Pepper: Essential seasonings that enhance the natural flavors of the chicken.
    • Light Soy Sauce: Gives the dish its signature savory, umami flavor and a deep, appealing color.
    • Brown Sugar: Balances the saltiness of the soy sauce with a hint of sweetness, while also contributing to a rich, caramelized exterior on the chicken.
    • White Vinegar or Rice Vinegar: Adds a tangy note that cuts through the richness of the dish, typical of the adobo cooking style.
    • Minced Garlic: Infuses the dish with a robust, aromatic flavor that complements the savory elements.
    • Bay Leaves: Add a subtle, herbal note that gives depth and complexity to the adobo sauce.
    • Chives, Freshly Diced: Used as a garnish, they add a pop of fresh, onion-like flavor and a vibrant color contrast.

    For the complete list of ingredients with measurements and instructions, please see the recipe card at the bottom of the post.

    📖  Substitutions & Variations

    • Chicken breast: Switch chicken thighs for chicken breasts for a different type of meat. You can also try chicken drumsticks as well.
    • Fresh Chicken: If you don't have fresh chicken you may use frozen chicken as a substitute for this pressure cooker version of chicken adobo. Simply add an extra 4 minutes of pressure cooking time.
    • Slow Cooker Adobo: To cook slow-cooked chicken adobo, pop all the ingredients into the crockpot for 4-5 hours and slow cook on high heat.

    🔪 How to Cook Adobo Chicken in the Instant Pot

    Chicken pieces and oil in the instant pot.
    1. Step 1: Set the Instant Pot to sauté and add the oil. Once the pot is hot, add the chicken and start to brown it off. Sauté the chicken for 2 minutes on each side, twice. 
    Cooked chicken in Instant Pot.
    1. Step 2: After the chicken is browned, add the vinegar and scrape the bottom of the pot to loosen any remnants to prevent burning. 
    Soy sauce, sugar, salt, pepper, garlic, and bay leaves added to cooked chicken,
    1. Step 3: Add the soy sauce, sugar, salt, pepper, garlic, and bay leaves.
    Chicken adobo cooked Instant Pot.
    1. Step 4: Seal the Instant Pot lid and pressure valve. Set the Instant Pot to high pressure for 7 minutes.
    Chicken adobo cooked in an Instant Pot.
    1. Step 5: Once cooked, allow the pressure to naturally release for ten minutes and then release the remaining pressure.
    Instant Pot chicken adobo in a bowl.
    1. Step 6: Remove the chicken and drizzle the adobo sauce over the chicken. Garnish the chicken pieces with chives and serve with steamed rice or cauliflower rice.
    Chicken adobo in a a serving bowl.

    👩‍🍳 Expert Tips

    • Searing the Chicken: When sautéing the chicken, ensure you sear it on each side for 2 minutes to lock in the flavors. This helps create a caramelized exterior that complements the rich, savory adobo sauce.
    • Adjusting the Sweetness: If you prefer a more pronounced sweetness, feel free to add extra brown sugar. It balances the acidity of the vinegar and soy sauce, creating a more complex flavor profile.
    • Using Frozen Chicken: If using frozen chicken, remember to add 4 extra minutes of cooking time for the Instant Pot. This ensures the chicken is properly cooked and tender.
    • Enhancing the Sauce: For a thicker sauce, once the chicken is cooked, remove it and simmer the sauce on "Sauté" mode for a few minutes until it reaches the desired consistency. This step intensifies the flavors and gives a richer texture.

    💭 FAQs

    What Is Adobo Chicken?

    Adobo is a popular dish from the Philippines that is typically made with pork or chicken cooked in vinegar, soy sauce, garlic, and pepper.
    It has become an iconic Filipino dish both locally and abroad. The combination of ingredients creates a unique flavor profile with just enough acidity to balance out the salty and savory notes in this delicious sauce.

    Is Adobo Chicken Spicy?

    Adobo chicken is not traditionally spicy, but it can be made more or less spicy depending on how much pepper is used. The heat level can also be adjusted by adding chili flakes or hot sauce of your choice.

    Do I Need Skinless Chicken Thighs for Adobo Chicken?

    No. You can use skinless chicken thighs but it’s not necessary. The flavor of the sauce will be more intense if you keep the skin on while cooking. You can use bone in chicken thighs for this tasty recipe.

    Can I Use Frozen Chicken in This Recipe?

    You can use Frozen chicken, however as you need to saute and brown the chicken thighs, it is best to use fresh or defrosted chicken.

    Why Do I Use Brown Sugar?

    The brown sugar helps to balance out the strong flavors of the vinegar and soy sauce. This will give your chicken adobo a sweet, tangy flavor that is unique and delicious!

    Can I Use Low Sodium Soy Sauce in Adobo Chicken?

    Yes, you can use low sodium soy sauce. The flavor of your chicken adobo will be slightly different than if you used regular soy sauce but it is still delicious!

    Best Way to Store Adobo

    Refrigerate leftover Chicken Adobo promptly, placing it in an airtight container to maintain freshness. Store in the refrigerator for up to 3 days. For longer storage, freeze Chicken Adobo in a freezer-safe container or vacuum-sealed bag. Ensure proper labeling with the date for easy tracking. It can be stored in the freezer for 2-3 months.

    💖 Serving Suggestions

    Here are my favorite appetizers to serve with Instant Pot Chicken Adobo:

    • Red Cabbage Slaw: A zesty mix of shredded cabbage, carrots, and cilantro tossed in a tangy soy-sesame dressing for a refreshing contrast.
    • Cucumber Salad: Sliced cucumbers in a light vinegar dressing is a great side for Chicken Adobo.
    • Mango Pineapple Salsa: Sweet and spicy mango salsa with red onions and cilantro, adding a tropical twist to the savory chicken.
    • Grilled Pineapple Skewers: Caramelized pineapple chunks on skewers, bringing a juicy and slightly smoky element to the table.
    Serving chicken adobo with a spoon.

    🍽 More Instant Pot Recipes

    • Instant Pot Cajun Chicken and Rice.
      Instant Pot Cajun Chicken and Rice
    • Creamy Instant Pot Tortellini Recipe.
      Creamy Instant Pot Tortellini Recipe
    • Instant Pot Kielbasa And Cabbage.
      Instant Pot Kielbasa And Cabbage
    • Instant Pot Enchilada Soup.
      Instant Pot Enchilada Soup

    Did you make this recipe? Leave a review and a ⭐⭐⭐⭐⭐ rating below, or tag us in our Facebook Group! Alternatively, bookmark it in your browser or save to Pinterest.

    Instant Pot Chicken Adobo.

    Instant Pot Chicken Adobo

    Angela Milnes
    This Instant Pot Chicken Adobo is a savory, tangy Filipino-inspired dish that’s packed with bold flavors. The tender chicken is simmered in a flavors, creating a perfect balance of savory, sour, and slightly sweet tastes.
    5 from 3 votes
    Print Recipe Pin Recipe Rate this Recipe
    Prep Time 5 minutes mins
    Cook Time 15 minutes mins
    Total Time 20 minutes mins
    Course Dinners
    Cuisine Filipino
    Servings 6 Servings
    Calories 300 kcal

    Ingredients
      

    • 5 Chicken Thighs
    • 2 Tablespoons Olive Oil
    • ¼ Teaspoon Salt Kosher
    • ¼ Teaspoon Black Pepper
    • ⅓ Cup Light Soy Sauce
    • ¼ Cup Brown Sugar
    • ¼ Cup White Vinegar or Rice Vinegar
    • 2 Tablespoons Chives Freshly Diced

    Instructions
     

    • Turn On Saute Function: Set the Instant Pot to sauté and add the oil.
    • Saute The Chicken: Once the pot is hot, add the chicken and start to brown it off. Sauté the chicken for 2 minutes on each side, twice. 
    • Add Vinegar And Deglaze: After the chicken is browned, add the vinegar and scrape the bottom of the pot to loosen any remnants to prevent burning. 
    • Add Flavors To Make Adobo Chicken: Add the soy sauce, sugar, salt, pepper, garlic, and bay leaves.
    • Pressure Cook Adobo Chicken: Seal the Instant Pot lid and pressure valve. Set the Instant Pot to high pressure for 7 minutes.
    • Naturally Release Adobo Chicken: Once cooked, allow the pressure to naturally release for ten minutes, and then release the remaining pressure.
    • Remove Chicken: Remove the chicken and drizzle the adobo sauce over the chicken.
    • Garnish And Serve Chicken Adobo: Garnish the chicken pieces with chives and serve with steamed rice or cauliflower rice

    Nutrition

    Calories: 300kcalCarbohydrates: 12gProtein: 17gFat: 20gSaturated Fat: 5gPolyunsaturated Fat: 4gMonounsaturated Fat: 10gTrans Fat: 0.1gCholesterol: 92mgSodium: 990mgPotassium: 254mgFiber: 0.2gSugar: 9gVitamin A: 119IUVitamin C: 2mgCalcium: 29mgIron: 1mg
    Print Recipe Pin Recipe Rate this Recipe
    Tried this recipe?Let us know how it was!

    We hope you enjoy this delicious Instant Pot Chicken Adobo recipe! Bon Appetite!

    Try These Recipes:

    If you are looking for more Instant Pot recipes, check out our other delicious meals.

    • Air Fryer Baked Potatoes
    • Air Fryer Yorkshire Puddings
    • Vegan Mayonnaise
    • Instant Pot Cajun Chicken and Rice
    • Best Beetroot Hummus Recipe
    • How To Make Caesar Dressing
    • Best Cranberry Orange Sauce

    Easy Instant Pot Shredded Chicken

    October 5, 2024 by Angela Milnes

    Easy Instant Pot Shredded Chicken in a yellow bowl.

    Instant Pot Shredded Chicken is your new kitchen BFF—quick, juicy, and endlessly versatile. Perfect for busy weeknights, meal prep, or when you just need a reliable protein that plays nice with everything.

    Easy Instant Pot Shredded Chicken in a yellow bowl.

    This recipe is a lifesaver for those hectic days when dinner needs to happen—fast. The Instant Pot transforms plain chicken into tender, flavorful shreds that can be used in countless dishes. If you're loving this, you might also enjoy my Instant Pot Chicken Breast with Mango Salad or Air Fryer Enchiladas for more quick and tasty options.

    [feast_advanced_jump_to]

    💖 Why This Recipe Works

    • Easy Meal: This Instant Pot Pulled chicken is literally the easiest meal you'll ever make.
    • Cooks Fast: If you need chicken and need it fast, then you'll love how quick this chicken cooks.
    • Versatile: Use it in salads, tacos, sandwiches, and more.

    ⭐ Star Ingredients

    Making Instant Pot pulled chicken is a quick and easy way to get dinner on the table. Here are the ingredients you'll need:

    chicken breasts on a chopping board.
    • Boneless Skinless Chicken Breasts And Thighs: Combining both types of chicken gives you lean protein with added flavor and tenderness.
    • Your Favorite Rub: Personalize the flavor to suit your taste buds.
    • Reduced Sodium Vegetable Broth: Keeps the chicken moist and adds depth without too much salt.

    For the complete list of ingredients with measurements and instructions, please see the recipe card at the bottom of the post.

    📖  Substitutions & Variations

    • Broth Swap: Use chicken broth instead of vegetable broth for a richer flavor.
    • Spice It Up: Add garlic powder or smoked paprika for extra zing.
    • Protein Choice: Stick with all breasts for leaner meat or all thighs for more juiciness.
    • Frozen Chicken: Yes, you can use frozen chicken—just increase the cook time by 2 minutes.

    Pair this with my Cooked Long Grain Rice or Quinoa Salad for a complete meal.

    🔪 How To Make Instant Pot Shredded Chicken?

    chicken breasts in a bowl.
    1. Step 1: Mix together chicken and your rub in a bowl.
    chicken breasts in a bowl covered in chicken stock.
    1. Step 2: Add the vegetable broth to Instant Pot and add the chicken directly into the liquid.
    chicken breasts and chicken stock in an instant pot.
    1. Step 3: Remove chicken from your Instant Pot onto a plate and shred using some forks.
    chicken breasts and chicken stock in an instant pot.
    1. Step 4: Cook and then allow the pressure to release naturally.
    shredded chicken in an instant pot.
    1. Step 5: Cover and seal your pot. Select Pressure Cook/Manual, set to high pressure for 10 minutes.
    shredded chicken on a white plate.
    1. Step 6: Remove liquid from Instant Pot and add chicken back in, add some of the cooking liquid, mix and serve.

    💡Hint: Shred the chicken while it's hot—it makes the process easier and the texture better.

    shredded chicken breast and thighs in a yellow bowl.

    👩‍🍳 Expert Tips

    • Mix It Up: Using both breasts and thighs gives you the best of both worlds—lean and juicy.
    • Flavor Boost: Let the chicken sit with the rub for a few minutes before cooking to enhance the taste.
    • Moisture Matters: Broth not only prevents dryness but also infuses the chicken with flavor.
    shredded chicken in a yellow bowl with two forks.

    💭 FAQs

    Is Shredded Chicken And Pulled Chicken The Same?

    Both shredded and pulled chicken involve cooking the meat until it's tender enough to be easily separated into smaller pieces.

    Shredded Chicken: Typically, shredded chicken is cooked until fully done, then the meat is manually or mechanically shredded into bite-sized pieces using forks, a mixer, or other utensils. It can be a more controlled and uniform process.

    Pulled Chicken: Pulled chicken often implies cooking the meat low and slow, traditionally in barbecue or slow-cooker style. The chicken is then pulled apart by hand or with forks into long, thin shreds. This method tends to result in a more rustic, uneven texture.

    Can You Use Frozen Chicken Breasts?

    Absolutely! Just add 2 extra minutes to the cooking time to ensure they're cooked through.

    Best Chicken Meat For Shredded Chicken?

    To get delicious shredded chicken I use a combination of boneless skinless chicken thighs and chicken breasts, however either will work well for this recipe.

    How Do I Store Leftover Shredded Chicken?

    To store shredded chicken, cool it to room temperature, then refrigerate in an airtight container for up to 3-4 days.
    For longer storage, freeze in a suitable container or bag, and when ready to use, thaw in the refrigerator overnight before reheating.

    💖 Serving Suggestions

    Shredded chicken is one of the most versatile ingredients in the kitchen. It can be used in a variety of dishes, from salads and sandwiches to soups and casseroles. here are some great ways to serve your shredded chicken.

    • Tacos: Use as a filling with your favorite toppings.
    • Salads: Top your greens for added protein.
    • Sandwiches: Mix with mayo and spices for a quick chicken salad.
    • Soups: Add to broths for a hearty meal.
    • Casseroles: Incorporate into baked dishes for extra substance.
    • Wraps: Combine with veggies and sauces for a quick lunch.
    Instant Pot Shredded Chicken in a bowl.

    🍽 More Super Chicken Recipes

    • Rotisserie Chicken Salad in a bowl garnished with dill.
      Best Rotisserie Chicken Salad Recipe
    • Air Fryer Almond Crusted Chicken.
      Crispy Almond Crusted Chicken (Air Fried or Oven Baked)
    • Slow Cooker Chicken Teriyaki.
      Slow Cooker Chicken Teriyaki
    • Sheet Pan Chinese Chicken With Green Beans.
      Sheet Pan Chinese Chicken With Green Beans

    Did you make this recipe? Leave a review and a ⭐⭐⭐⭐⭐ rating below, or tag us in our Facebook Group! Alternatively, bookmark it in your browser or save to Pinterest.

    Easy Instant Pot Shredded Chicken in a yellow bowl.

    Easy Instant Pot Shredded Chicken

    Angela Milnes
    Make meal prep a breeze with this Instant Pot Shredded Chicken! Tender, juicy chicken breasts are cooked to perfection in the Instant Pot, making it easy to shred and use in your favorite dishes. Perfect for tacos, salads, sandwiches, or meal prep, it’s a versatile and time-saving recipe you'll love!
    5 from 3 votes
    Print Recipe Pin Recipe Rate this Recipe
    Prep Time 5 minutes mins
    Cook Time 15 minutes mins
    0 minutes mins
    Total Time 20 minutes mins
    Course Dinners
    Cuisine American
    Servings 4 Servings
    Calories 1050 kcal

    Ingredients
      

    • 2 pounds Boneless Skinless Chicken Breast and Thighs
    • 1.5 tablespoon Herbs or Your Favorite Rub
    • 1 Cup Reduced Sodium Vegetable Broth

    Instructions
     

    • Mix together chicken and your rub in a bowl.
    • Add the vegetable broth to Instant Pot and add the chicken directly into the liquid. Cover and seal your pot. Select Pressure Cook/Manual, set to to high pressure for 10 minutes. Cook and then allow the pressure to release naturally.
    • Remove chicken from your Instant Pot onto a plate and shred using some forks.
    • Remove liquid from Instant Pot and add chicken back in, add some of the cooking liquid, mix and serve.

    Notes

    Fridge: To store shredded chicken, cool it to room temperature, then refrigerate in an airtight container for up to 3-4 days.
    Freeze: For longer storage, freeze in a suitable container or bag, and when ready to use, thaw in the refrigerator overnight before reheating.
    Reheat: Reheat shredded chicken by microwaving, sautéing, or incorporating it into other recipes. Ensure it reaches an internal temperature of 165°F (74°C) to ensure food safety.

    Nutrition

    Calories: 1050kcalCarbohydrates: 3gProtein: 194gFat: 24gSaturated Fat: 5gPolyunsaturated Fat: 4gMonounsaturated Fat: 7gTrans Fat: 0.1gCholesterol: 581mgSodium: 1052mgPotassium: 3365mgFiber: 1gSugar: 1gVitamin A: 430IUVitamin C: 11mgCalcium: 51mgIron: 3mg
    Print Recipe Pin Recipe Rate this Recipe
    Tried this recipe?Let us know how it was!

    Best Jiffy Jalapeno Cheddar Cornbread

    October 5, 2024 by Angela Milnes

    Best Jiffy Jalapeno Cornbread Recipe.

    This Jiffy Jalapeno Cheddar Cornbread is sweet, spicy, cheesy, and dangerously easy to make. If comfort food and a jalapeño popper had a love child, this would be it.

    Best Jiffy Jalapeno Cornbread Recipe.

    I’ve made a lot of cornbread in my time—from plain-Jane boxed mixes to cornbread casseroles that try too hard. But this? This is the one I keep coming back to. It’s got the nostalgic ease of Jiffy cornbread mix (yes, the blue box we all grew up with), but then we zhuzh it up with sharp cheddar, sweet corn, and just the right amount of jalapeño kick.

    Whether I’m serving this up with Crock Pot Chili Mac and Cheese or slicing it into thick wedges to go with Barbecue Brisket, this cheesy jalapeño cornbread always disappears fast. And as someone who’s tested a dozen versions over the years, I can confidently say—this one hits every time.

    [feast_advanced_jump_to]

    💖 Why This Recipe Works

    • Bold flavor combo – Sweet, spicy, savory, cheesy. It’s got layers, people.
    • Fast and foolproof – One bowl, one box of Jiffy, one dreamy skillet of cornbread.
    • Crowd-pleaser – It’s great for potlucks, BBQs, chili night, or let’s be honest… breakfast.

    ⭐ Star Ingredients

    Ingredients for Jiffy jalapeno cornbread recipe.
    • Jiffy Corn Muffin Mix: The classic shortcut. It bakes up fluffy and just sweet enough to balance the jalapeño heat.
    • Pickled Jalapeños: I prefer pickled for that tangy kick, but fresh works too if you want extra heat.
    • Shredded Sharp Cheddar: Sharp cheddar gives this cornbread real flavor depth—none of that bland melt here.
    • Sweet Corn Kernels: Adds texture and little pops of natural sweetness in every bite.

    For the complete list of ingredients with measurements and instructions, please see the recipe card at the bottom of the post.

    📖  Substitutions & Variations

    • Sour Cream: Use in place of milk for a richer, tangier loaf.
    • Fresh Jalapeños: Want more kick? Swap or mix with pickled for layered heat.
    • Crumbled Bacon: Fold in for a smoky twist. Or better yet: sprinkle on top.
    • Pepper Jack: Sub for cheddar to double down on the spice.
    • Gluten-Free Option: Use a gluten-free corn muffin mix if needed.

    Want more easy cheesy sides? Check out my Pizza Garlic Bread or this gooey Cheesy Cauliflower Mash next.

    Jiffy jalapeno cornbread in a dish.

    🔪 How To Make Jiffy Jalapeno Cheddar Cornbread

    Flour, egg, milk and melted butter in a bowl.
    1. Step 1: Mix flour (corn and wheat, or all-purpose mix or Jiffy mix), egg, milk, and melted butter in a bowl. Add salt, spices, and baking powder to the cornbread mixture. Mix again.
    jalapeno cornbread mixture in a bowl.
    1. Step 2: Add shredded cheddar cheese and finely chopped jalapeno. Knead the dough until well combined.
    jalapeno cornbread mixture in a bowl.
    1. Step 3: Knead the dough until well combined.
    jalapeno cornbread mixture in a baking dish.
    1. Step 4: Grease a baking dish with oil. Spread out the dough (cornbread batter).
    cooked jalapeno corn bread in a baking dish.
    1. Step 5: Bake the cornbread for 25-30 minutes at 200 °C or until golden brown.
    sliced cornbread on a plate.
    1. Step 6: Serve the bread once it has cooled slightly or at room temperature.

    💡Hint: Preheat the skillet for 5 minutes before pouring in the batter. It gives you that crave-worthy crispy edge every time.

    👩‍🍳 Expert Tips

    • Grate your own cheese: It melts better and tastes fresher than pre-shredded bags.
    • Double the batch: Make one for now and one to freeze. Trust me—you’ll want it again tomorrow.
    • Let it rest: Give it 10 minutes before slicing so the cheese sets and the texture stays fluffy.
    Jiffy Jalapeno Cornbread in a baking dish.

    💭 FAQs

    Can I make jiffy jalapeno cheddar cornbread ahead of time?

    Yes: Store tightly wrapped at room temp for 2 days or in the fridge up to 5 days. Reheat in the oven to crisp it back up.

    Can I freeze Jiffy Jalapeno Cheddar Cornbread?

    Yes! Slice and wrap each piece in cling film. Freeze for up to 3 months and reheat straight from frozen.

    What kind of jalapeños work best in cornbread?

    Pickled jalapeños offer tang and mellow heat. Fresh jalapeños bring more spice—use both if you love a layered flavor.

    Can I skip the corn?

    ou can: But the little pops of sweetness help balance the heat and add texture. If you skip it, reduce the milk slightly.

    💖 Serving Suggestions

    These are my favorite dishes to serve with jiffy cornbread:

    • Instant Pot Enchilada Soup or Instant Pot Chicken Barley Soup: The creamy cornbread is a perfect dunker.
    • BBQ Pulled Pork: Sweet heat meets smoky meat.
    • Purple Cabbage Slaw: A cool, crunchy contrast to the warm spice.
    • Chili Con Carne: Classic pairing for a reason.
    • Fried Eggs + Hot Sauce: Slice it up for a spicy, savory breakfast.
    • Beetroot Carpaccio with Goat Cheese: For a bold veggie plate that stands up to flavor.
    • Smoked Texas Twinkies: Serve alongside some Bacon Wrapped Brisket Jalapeno Poppers for a burst of spice and deliciousness.
    Cooked jalapeno cornbread  in a dish.

    🍽 Try More Tasty Bread Recipes

    • Raw vegan bread topped with a tomato and cheese slice served on a tray.
      Best Raw Vegan Bread Recipe
    • pull apart monkey bread mixture in a bundt pan.
      Pizza Monkey Bread: Pizza Pull Apart Bread
    • Heart Shaped Parmesan Breadsticks.
      Heart Shaped Parmesan Breadsticks
    • Easy Oat Bread With Crunchy Seed Topping.
      Easy Oat Bread With Crunchy Seed Topping

    Did you make this recipe? Leave a review and a ⭐⭐⭐⭐⭐ rating below, or tag us in our Facebook Group! Alternatively, bookmark it in your browser or save to Pinterest.

    Best Jiffy Jalapeno Cornbread Recipe.

    Jiffy Jalapeno Cornbread Recipe

    Angela Milnes
    Add a spicy twist to your cornbread with this Jiffy Jalapeno cheddar Cornbread Recipe! This easy recipe combines the classic sweetness of Jiffy cornbread mix with the heat of fresh jalapeños for a flavorful, savory side dish. Perfect for pairing with chili, soups, or as a standalone snack!
    5 from 4 votes
    Print Recipe Pin Recipe Rate this Recipe
    Prep Time 5 minutes mins
    Cook Time 30 minutes mins
    Total Time 35 minutes mins
    Course Side Dish
    Cuisine American
    Servings 6 Servings
    Calories 188 kcal

    Ingredients
      

    • 1 Cup Corn And Wheat Flour Mix or All-purpose Corn Muffin Mix
    • 1 Egg
    • 100 g Canned Corn
    • 2 tablespoon Pickled Chopped Jalapeno
    • 50 g Cheddar
    • 50-70 ml Milk
    • 2 tablespoon Butter
    • 0.5 tablespoon Baking Powder
    • Salt Spices - To Taste.

    Instructions
     

    • Mix flour (corn and wheat, or all-purpose mix or Jiffy mix), egg, milk, and melted butter in a bowl.
    • Add salt, spices, and baking powder to the cornbread mixture. Mix again.
    • Add shredded cheddar cheese and finely chopped jalapeno.
    • Knead the dough until well combined.
    • Grease a baking dish with oil.
    • Spread out the dough (cornbread batter). It is not very thick, not pouring, approximately like cottage cheese.
    • Bake bread for 25-30 minutes at 200C or until golden brown.
    • Serve the bread once it’s slightly cooled or at room temperature.

    Notes

    Cheese Varieties: Experiment with different types of cheese such as pepper jack cheese or gouda cheese for a unique flavor twist in your cornbread.
    Cast Iron Magic: Baking your cornbread in a preheated cast iron skillet can give it a beautifully crisp crust and even the cooking.
    Selecting Jalapenos: For a vibrant kick in your jiffy jalapeño cornbread, opt for fresh jalapenos. They bring a brighter, more pronounced heat compared to their canned canned jalapenos.

    Nutrition

    Calories: 188kcalCarbohydrates: 21gProtein: 4gFat: 10gSaturated Fat: 4gPolyunsaturated Fat: 1gMonounsaturated Fat: 3gTrans Fat: 0.2gCholesterol: 39mgSodium: 508mgPotassium: 77mgFiber: 2gSugar: 5gVitamin A: 254IUVitamin C: 1mgCalcium: 95mgIron: 1mg
    Print Recipe Pin Recipe Rate this Recipe
    Tried this recipe?Let us know how it was!

    Heart Shaped Parmesan Breadsticks

    October 5, 2024 by Angela Milnes

    Heart Shaped Parmesan Breadsticks.

    I love finding unique ways to add a little extra love to my meals, especially when it involves something as delicious as homemade breadsticks. That's why I decided to make these Heart Shaped Parmesan Breadsticks. These adorable and cheesy delights will steal the hearts of everyone at the table.

    heart shaped parmesan breadsticks.
    [feast_advanced_jump_to]

    💖 Why This Recipe Works

    • Crunchy and Cheesy: These parmesan breadsticks are the perfect blend of crispy texture and cheesy goodness.
    • Easy to Make: With a few simple ingredients, these Parmesan Breadsticks are to prepare at home.
    • Great for Sharing: Perfect for parties or family dinners, they're sure to be a crowd-pleaser.

    ⭐ Star Ingredients

    parmesan breadstick ingredients.
    • Salt: Enhances the flavors of the other ingredients.
    • Unsalted Butter: Adds a rich, creamy flavor and aids in achieving a golden crust.
    • Vegetable Oil or Olive Oil: Helps these buttery breadsticks stay moist and tender.
    • Flour (Bread Flour or All Purpose Flour): Forms the structure of the breadsticks, providing body and texture.
    • Milk: Adds moisture and helps to create a soft, tender crumb in the breadsticks.
    • Dry Yeast: Is the leavening agent that makes the breadsticks rise and become fluffy.
    • Sugar: Feeds the yeast to activate it and adds a slight sweetness to balance the saltiness.
    • Egg: Provides structure and richness to the dough, and gives the breadsticks a golden color when baked.
    • Sea Salt or Kosher Salt: Sprinkled on top for a crunchy finish and an extra burst of flavor.
    • Garlic Powder (No Need for Garlic Salt): Infuses the breadsticks with a subtle, savory garlic flavor.
    • Grated Parmesan Cheese: Melts into the breadsticks in the oven, adding a nutty, salty note that makes these breadsticks irresistible.

    For the complete list of ingredients with measurements and instructions, please see the recipe card at the bottom of the post.

    📖  Substitutions & Variations

    • Powdered Parmesan Cheese: Infuses a deeper, savory umami kick, perfect for mixing into the dough and sprinkling atop for a golden, cheesy crust.

    🔪 How To Make Parmesan Breadsticks

    bread mixture in bowl.
    1. Step 1: In the bowl, mix flour, warm milk, sugar, and salt. Add dry yeast. Also, add one egg white and butter. Make a soft dough.
    mixing dough in bowl.
    1. Step 2: Cover it and leave the dough in a warm place for 30 minutes.
    breadstick dough rolled into a ball.
    1. Step 3: Divide the dough into small portions.
    breadstick dough shaped into hearts.
    1. Step 4: Roll each piece of dough into a long rope about ½ inch thick and over 13 inches long. Create a heart shape. Place the heart-shaped breadsticks on a rimmed baking sheet.
    heart shaped parmesan breadsticks on a sheet pan.
    1. Step 5: Cover with a kitchen towel and let rise for 30-45 minutes. Mix the chicken yolk with a spoonful of water and brush the hearts. Sprinkle with garlic bread seasoning (garlic powder, salt, and grated Parmesan cheese).
    heart shaped parmesan breadsticks on a sheet pan.
    1. Step 6: Bake at 350 degrees Fahrenheit for 15-18 minutes or until golden brown. Brush the finished Parmesan breadsticks with melted butter and serve warm.
    heart shaped parmesan breadsticks.

    👩‍🍳 Expert Tips

    • Dough Rolling: Roll the dough evenly so your heart shapes are perfect and cook evenly.
    • Garlic Butter Glory: Brush with garlic butter before baking, for a yummy, golden crust of your delicious garlic parmesan breadsticks.

    💭 FAQs

    What's The Best Dipping Sauce For Breadsticks?

    There are so many great dipping sauces for breadsticks, but some of our favorites include marinara sauce, Garlic Aioli, and Herby Ranch Dressing. These Parmesan breadsticks are the perfect easy, homemade breadstick recipe!

    How To Store Homemade Breadsticks?

    Keep your leftover parmesan breadsticks at room temperature for up to 2 days for best taste.
    Refrigerate for up to a week in a sealed bag or container.

    💖 Serving Suggestions

    These are my favorite dishes to serve with breadsticks:

    • Instant Pot Chicken Pot Pie Soup - Creamy and hearty, perfect for dipping those cheesy breadsticks.
    • Instant Pot Enchilada Soup - A spicy, flavorful option that complements the savory Parmesan.
    • Instant Pot Zuppa Toscana Soup - A rich and creamy soup that balances well with the crispness of the breadsticks.
    parmesan bread sticks.

    🍽 Try More Tasty Bread Recipes

    • Raw vegan bread topped with a tomato and cheese slice served on a tray.
      Best Raw Vegan Bread Recipe
    • pull apart monkey bread mixture in a bundt pan.
      Pizza Monkey Bread: Pizza Pull Apart Bread
    • Best Jiffy Jalapeno Cornbread Recipe.
      Best Jiffy Jalapeno Cheddar Cornbread
    • Easy Oat Bread With Crunchy Seed Topping.
      Easy Oat Bread With Crunchy Seed Topping

    Did you make this recipe? Leave a review and a ⭐⭐⭐⭐⭐ rating below, or tag us in our Facebook Group! Alternatively, bookmark it in your browser or sn your browser or save to Pinterest.

    Heart Shaped Parmesan Breadsticks.

    Heart Shaped Parmesan Breadsticks

    Angela Milnes
    Whip up some love with these cheesy, heart-shaped parmesan breadsticks that are super easy to make and taste amazing!
    5 from 5 votes
    Print Recipe Pin Recipe Rate this Recipe
    Prep Time 1 hour hr
    Cook Time 17 minutes mins
    Total Time 1 hour hr 18 minutes mins
    Course Side Dishes, Snack
    Cuisine Italian
    Servings 6 Servings
    Calories 458 kcal

    Ingredients
      

    • 2 teaspoon Salt
    • ½ Cup Butter
    • 2 tablespoon Vegetable Oil
    • 3 Cups Flour
    • ⅔ Cups Milk
    • 2 teaspoon Dry Yeast
    • 2 teaspoon Sugar
    • 1 Egg
    • 2 tablespoon Sea Salt
    • 2 tablespoon Garlic Powder
    • 3 tablespoon Grated Parmesan

    Instructions
     

    • In the bowl, mix flour, warm milk, sugar, and salt. Add dry yeast. Also add one egg white and butter. Make a soft dough.
    • Cover it and leave the dough in a warm place for 30 minutes.
    • Divide the dough into small portions.
    • Roll each piece of dough into a long rope about ½ inch thick and over 13 inches long. Create a heart shape. Place the heart-shaped bread sticks on a rimmed baking sheet.
    • Cover with a kitchen towel and let rise for 30-45 minutes.
    • Mix the chicken yolk with a spoonful of water and brush the hearts. Sprinkle with garlic bread seasoning (garlic powder, salt, and grated Parmesan cheese).
    • Bake at 350 degrees Fahrenheit for 15-18 minutes or until golden brown.
    • Brush the finished parmesan breadsticks with melted butter and serve warm.

    Notes

    Dough Rolling: Roll the dough evenly so your heart shapes are perfect and cook evenly.
    Garlic Butter Glory: Brush with garlic butter before baking, for a yummy, golden crust of your delicious garlic parmesan breadsticks.

    Nutrition

    Calories: 458kcalCarbohydrates: 53gProtein: 10gFat: 23gSaturated Fat: 12gPolyunsaturated Fat: 4gMonounsaturated Fat: 6gTrans Fat: 1gCholesterol: 73mgSodium: 3290mgPotassium: 169mgFiber: 2gSugar: 3gVitamin A: 578IUVitamin C: 0.03mgCalcium: 78mgIron: 3mg
    Print Recipe Pin Recipe Rate this Recipe
    Tried this recipe?Let us know how it was!

    More Tasty Appetizers To Try

    • Best Air Fryer Onion Rings
    • Fondue Cheese Recipe
    • Air Fryer Cheesesteak Egg Rolls
    • Shrimp Cucumber Bites
    • Stuffed Cucumber Boats
    • Homemade Bagel Chips

    Instant Pot Chicken Pot Pie Soup

    October 5, 2024 by Angela Milnes

    Instant Pot Chicken Pot Pie Soup.

    Cozy up with our Instant Pot Chicken Pot Pie Soup. A quick and comforting twist on the classic. Enjoy the flavors of chicken pot pie in a speedy, delicious bowl. Let the Instant Pot do the work for a warm and hearty meal that's easy to make. Get ready to savor comfort simplified!

    Instant Pot Chicken Pot Pie Soup.
    [feast_advanced_jump_to]

    If you love this Chicken Pot Pie Soup recipe then be sure to check out our Instant Pot Enchilada Soup, Homemade Cheeseburger Soup and Air Fryer Chicken Pot Pie recipes.

    💖 Why This Recipe Works

    • Creamy And Delicious: Made with heavy cream and Chicken Broth, this Chicken Pot Pie Soup recipe is creamy and delicious.
    • Quick And Easy: You can have dinner on the table in about 30 minutes. It's perfect for busy households that need something quick and easy to whip up.
    • Low Carb: Since this chicken pot pie is crustless, it's low on carbs and perfect for those trying to limit their carb intake.

    ⭐ Star Ingredients

    chicken pot pie soup ingredients.
    • Chicken: Used for their lean, tender meat that shreds easily.
    • Potatoes: Add heartiness to the dish.
    • Butter: Used for sautéing veggies, it adds a rich, savory flavor.
    • Onion: Preferred for its mild, sweet flavor that enhances the overall taste of the pie.
    • Carrots: Add a sweet, earthy flavor and a pop of color.
    • Minced Garlic: Infuses the dish with a robust, aromatic flavor that complements the other ingredients.
    • Chicken Broth: Serves as the base of the sauce, adding depth and richness to the pot pie.
    • Heavy Cream: Enhances the richness of the sauce, giving it a creamy texture and a slightly sweet flavor.
    • Corn Starch: Used to thicken the sauce, ensuring a hearty filling for the pot pie.
    • Veggies: Frozen corn and peas add texture and sweetness.
    • Spices: Customize the flavor profile of the pot pie, allowing you to tailor it to your taste preferences.

    For the complete list of ingredients with measurements and instructions, please see the recipe card at the bottom of the post.

    📖  Substitutions & Variations

    • Chicken Pot Pie and Biscuit Soup: Instant Pot chicken pot pie soup with flaky biscuits, chicken, and veggies is a great options to make!
    • Instant Pot Chicken and Mushroom Pot Pie Soup: A delicious soup that blends chicken pot pie flavors with earthy mushrooms, cooked to perfection in an Instant Pot.
    • Instant Pot Creamy Chicken and Leek Pot Pie Soup: Combine your comforting chicken pot pie flavors with the subtle sweetness of leeks, easily prepared in your Instant Pot.
    • Spicy Instant Pot Chicken Pot Pie Soup: For heat lovers add jalapenos or hot sauce to the classic chicken pot pie soup.
    • Instant Pot Chicken Pot Pie and Sweet Corn Soup: Add a sweet twist by including corn kernels with the traditional ingredients of a chicken pot pie soup.

    🔪How To Make Instant Pot Chicken Pot Pie Soup

    Chopped carrots and onions in Instant Pot.
    1. Step 1: First, hit the sauté or sear button on your Instant Pot, melt your butter, and then add your onions and carrots. Sauté them for about 8-10 minutes. Next, add ¼ cup of chicken broth to your pot, and scrape the bottom to remove any remnants from the bottom.
    Garlic, thyme, chicken, potatoes, corn, and peas in an Instant Pot.
    1. Step 2: Add your garlic, thyme, chicken, potatoes, corn, peas, and the rest of your chicken broth to the Instant Pot. Close the lid on your Instant Pot, push the pressure valve to the sealing position, hit pressure cook or manual, and set the time for 10 minutes.
    Cooked shredded chicken and soup mixture in instant pot.
    1. Step 3: Once your Instant Pot beeps, do a quick release by pushing the pressure valve to the venting position.
    Chicken pot pie soup in a bowl.
    1. Step 4: In a mixing bowl, whisk together the cornstarch and heavy cream until a creamy slurry forms. Then, stir the roux into the soup until it thickens. Garnish with herbs and serve.
    Chicken pot pie soup in a serving bowl.

    👩‍🍳 Expert Tips

    • Cut Potatoes Large: You want your potatoes to be no smaller than 1 inch. You want the potatoes to be fairly large, so they don't turn into mashed potatoes.
    • Make Sure The Roux Is Not Lumpy: You don't want clumps and lumps in your slurry.
    • Simmer To Thicken: If your chicken pot pie still seems thin, you can use your saute button to simmer and thicken the soup.

    💭 FAQs

    Can I Use Frozen Chicken Breasts In This Recipe?

    Yes, some recipes even recommend using frozen chicken breasts directly without the need to thaw them first.

    Can I Make A Vegetarian Version Of This Soup?

    Absolutely! You can replace the chicken with more vegetables or add tofu or beans for protein. Just make sure to also substitute the chicken broth with vegetable broth.

    Can I Use Other Meats Instead Of Chicken In This Soup Recipe?

    Yes, you can substitute chicken with turkey or even ham. Just bear in mind that the cooking time might vary depending on the type and size of the meat pieces.

    Can I Use Cooked Chicken Or Leftover Chicken?

    Yes, you can use cooked chicken, leftover chicken, or even rotisserie chicken. Just add it towards the end of the cooking process to prevent it from overcooking.

    What Can I Use As A Dairy-Free Alternative To Cream?

    You can use coconut milk or coconut cream to make the soup creamy and dairy-free. Almond milk is another good alternative.

    Can I Use Sweet Potatoes Or Yukon Gold Potatoes In This Recipe?

    Absolutely! Both sweet potatoes and Yukon gold potatoes add a hearty element to the soup. Just remember to adjust the cooking time as sweet potatoes cook faster than regular potatoes.

    What Makes Instant Pot Chicken Pot Pie Soup Different From Traditional Chicken Soup?

    Instant Pot Chicken Pot Pie Soup is a creamy and hearty variation of traditional chicken soup. It incorporates the flavors and ingredients typical of a chicken pot pie, such as diced chicken, peas, carrots, and potatoes, but in soup form. The Instant Pot allows for quick and easy preparation, making it a comforting meal perfect for busy days.

    Best Way to Store Chicken Soup

    First, give the Instant Pot Chicken Pot Pie Soup some time to cool down to room temperature. If you plan on eating the soup within the next 3-4 days, you can store it in the refrigerator. For longer storage, you can freeze the soup. When doing so, remember to leave about an inch of space at the top of each container to allow for the soup to expand as it freezes. You can freeze your chicken pot pie soup for 2-3 months.

    💖 Serving Suggestions

    Here are my favorite sides to serve with Instant Pot Chicken Pot Pie Soup:

    • Spinach Bread: A nutrient-dense, earthy side dish that balances the rich and creamy Chicken Pot Pie Soup.
    • Tasty Broccoli Salad: A vibrant, crunchy salad that brings a refreshing contrast to the hearty soup.
    • Pizza Monkey Bread: Sweet, fluffy, warm bread that perfectly offsets the savory notes of the soup.
    • Roasted Brussels Sprouts With Maple Syrup: Caramelized sprouts that offer a delightful contrast and crispy texture to the creamy soup.
    • Garlic Knots: Soft, buttery knots loaded with garlic flavor, perfect for dipping into the rich soup.

    🍽 More Instant Pot Recipes

    • Instant Pot Cajun Chicken and Rice.
      Instant Pot Cajun Chicken and Rice
    • Creamy Instant Pot Tortellini Recipe.
      Creamy Instant Pot Tortellini Recipe
    • Instant Pot Kielbasa And Cabbage.
      Instant Pot Kielbasa And Cabbage
    • Instant Pot Enchilada Soup.
      Instant Pot Enchilada Soup

    Did you make this recipe? Leave a review and a ⭐⭐⭐⭐⭐ rating below, or tag us in our Facebook Group! Alternatively, bookmark it in your browser or save to Pinterest.

    Instant Pot Chicken Pot Pie Soup.

    Instant Pot Chicken Pot Pie Soup

    Angela Milnes
    Enjoy the comforting flavors of a classic chicken pot pie in a fraction of the time with this Instant Pot Chicken Pot Pie Soup! Creamy, hearty, and filled with tender chicken and veggies, this soup captures all the cozy goodness of pot pie without the fuss. Perfect for a quick and satisfying meal on busy days.
    5 from 3 votes
    Print Recipe Pin Recipe Rate this Recipe
    Prep Time 10 minutes mins
    Cook Time 20 minutes mins
    Total Time 29 minutes mins
    Course Soup
    Cuisine American
    Servings 4 Servings
    Calories 609 kcal

    Ingredients
      

    • 4 tablespoon Butter
    • ½ Onion Diced
    • 1 Cup Carrot Diced
    • 3 tablespoon Garlic Minced
    • ¼ teaspoon Thyme Chopped (or ⅛ Teaspoon Dried Thyme)
    • 2 Chicken Breasts Shredded
    • 2 Cups Potatoes You Can Remove Skin. I Left It On.
    • 1 Cup Corn Frozen
    • 1 Cup Peas Frozen
    • 4 Cups Chicken Broth
    • 3 tablespoon Corn Starch
    • ½ Cup Heavy Cream
    • Pinch Salt
    • Pinch Pepper

    Instructions
     

    • First, hit the sauté or sear button on your Instant Pot, melt your butter, and then add your onions and carrots. Sauté them for about 8-10 minutes.
    • Next, add ¼ cup of chicken broth to your pot, and scrape the bottom to remove any remnants from the bottom.
    • Add your garlic, thyme, chicken, potatoes, corn, peas, and the rest of your chicken broth to the Instant Pot.
    • Close the lid on your Instant Pot, push the pressure valve to the sealing position, hit pressure cook or manual, and set the time for 10-minutes.
    • Once your Instant Pot beeps, do a quick release by pushing the pressure valve to the venting position.
    • Remove the chicken from your Instant Pot and shred it using two forks. Then, transfer the chicken back to your pot and stir it in.
    • In a mixing bowl, whisk together the corn start and heavy cream until a creamy slurry forms. Then, stir the roux into the soup until it thickens.
    • Serve and Enjoy!

    Notes

    Cut potatoes big: You want your potatoes to be no smaller than 1-inch. You want the potatoes to be fairly large, so they don’t turn into mashed potatoes.
    Make sure the roux is not lumpy: You don’t want clumps and lumps in your slurry.
    Simmer to thicken: If your chicken pot pie still seems thin, you can use your saute button to simmer and thicken the soup.

    Nutrition

    Calories: 609kcalCarbohydrates: 59gProtein: 34gFat: 27gSaturated Fat: 15gPolyunsaturated Fat: 2gMonounsaturated Fat: 7gTrans Fat: 0.5gCholesterol: 141mgSodium: 1135mgPotassium: 1245mgFiber: 8gSugar: 7gVitamin A: 6519IUVitamin C: 42mgCalcium: 124mgIron: 4mg
    Print Recipe Pin Recipe Rate this Recipe
    Tried this recipe?Let us know how it was!

    Try Homemade Instant Pot Soup Today

    • Purple Cabbage Soup
    • Instant Pot Split Pea Soup
    • Vegetarian Carrot And Leek Soup
    • Instant Pot Chicken Barley Soup
    • Homemade Bean and Bacon Soup
    • Instant Pot Chinese Dumpling Soup
    • Butternut Squash Soup
    • Instant Pot Enchilada Soup
    • Instant Pot Clam Chowder

    Easy Air Fryer Pot Pies Recipe

    October 5, 2024 by Angela Milnes

    Easy Air Fryer Pot Pies Recipe.

    Get ready for a delicious twist on a classic: Air Fryer Pot Pies! Imagine crispy pastry filled with savory goodness, all cooked to perfection in your air fryer. This classic comfort food dish makes an easy and tasty pot pie. Let's dive into the recipe and enjoy homemade pot pies like never before!

    Air Fryer Pot Pies
    [feast_advanced_jump_to]

    💖 Why This Recipe Works

    • Time-Saving: Air frying cuts the cooking time, delivering Chicken Pot Pies in a jiffy.
    • Flaky and Golden: Achieve a perfect crispy crust without having to turn on your oven.
    • Customizable Fillings: Easily swap ingredients to create your creamy filling combination.

    ⭐ Star Ingredients

    chicken pot pie ingredients.
    • Grand Biscuits: Act as the vessel for our pot pies, providing a fluffy, golden-brown crust that's both deliciously buttery and satisfyingly crisp.
    • Diced Chicken (Cooked): Adds a hearty, savory element that makes this chicken pot pie recipe truly filling.
    • Frozen Mixed Vegetables: Add a pop of color, a variety of textures, and a medley of flavors, enhancing the overall taste of the pot pies.
    • Condensed Cream of Chicken (Canned or Homemade): Forms the creamy, rich base of our filling, binding all the other ingredients together and adding a comforting, hearty flavor.
    • Onion Powder: Gives a subtle sweetness, enhancing the savory flavors of the chicken and vegetables.
    • Salt and Pepper: Heighten the natural flavors of the other ingredients, bringing balance and depth to the pot pies.

    For the complete list of ingredients with measurements and instructions, please see the recipe card at the bottom of the post.

    📖  Substitutions & Variations

    • Load up your pot pie with carrots, peas, and potatoes for a veggie-packed twist that’s just as cozy and delicious.
    • Craving something heartier? Swap the chicken for tender beef chunks, add some aromatic herbs, and let the rich flavors do their thing!

    🔪How To Make Air Fryer Pot Pies

    chicken pot pie mixture in bowl.
    1. Step 1: Mix the chicken, veggies, cream of chicken, and the spices together in a large bowl. Make sure chicken and veggies are fully coated. Set aside. Open the can of biscuits and set them out separately.
    chicken pot pie mixture in bowl.
    1. Step 2: Spray 6 jumbo silicone muffin liners lightly with oil. Pinch off ¼ of the dough from 6 biscuits. Set aside pinches of dough. Mold the ¾ size biscuits to the inside of the muffin liners. Cook in the air fryer at 300°F for 5 minutes.
    adding mixture to chicken pot pie.
    1. Step 3: Remove and spoon in filling. You want to fill half way pressing down to continue forming the crust into a cup. Fill up the cup with a little mound of filling. Repeat this for the remaining 5 pies.
    adding mixture to chicken pot pie.
    1. Step 4: Use the remaining biscuits and pinches of dough and place a thin layer of dough over the pies to seal them. Using your fingers, pinch the pie tips to the sides of the pie cups along the rim of the liner. Make 4 little punctures in the top of the pies to allow for venting.
    Air Fryer Pot Pies in air fryer basket.
    1. Step 5: Continue to cook the pies at 300° for 20 minutes or until the crust is fully cooked. Depending on the size of your air fryer basket and the closeness of the heating element, you may find that you'll need to rotate the pot pie in air fryer while cooking. You don’t want to burn the tops.
    Air Fryer Pot Pies in air fryer basket.
    1. Step 6: If the top finishes while the cups still need cooking, wrap the pies in a layer of foil to protect the tops. Once finished, allow the pot pies to cool before serving.
    Air Fryer Pot Pies.

    💡 Hint: To achieve a perfectly crisp homemade pie crust, brush the pastry with a light egg wash before air frying to promote browning and texture.

    👩‍🍳 Expert Tips

    If you're going to make this recipe, make sure to follow this top tip!

    • Preheat Pot Pie Base: A lesser-known trick to elevate the flavor of air fryer pot pies is to preheat the base mixture (filling) before assembling the pie. By gently warming the filling, you can enhance the melding of flavors and ensures even cooking.

    💭 FAQs

    Can You Cook Frozen Pot Pie In The Air Fryer?

    Yes! You can cook frozen chicken pot pie in the air fryer. Just be sure to add 5-8 extra minutes to the air fry time to cook frozen pot pies.

    How To Keep Your Pot Pies Fresh?

    Ensure any leftover chicken pot pie is properly stored in an airtight container in the refrigerator for 3-4 days.

    Can You Freeze Pot Pies?

    For longer storage, store leftovers in a freezer-safe containers before placing them in the freezer for 1-2 months.

    How To Reheat Pot Pies?

    When reheating a pie from the fridge cook for 5-8 minutes until heated through. For frozen chicken pot pies, adjust the temperature to 360-400°F and follow specific timing instructions, usually around 20-25 minutes, to ensure these frozen pot pies are thoroughly heated.

    💖 Serving Suggestions

    Pair your air fryer pot pies with these delicious sides:

    • Mashed Potatoes: Creamy spuds complement the flaky crust of air fryer pot pies.
    • Broccolini: A vibrant, crunchy side that adds a burst of freshness to your savory pies.
    • Garlic Cilantro Rice: Perfect for balancing the richness of the homemade pot pie.
    • Grilled Parmesan Asparagus: Adds a light and vibrant touch to your meal, perfectly complementing the comforting flavors of pot pies.
    Air Fryer Pot Pies

    🍽 More Fantastic Air Fryer Recipes

    • Crispy Air Fryer Avocado Fries Recipe.
      Crispy Air Fryer Avocado Fries Recipe
    • Air Fryer Smoked Turkey Legs.
      Best Air Fryer Smoked Turkey Legs
    • Air Fryer Bok Choy on a white plate covered in paprika.
      Air Fryer Bok Choy
    • Philly Cheesesteaks With Sauteed Peppers and melted cheese.
      Air Fryer Philly Cheesesteaks With Sauteed Peppers

    Did you make this recipe? Leave a review and a ⭐⭐⭐⭐⭐ rating below, or tag us in our Facebook Group! Alternatively, bookmark it in your browser or save to Pinterest.

    Easy Air Fryer Pot Pies Recipe.

    Air Fryer Pot Pies

    Angela Milnes
    Indulge in golden-crisp perfection with our Air Fryer Pot Pies, a savory delight for any mealtime.
    5 from 4 votes
    Print Recipe Pin Recipe Rate this Recipe
    Prep Time 15 minutes mins
    Cook Time 23 minutes mins
    Total Time 40 minutes mins
    Course Dinners
    Cuisine American
    Servings 6 Servings
    Calories 314 kcal

    Ingredients
      

    • 8 Jumbo Grand Biscuits
    • 3 Cups Diced Chicken Cooked
    • 1 ½ Oz Frozen Mixed Vegetables.
    • 1 ½ Cups Condensed Cream Of Chicken canned or homemade
    • 1 Teaspoon Onion Powder
    • Pinch Salt and Pepper

    Instructions
     

    • Mix the chicken, veggies, cream of chicken and the spices together in a large bowl. Make sure chicken and veggies are fully coated. Set aside.
    • Open the can of biscuits and set them out separately. Spray 6 jumbo silicone muffin liners lightly with oil. Pinch off ¼ of dough from 6 biscuits. Set aside pinches of dough.
    • Mold the ¾ size biscuits to the inside of the muffin liners. Cook in air fryer at 300 for 5 minutes.
    • Remove and spoon in filling. You want to fill half way pressing down to continue forming the crust into a cup. Fill up the cup with a little mound of filling. Repeat this for the remaining 5 pies.
    • Use the remaining biscuits and pinches of dough to place a thin layer of dough over the pies to seal them. Using your fingers, pinch the pie tips to the sides of the pie cups along the rim of the liner.
    • Make 4 little punctures in the top of the pies to allow for venting.
    • Continue to cook the pies at 300° for 20 minutes or until the crust is fully cooked.
    • Depending on the size of your air fryer basket and the closeness of the heating element, you may find that you'll need to rotate the pot pie in air fryer while cooking. You don’t want to burn the tops.
    • If the top finishes while the cups still need cooking, wrap the pies in a layer of foil to protect the tops.
    • Let cool air fryer pot pies when finished and enjoy!

    Notes

    Egg Wash: To achieve a perfectly crisp homemade pie crust, brush the pastry with a light egg wash before air frying to promote browning and texture.
    Preheat Pot Pie Base: A lesser-known trick to elevate the flavor of air fryer pot pies is to preheat the base mixture (filling) before assembling the pie. By gently warming the filling, you can enhance the melding of flavors and ensures even cooking.

    Nutrition

    Calories: 314kcalCarbohydrates: 31gProtein: 22gFat: 12gSaturated Fat: 2gPolyunsaturated Fat: 3gMonounsaturated Fat: 4gTrans Fat: 0.01gCholesterol: 53mgSodium: 897mgPotassium: 523mgFiber: 3gSugar: 2gVitamin A: 3257IUVitamin C: 7mgCalcium: 47mgIron: 3mg
    Print Recipe Pin Recipe Rate this Recipe
    Tried this recipe?Let us know how it was!

    More Easy Recipes:

    • Instant Pot Fondue Cheese Recipe
    • Instant Pot Chicken Pot Pie Soup
    • Greek Beetroot Dip
    • Crispy Okra Chips Recipe
    • Air Fryer Chicken Fajitas With Cojita Cheese
    • Turkey Patties with Yogurt and Onion
    • Easy Greek Zucchini Moussaka
    • Best Cranberry Orange Sauce
    • Instant Pot Buffalo Chicken Dip
    • Easy Slow Cooker Spinach Artichoke Dip
    Air Fryer Pot Pies

    Best Air Fryer Cheesesteak Egg Rolls

    October 5, 2024 by Angela Milnes

    Best Air Fryer Cheesesteak Egg Rolls.

    Today we are sharing the best Air Fryer Cheesesteak Egg Rolls. These egg rolls are bursting with all of your favorite cheesesteak flavors, and they’re cooked to perfection in the air fryer! Serve them with a dipping sauce of your choice for a delicious appetizer or main dish.

    Air fryer cheesesteak egg rolls served with a bowl of sauce on a plate.
    [feast_advanced_jump_to]

    Why This Recipe Works

    • Crispy and Delicious: Air frying gives these egg rolls a perfect, crunchy exterior.
    • Flavorful Fusion: Combines the savory taste of cheesesteak with the fun of egg rolls.
    • Easy to Make: Simple steps make this Cheesesteak Egg Rolls recipe an accessible choice for any home cook.

    🥘 Ingredients

    Cheesesteak egg rolls ingredients.
    • Olive Oil: Is used for sautéing the onion, bell pepper, and garlic, allowing them to develop a deep, caramelized flavor that forms the aromatic base of this dish.
    • Onion (Diced): Provides a sweet and slightly sharp flavor that enhances the overall taste of the egg roll filling.
    • Green Bell Pepper (Diced): Adds a fresh, slightly sweet crunch that complements the soft textures of the other ingredients.
    • Garlic (Minced): Infuses the dish with its characteristic pungent and spicy flavor, giving the egg rolls a delectable depth of taste.
    • Worcestershire Sauce: Adds a tangy, umami-rich flavor that heightens the savory taste of the beef.
    • Beef Eye Round Steak (Diced): Is the star protein of the dish, providing a hearty, meaty flavor and satisfying chewiness.
    • Salt and Pepper: Enhance the natural flavors of the ingredients, bringing out their best characteristics.
    • Monterey Jack Cheese (Finely Shredded): Melts into a creamy, gooey delight, adding a rich, savory note that pairs perfectly with the beef.
    • Egg Roll Wraps: Hold all the ingredients together and, when air-fried, they become wonderfully crispy, providing an excellent contrast to the savory filling inside.

    For the complete list of ingredients with measurements and instructions, please see the recipe card at the bottom of the post.

    📖  Substitutions & Variations

    • Add Onions: Try Air Fryer Philly Cheesesteak Egg Rolls, by using ground beef, provolone cheese sauce, and sautéed onions.
    • Savory Beef and Cheese Egg Rolls: Enjoy a flavorful twist on traditional egg roll recipes, by using seasoned ground beef and creamy provolone cheese sauce.

    🔪 How To Make Air Fryer Cheesesteak Egg Rolls

    Sauteing chopped onions and bell peppers in a skillet.

    Step One: In a saucepan over med-high, add oil. Add to your hot saucepan or bell pepper and onions. Sauté for 3 to 5 minutes until softened.

    Cooking chopped beef in a pan with sauces and spices.

    Step Two: Add in minced garlic, Worcestershire sauce, steak, salt, and pepper. Sauté and cook until your meat is browned. Drain juice for an au jus. Set aside.

    Steak on egg roll wrapper on a wooden board.

    Step Three: Layout the egg roll wrap in the position of a diamond. Place 2 to 3 spoons of meat in the center of the wrapper. Add 2 tablespoon of your shredded cheese.

    Wrapping to make egg roll.

    Step Four: Lightly wet the edge of the wrapper with water. I like using a sponge brush. Makes it super-efficient!

    Making cheesesteak egg rolls.

    Step Five: Fold the left and right corners into the center. Fold the bottom corner and roll the egg rolls shut, squeezing the air out as you roll. Lightly wet the exposed corner to seal it down.

    Cheesesteak egg rolls in air fryer.

    Step Six: Spray the air fryer basket with oil and place the egg rolls in the basket. Spray rolls with oil. Cook for 8 minutes at 380°F, flipping halfway.

    Cooked cheesesteak egg rolls in air fryer.

    Step Seven: Cook until egg rolls are crispy and golden brown on all sides.

    Cheesesteak egg rolls on a plate with dipping sauce.

    Step Eight: Let your air-fried egg rolls cool for 5-10 minutes before you eat.

    Eating cheesesteak egg roll holding in a hand.

    👩‍🍳 Expert Tips

    • Avoid Overcrowding: Place egg rolls in a single layer in the air fryer basket, with space between each for even hot air circulation. Overcrowding can lead to uneven cooking and soggy rolls.
    • Wrapper Wrangling: Use egg roll wrappers that are just right - not too dry or moist. Seal the rolls well, remove air pockets, and avoid overstuffing for crispy, evenly cooked egg rolls.

    💭 FAQs

    Can You Cook Frozen Egg Rolls In Air Fryer?

    Yes! You can cook frozen egg rolls in the air fryer. Just be sure to add a few minutes to the cooking time if they’re frozen.

    Do Air Fryer Frozen Egg Rolls Taste As Good As Fresh Egg Rolls?

    Air fryer frozen egg rolls taste just as good as fresh egg rolls! The key is to cook them long enough so that they’re hot all the way through and crispy on the outside.

    The Best Way To Store Cheesesteak Egg Rolls

    Once your air fryer egg rolls have cooled to room temperature, place them in an airtight container. Refrigerate within 2 hours of cooking and consume within 2-3 days for optimal freshness.
    For longer storage, freeze the egg rolls in a single layer on a baking sheet until solid. Then transfer them to a freezer-safe bag or container. Label with the freezing date and store for up to 2-3 months.

    🧂Serving Suggestions

    These are my favorite dishes to serve with egg rolls:

    • Garlic Confit: Pair the egg rolls with a side of garlic confit for a rich and aromatic dipping experience.
    • Classic Caesar Salad: A crisp Caesar salad serves as a light and refreshing side, offering a palate-cleansing break between bites of the flavorful egg rolls.
    • Creamy Beetroot Hummus: Complement the savory egg rolls with creamy roasted red pepper hummus, adding a delightful contrast of flavors and textures.
    • Salsa Dip: Elevate the egg rolls with a zesty Instant Pot salsa dip, providing a refreshing and tangy accompaniment.
    • Unstuffed Cabbage Roll Soup: Try pairing your egg rolls with an stuffed cabbage roll soup for a hearty meal.
    Cheesesteak egg rolls on a plate with sauce.

    🍽 Related Recipes

    • Smothered Cajun Cabbage in a bowl.
      Best Cajun Smothered Cabbage Recipe
    • Caramelized Onions in a bowl/.
      Quick Caramelized Onions (Air Fryer Recipe)
    • Chopped Greek Salad in a bowl.
      Chopped Greek Salad with Feta & Olives (Bariatric-Friendly)
    • Zesty Cabbage Soup in a white bowl.
      Zesty Cabbage Soup (With Lemon & Herbs – One Pot Wonder!)

    Did you make this recipe? Leave a review and a ⭐⭐⭐⭐⭐ rating below, or tag us in our Facebook Group! Alternatively, bookmark it in your browser or save to Pinterest.

    Best Air Fryer Cheesesteak Egg Rolls.

    Best Air Fryer Cheesesteak Egg Rolls

    Angela Milnes
    Delicious air fryer cheesesteak egg rolls - a flavorful twist on a classic favorite, perfect for any occasion.
    5 from 3 votes
    Print Recipe Pin Recipe Rate this Recipe
    Prep Time 15 minutes mins
    Cook Time 8 minutes mins
    Total Time 23 minutes mins
    Course Air Fryer Recipes
    Cuisine American
    Servings 8 Servings
    Calories 187 kcal

    Ingredients
      

    • 1 tablespoon Olive Oil
    • ½ Onion Diced
    • 1 Green Bell Pepper Seeds Removed, Diced
    • 1 tablespoon Garlic Minced
    • 1 tablespoon Worcestershire Sauce
    • 1 lb Beef Steak Diced
    • Pinch Salt And Pepper
    • 1 Cup Monterey Jack Cheese Finely Shredded
    • 8 Egg Roll Wraps

    Instructions
     

    • In a saucepan over med-high, add oil. Add to your hot saucepan or bell pepper and onions. Sauté for 3 to 5 minutes until softened.
    • Add in minced garlic, Worcestershire sauce, steak, salt, and pepper. Sauté and cook until your meat is browned. Drain juice for an au jus. Set aside.
    • Layout the egg roll wrap in the position of a diamond. Place 2 to 3 spoons of meat in the center of the wrapper. Add 2 tablespoon of your shredded cheese.
    • Lightly wet the edge of the wrapper with water. I like using a sponge brush. Makes it super-efficient! Fold the left and right corners into the center. Fold the bottom corner and roll the egg rolls shut, squeezing the air out as you roll. Lightly wet the exposed corner to seal it down.
    • Spray the air fryer basket with oil and place the egg rolls in the basket. Spray rolls with oil.
    • Cook for 8 minutes at 380°F, flipping halfway. Cook until egg rolls are crispy and golden brown on all sides.
    • Let your air fried egg rolls cool for 5-10 minutes before you eat.

    Notes

    Avoid Overcrowding: Place egg rolls in a single layer in the air fryer basket, with space between each for even hot air circulation. Overcrowding can lead to uneven cooking and soggy rolls.
    Wrapper Wrangling: Use egg roll wrappers that are just right - not too dry or moist. Seal the rolls well, remove air pockets, and avoid overstuffing for crispy, evenly cooked egg rolls.

    Nutrition

    Calories: 187kcalCarbohydrates: 10gProtein: 18gFat: 8gSaturated Fat: 4gPolyunsaturated Fat: 0.5gMonounsaturated Fat: 3gCholesterol: 47mgSodium: 219mgPotassium: 282mgFiber: 1gSugar: 1gVitamin A: 167IUVitamin C: 13mgCalcium: 131mgIron: 2mg
    Print Recipe Pin Recipe Rate this Recipe
    Tried this recipe?Let us know how it was!

    Try these tasty and delicious recipes:

    • Crock Pot Chicken Gravy
    • Instant Pot Pork Roast
    • Creamy Oven Baked Mac and Cheese
    • Best Sausage Cannelloni Recipe
    • Easy Beef Rice Bowl
    • Hearty Beef Pot Pie With Celery And Carrots
    • Crispy Okra Chips Recipe
    • Creamy Instant Pot Tortellini
    • Hawaiian Pasta Salad
    • Air Fryer Hot Dogs
    • Best Sausage Gravy Recipe
    • « Previous Page
    • 1
    • …
    • 5
    • 6
    • 7
    • 8
    • 9
    • …
    • 19
    • Next Page »
    Angela Milnes.

    Hi I'm Angela

    Welcome to Eat Your Beets where you'll find Healthy and Nutritious Family Recipes that are tasty and simple to cook.

    More About Me

    Spring Recipes

    • edamame stir fry in a white bowl.
      Easy Edamame Stir Fry (15-Minute Protein-Packed Side Dish)
    • Best Gravlax Salmon With Dill (Cured Salmon).
      Best Gravlax Salmon With Dill (Cured Salmon)
    • One Pan Chicken And Asparagus.
      One Pan Chicken And Asparagus
    • Chicken And Cabbage Stir Fry Recipe.
      Chicken And Cabbage Stir Fry Recipe
    • Zucchini Egg Bake Recipe.
      Best Zucchini Egg Bake Recipe
    • How To Make Sun Dried Tomatoes Without Oil.
      How To Make Sun Dried Tomatoes Without Oil – Easy Oven Method

    Popular Recipes 💗

    • best stuffed mushrooms.
      The Best Stuffed Mushrooms
    • Slow Cooker Chicken Bacon Ranch Pasta.
      Slow Cooker Chicken Bacon Ranch Pasta
    • Baked Ricotta On A Spoon.
      Bariatric Friendly Ricotta Bake Recipe
    • Fun Veggie Train With Bell Peppers.
      Fun Veggie Train With Bell Peppers
    • Best Blueberry Smoothie Bowl topped with fruit.
      Best Blueberry Smoothie Bowl Recipe
    • Grilled Eggplant With Lemon Dip.
      Grilled Eggplant With Lemon Dip
    • Air Fryer Asparagus with Parmesan.
      Air Fryer Asparagus with Parmesan
    • Sheet Pan Chicken Fajitas.
      Sheet Pan Chicken Fajitas

    Footer

    As Seen In

    As Seen In.
    • Facebook
    • Pinterest

    Privacy Policy

    Accessibility Policy

    ↑ Back To Top

    Copyright © 2025 | Eat Your Beets | All Rights Reserved

    Rate This Recipe

    Your vote:


    A rating is required
    A name is required
    An email is required