
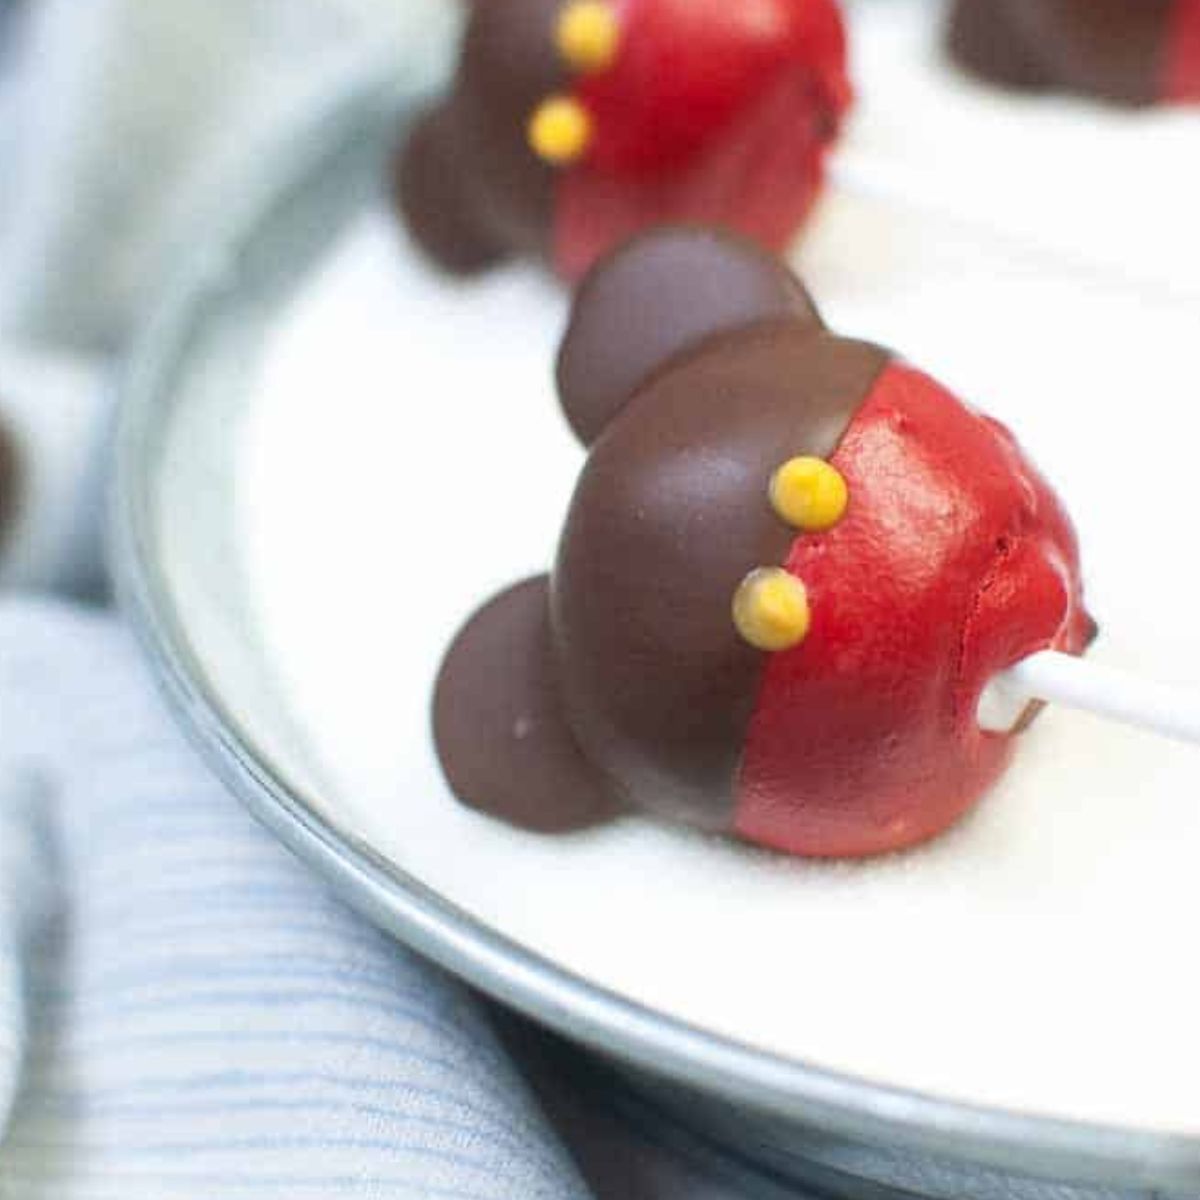
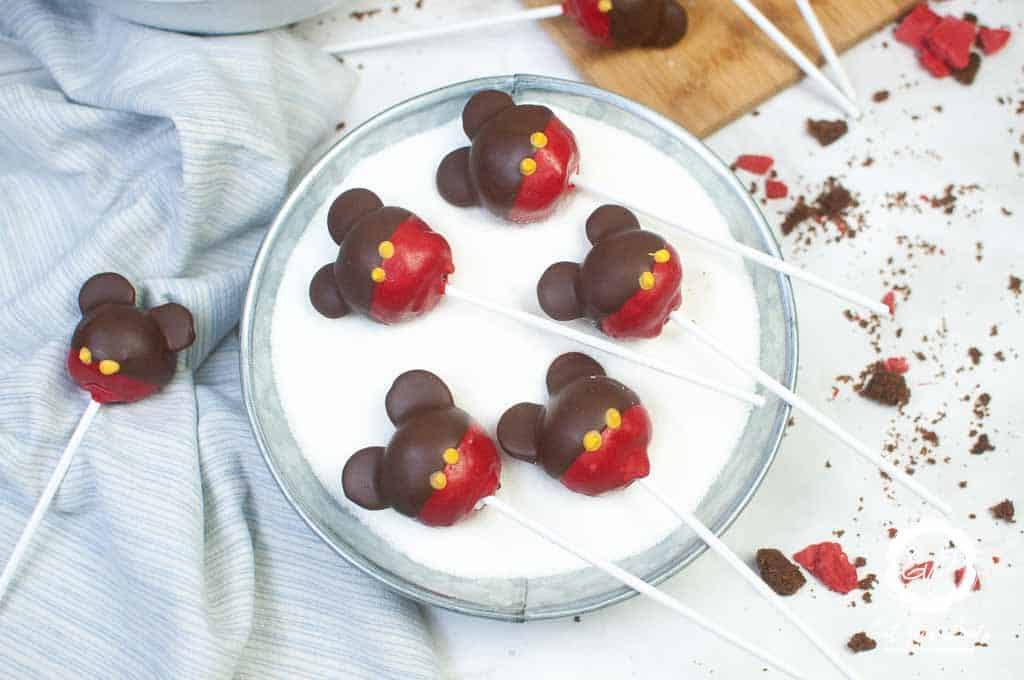
Mickey Mouse Cake Pops are the cutest party treat on a stick—perfect for birthdays, playdates, or any day you’re feeling that Disney magic. These are way easier to make than you think, and the best part? The kids can help too!
There’s something timeless about Mickey Mouse—and these Disney-themed desserts are always a hit. Whether you're throwing a Mickey Mouse party or just want to recreate that Disney World magic at home, these cake pops are a total win. They’re easier than a layered cake but still look super impressive on any dessert table.
Want more delicious treats? Try my Chocolate Covered Bananas, Pineapple Coconut Popsicles, or No-Churn Vegan Mango Sorbet for a themed dessert spread.
Jump to:
💖 Why These Disney Cake Pops Are So Fun
- Kid-friendly fun: A hands-on kitchen project little ones love (especially when they get to add Mickey’s ears!).
- No fancy tools needed: Just cake, frosting, chocolate melts, and a little Disney spirit.
- Perfect party bites: A great alternative to a full Mickey cake—bite-sized, mess-free, and adorable.
🌟 Star Ingredients

- Crumbled Cake: This is your base—moist, flavorful, and easy to mold. You can use boxed cake or your fave homemade recipe.
- White Cake Frosting: Helps bind everything together. I like cream cheese frosting for an extra-rich flavor.
- White Almond Bark: Makes the perfect coating—smooth, glossy, and lightly sweet with a hint of almond.
- Melting Wafers: Use them for Mickey’s ears and decoration. Go wild with colors or stick to red, yellow, and black for that classic Mickey look.
For the complete list of ingredients with measurements and instructions, please see the recipe card at the bottom of the post.
Variations and Substitutions
- Black candy melts: Swap in for the ears or for adding tiny details without food coloring.
- Minnie twist: Add a piped-on bow or a sprinkle bow for a cute Minnie Mouse cake pop version.
- Flavor swaps: Red velvet and chocolate cake are the most popular, but lemon or strawberry can be super fun too.
These are also super easy to dress up for the season—just switch up the colors! Think red and green for Christmas, pastels for Easter, or black and orange for Halloween Mickeys. They're such a fun way to turn a classic into a holiday-ready treat without much extra effort.
How To Make Mickey Mouse Cake Pops?
Use this section for process shots, alternating between the step and image showing the step. Users don't like seeing process shots cluttering up the recipe card, so include your process shots here.

- Step 1: In a large mixing bowl, add the cake and frosting, and mix well until the cake becomes like firm batter. Form batter into 1 ½” balls. Set aside. Melt the white almond bark in a bowl using a microwave. Heat 30 seconds at a time until fully melted. Add a splash of oil if needed.

- Step 2: Add a few drops of red coloring until you reach fire engine red. Dip the cake pop stick into the melted chocolate about a half inch. Then stick it into the cake ball. Repeat for all the Mickey mouse cake balls. Dip cake pops into the red chocolate until fully coated. Place upright in a holder or foam base to allow the chocolate to harden. Before the chocolate hardens, take two melting wafers and stick them in the cake pop to form Mickey’s ears.

- Step 3: Melt the almond bark in a bowl using a microwave. Heat 30 seconds at a time until fully melted or according to package directions. Add a splash of oil if needed. Dip the hardened cake pops in the melted chocolate covering the Mickey's ear and half of the cake pops. Leaving the red exposed on the bottom.

- Step 4: Melt half a block of white almond bark in a bowl using a microwave. Heat 30 seconds at a time until fully melted. Add a splash of oil if needed. Add a drop of yellow and mix. Once the cake pops have hardened, dab some yellow chocolate between the red and brown chocolate to form yellow buttons using an unused cake pop stick. Let the Mickey Mouse cake pops finish hardening and enjoy!
💡Hint: For clean, glossy finishes, add a teaspoon of oil to your melted chocolate and tap off any excess coating before decorating.

👩🍳 Expert Tips
- Use a foam block or cardboard box with holes to dry pops upright and avoid flat spots.
- Tap off excess chocolate gently before it hardens for a smooth finish.
- Prep in batches: Stick all the pops, then dip, then decorate—it keeps things neater (and more fun with kids).
- Work quickly: Melting wafers harden fast, so have all decorations ready before dipping.
FAQs
Chocolate and red velvet are most popular for their rich flavor and color, but you can use any cake you like.
Yes! Store in an airtight container in the fridge for up to 5–6 days, or freeze undecorated pops for longer storage.
White chocolate chips or almond bark work well—just be sure to add a bit of oil for smoother dipping.
Dip the stick in melted chocolate before inserting into the cake ball—this helps it stay put once chilled.
💖 Serving Suggestions
- Add to a themed dessert table for a Mickey or Disney birthday party.
- Wrap individually with ribbon for party favors.
- Stick in a foam block and use as a centerpiece.
- Serve with fruit skewers for a colorful, kid-friendly snack platter.
- Pair with a Disney movie night for a full themed experience.
🍽 More Fantastic Desserts
You'll want to check out more easy and simple desserts here on Eat Your Beets.


Did you make this recipe? Leave a review and a ⭐⭐⭐⭐⭐ rating below,

Mickey Mouse Themed Cake Pops
Equipment
- 15 Cake Pop Sticks
Ingredients
- ½ Prepared cake crumbled (13x9 cake)
- 2 tablespoons of White cake frosting
- 4 cubes of White almond bark
- 4 cubes of Almond bark
- 30 Chocolate melt wafers any colors (for the ears)
- Red food coloring
- Yellow food coloring
Instructions
- In a large mixing bowl, add the cake and frosting, and mix well until the cake becomes like firm batter. Form batter into 1 ½” balls. Set aside.
- Melt the white almond bark in a bowl using a microwave. Heat 30 seconds at a time until fully melted. Add a splash of oil if needed. Add a few drops of red coloring until you reach fire engine red.
- Dip the cake pop stick into the melted chocolate about a half inch. Then stick it into the cake ball. Repeat for all the Mickey Mouse cake balls.
- Dip cake pops into the red chocolate until fully coated. Place upright in a holder or foam base to allow the chocolate to harden.
- Before the chocolate hardens, take two melting wafers and stick them in the cake pop to form Mickey’s ears.
- Melt the almond bark in a bowl using a microwave. Heat 30 seconds at a time until fully melted or according to package directions. Add a splash of oil if needed.
- Dip the hardened cake pops in the melted chocolate covering the Mickey's ear and half of the cake pops. Leaving the red exposed on the bottom.
- Melt half a block of white almond bark in a bowl using a microwave. Heat 30 seconds at a time until fully melted. Add a splash of oil if needed. Add a drop of yellow and mix.
- Once the cake pops have hardened, dab some yellow chocolate between the red and brown chocolate to form yellow buttons using an unused cake pop stick.
- Let the Mickey Mouse cake pops finish hardening and enjoy!


These Mickey Mouse Cake Pops are a delightful blend of creativity and sweetness! The combination of red and chocolate coatings, complete with iconic ears and yellow buttons, makes them a charming treat for any Disney-themed occasion.