

Making Hot Cocoa Bombs at home is my new favorite winter activity. I’ve discovered a simple method that makes these delightful treats effortlessly. In just a few steps, you can create these chocolate spheres filled with cocoa goodness. Join me as I share How to Make Hot Cocoa Bombs that will warm up any chilly day.

Jump to:
💖 Why This Recipe Works
- Interactive and Fun: Making these Hot Cocoa Bombs is a delightful Halloween activity for all ages.
- Deliciously Spooky: Enjoy the surprise of hot cocoa mixed with Halloween-themed fillings.
- Easy Instructions: With our step-by-step guide, you'll master this hot chocolate bombs recipe in no time.
⭐ Star Ingredients

- Black Chocolate Candy Melts: Create the dark, chocolatey shell of your Hot Cocoa Bombs, which melt away to reveal the surprise inside.
- Light Green Candy Melts: Adds a fun, contrasting color to your bombs, and when melted, they blend with the black chocolate to create an interesting swirl effect.
- Marshmallows: Fluffy treats hide inside the chocolate shell, ready to pop out and float atop your hot cocoa for a delightful surprise.
- Hot Chocolate Mix: Is the heart of your Cocoa Bombs, providing the rich and comforting cocoa flavor once the bomb is dropped into hot milk.
- Candy Eyeball Sprinkles: Add a playful, Halloween touch to your bombs, making them fun to look at before they're even enjoyed.
- Green Mini Pearl Sprinkles: Provide a pop of color, adding to the festive look and creating a nice crunch when you sip your hot cocoa.
- Black Sparkle Gel For Decorating: Gives your Cocoa Bombs a shiny, polished finish, perfect for creating spooky Halloween designs.
- Dome Mold: This essential tool shapes your Hot Cocoa Bombs into perfect spheres, ensuring they'll melt evenly in your hot milk.
- Milk Crushed Candy Cane: Adds a refreshing peppermint flavor. Sprinkle it on top of the bombs after sealing for a festive look and peppermint taste.
For the complete list of ingredients with measurements and instructions, please see the recipe card at the bottom of the post.
👻🍫🎃 Substitutions & Variations
- Swap black chocolate for melted white chocolate for a ghostly, creamy twist—perfect for coating your cocoa bomb molds with a smooth, rich boo-licious flavor!
- Milk chocolate or chocolate chips bring a wickedly creamy touch in place of black candy melts. Melt them with eerie green candy melts or hide them inside with marshmallows for a spooky, chocolatey surprise!
🔪How To Make Hot Cocoa Bombs?

- Step 1: Melt and temper the black and green candy melts as directed on the package.

- Step 2: Using the back of a spoon, place the melted chocolate (green and black chocolate) into the mold and lightly swirl while coating the mold. Make sure you cannot see the mold through the candy melts.

- Step 3: Place the cocoa bomb mold in the freezer for 10 minutes. Once the chocolate hardens, remove the chocolate shell carefully and set it to side.
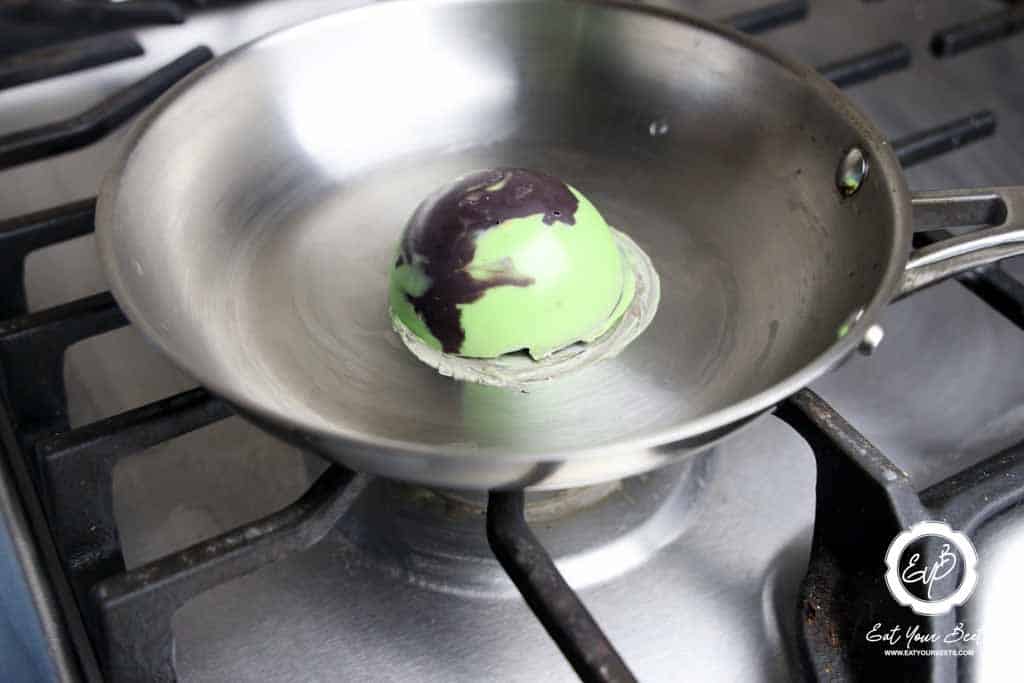
- Step 4: Turn a frying pan onto low heat or press the saute function on your Instant Pot. Place the bomb edge side down into the pan or pot. Melt slightly just to even out the edges. Quickly remove the dome.

- Step 5: Fill with two tablespoons of hot cocoa mix and mini marshmallows. Quickly heat another dome edge and place it on top of the one with the cocoa mix. Make sure to align the domes well. Repeat the process for the second and third Halloween hot chocolate bombs.
- Step 6: Using cooled hot chocolate, place a little melted chocolate on the back of the candy eyeball and place it onto the front of the chocolate cocoa bomb to create the eyes for your Zombie Halloween treat. Paint chocolate on top of the chocolate bomb and place green pearl sprinkles to make a Zombie mohawk. Your Halloween hot cocoa bombs are now ready to be used or stored in a cool, dry place until needed.

💡 Hint: I like to use a silicone molds. Silicone molds are easier to reuse and are simple to clean with warm water and soap. Acrylic molds on the other hand require tools to remove chocolate bombs making them more difficult when working with chocolate.
👩🍳 Expert Tips
If you're going to make Halloween Cocoa Bombs, make sure to follow these tips:
- For the best undead results, use candy melts in creepy colors—green, black, or even oozing red—to bring your Zombie Hot Cocoa Bombs to life!
- Melt your chocolate slowly—break it into small pieces and gently heat over warm (not boiling!) water, stirring like a mad scientist until smooth.
- Keep your cocoa bombs from cracking by placing the chocolate shells on parchment paper while working.
💭 FAQs
Tempering chocolate is the process of heating and cooling chocolate to ensure that it sets up correctly. You can temper your chocolate either by traditional methods or using a candy thermometer. If you choose not to temper your chocolate, just make sure you melt it slowly in a double boiler or microwave in a microwave-safe bowl on low power.
The best mold to use for making Hot Cocoa bombs is a dome-shaped silicone mold. This ensures that the edges of your cup will be even and it's easy to release from the mold without breaking.
It would be very hard to make a hot cocoa bomb without a mold. The mold is ideal for making the chocolate spheres and chocolate molds make it much easier to evenly coat the inside of the sphere so that it can be filled without breaking.
If you would like to add some flavor to your hot cocoa bombs try adding a teaspoon of espresso powder, a pinch of cinnamon or a few drops of peppermint extract. You could also use flavored syrups such as caramel for added sweetness and flavor.
Yes, you can add sprinkles to your Halloween hot cocoa bomb for extra decoration. Just ensure that you don't add too much as this can make them harder to stick together.
Keep your hot cocoa bombs in the fridge until you're ready to use them, ensuring they stay fresh for immediate enjoyment.
💖 Serving Suggestions
Here are some of the best ways to serve your Halloween Hot Cocoa Bombs:
- Hot Milk: Pour steaming hot milk over the cocoa bomb for a classic, creamy chocolate drink that warms you up instantly.
- Hot Chocolate: Combine with hot chocolate for an ultra-rich and decadent double chocolate experience that's perfect for chocolate lovers.
- You can enjoy also these cocoa bombs at your next Halloween party alongside these Halloween Finger Food Party Snacks.

🍽 More Party Snacks


Did you make this recipe? Leave a review and a ⭐⭐⭐⭐⭐ rating below, or tag us in our Facebook Group! Alternatively, bookmark it in your browser or save to Pinterest.

Halloween Hot Cocoa Bombs: Easy Halloween Treat
Ingredients
- 1 Cup Black Chocolate Candy Melts
- 1 Cup Light Green Candy Melts
- 16 Marshmallows
- 6 Tablespoons Hot Chocolate Mix
- 6 Large Candy Eyeball Sprinkles
- Green Mini Pearl Sprinkles
- Black Sparkle Gel For Decorating
Instructions
- Melt and temper the black and green candy melts as directed on the package.
- Using the back of a spoon, place the melted chocolate (green and black chocolate) into the mold and lightly swirl while coating the mold. Make sure you cannot see the mold through the candy melts.
- Place the cocoa bomb mold in the freezer for 10 minutes.
- Once the chocolate hardens, remove the chocolate shell carefully and set it to one side.
- Turn a frying pan on to low heat or press the saute function on your Instant Pot. Place the bomb edge side down into the pan or pot. Melt slightly just to even out the edges. Quickly remove the dome.
- Fill with two tablespoons of hot cocoa mix and mini marshmallows.
- Quickly heat another dome edge and place it on top of the one with the cocoa mix. Make sure to align the domes well.
- Repeat the process for the second and third Halloween hot chocolate bombs.
- Using cooled hot chocolate, place a little melted chocolate on the back of the candy eyeball and place onto the front of the chocolate cocoa bomb to create the eyes for your Zombie Halloween treat.
- Paint chocolate on top of the chocolate bomb and place green pearl sprinkles to make a Zombie mohawk.
- Your Halloween hot cocoa bombs are now ready to be used or stored in a cool, dry place until needed.


These spooky cocoa bombs are a blast to make and even more fun to watch melt—surprise marshmallows and eerie sprinkles included!